

Gladius
-
Posts
196 -
Joined
-
Last visited
Content Type
Events
Profiles
Forums
Posts posted by Gladius
-
-
Okey Michael :-)

Thanks Sandman!
-
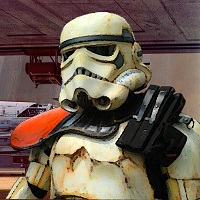
Dear Command,after recieving the basic 501st approval it's time for me to make my application here.I hope everything's alright and that the pics are okay. It would be very cool. The project took me about a year.As far as I know I have the pleasure to be first of the kind in the Garrison I'm in. So it means a little bit more.Worked on that set about a week while improving and making some fixes.All the best and thanks to those who were helping.NAME: Michael VrtacnikForumname: Ossus501chGarrison: Swiss GarrisonHelmet-off pic

Front with helmet Sniper knee
From side, right Back:
Back: backpack alone
 Side, left
 Canvas shoulder strps
 Canvas Belt
 Button(s)
 Button(s)
 Abplate(I made a weathering fix later leftsides and on the square in the middle with some greay and black )
BucketLenses
Traps and tears


Frown(the black thing behind the frown (dont know the english word for it) I have meanwhile removed. Just if there are rising up thoughts that its not the same helmet fotographed ) Mic
Mic
TubestripesrightleftNeckseal:
Weapon :E11 , visible & solo with some weathering detail


 Body action shots"Move along, droid!"
 "Stop them!"
 With T21 gear:
 "Hopphopp!" (move it move it)
I think that's it.If You wanna see more: lemme know!Cheers all!Michael -
Hi there!
'm not sure if I've already done that yet, as I had about a year on the TD project,
wich was granted with the 501st basic approval yesterday
Here's my profile. Maybe have a look tomorrow, actually we're all Minions ,-)
http://www.501st.com/members/garrisonroster.php?garrisonId=22
Chirio!
Michael
-
-
Thank You Juan. Maybe by occasion i will add a lighter blue selfmixed. Choice even in modelingshops not that good. Though outside it is a bit different. Afterwards id be also a bit more careful with varnishing as it darkened the color additionally a bit.
-
Like it! Great blue clor choice
-
Mine, after some very tough weeks

some weathering detail. Pitty we have no desert arround here

-
good! Now I'm happy. Thx!
-
-
a bit ahead, not screwed yet..


-
-
And now its going to the stinger....... my favourite...........
-
@Thanks both!
now with the cut (and repaint, argh) , quite a length that it was too long now total 29.5"
Hurrying brings mistakes, gona buildon my TM tomorrow and tried to have it finish, to see
how it is on the complete armor with wearing it and do maybe necessary fixes

-
Thx rick. I sadly do not know what is meant with the cistern . S there a picture showing what you mean? I went after the pinned thread wich says 29.5 ". Maybe this 29.5 is incl caps. On mine its additional 29.5 plus the caps. I thought it way long too. might be just miscalculation. And sorry my englishs not too bad. Its just bit different on spcific parts. I tried to find an overview scheme of what is what..
-
Position and allignment test before screwing

-
-
Looks great Michael. Off to a good start.
Thanks a lot!! here some more pictures of the actual progress and so I hope final lap

-
Started stripe adding already

-
Nice...
I also drill most of the wholes in my gear with a modeling hand drill. I do have a Dremel but I found it to be very difficult to use it in a precise way.
So I also go the hard way... and enjoy it actually.
Your armor is looking good.
When you move to the lower blue box, remember it should have 5 strips, not 3. Just add them and it will work fine.
Saludos.
Thank You Juan. Very good that You tell me with the blue box, didnt realize that so far.
-
Thank You Juan!
Yeah indeed most of ANH on Sandies specially I can imagine it was put together in a hurry
or with improvisation
Nice that I can post here. I mostly watched the tips thread that is pinned here, PO approvals
on how the backpack locks or things might have been attached and also pandatroopers build so far.
As I'm not that electrically good and equipped I go way hard ways . Drilling holes with a modeller's
driller for kits is hard, but saver for me.
Agree that it Needs a certain look and I try to match it, also with later weathering.
This is now from today the upper part, more things are already prepared for giving it a go when missing pieces arrive

-
Thanks!
Well I bet it's gona be "heavy" :-)
Now made it that way. I think almost all attach the parts on to those long stripes (dont know the real matching word now)
It was just not pefectly matching on the lower end. Would have had to screw on far edges. Didnt want to do that.
Using almost light M3 screws only and drill all by hand

-
Great advices!
Too bad that here in shops there seems to be no such a sold tube diameter norm of 6.34mm / 2.5" :-/ only sell DN53 (53mm 2.1" and DN70 70mm 2.75" wich looks quite bulky
-
Yeah right. Much important too is a good and holding primer. On my stinger the Color started to fall off without touching it :-/ Had to grind that thing all over again for next try
-
Alright! Yeah those on the balcony look good. I keep it painted with it.


*DONE*TD-10316 Requesting Deployment
in MEPD Police Officer Program
Posted
Alright! Thanks for the great comments first of all.
Standing by!