

silverboyd
-
Posts
146 -
Joined
-
Last visited
Content Type
Events
Profiles
Forums
Everything posted by silverboyd
-
I also have enough black ABS pipe (2" diameter) leftover to get about 3 mortar tubes out of. If anyone needs it....send me a PM or something. I'll just charge for shipping.
-
 I found the coolest rubber endcaps that were 2" in diameter. I painted them white and will weather them. They fit perfectly....I'll post pics soon
 -
Attaching the mortar tube... inconspicuous recommendations?
silverboyd replied to HeloTrooper's topic in Field Backpack
That's how I attached my mortar tube last night. works like a champ -
The backpack didn't feel intimidating at all to me. I enjoyed it. Even though it took a few months to find the pieces. The Sandtrooper is a real commitment w/ all of the weathering, pauldron, Ab details, backpack & possible build of a BFG but I think the Sandy looks better
-
yEAH....i think the seed trays are a little gappy but I have the proper angle on my frame. Everything is riveted in place and taking things apart would throw a monkey wrench in everything I've done already. I made the proper measurements when cutting the PVC for the frame but I think the size of the Park Seed trays was just a little bit narrower than I thought. The frames are attached to aluminum bars that are riveted to the PVC frame. I appreciate the input / tips though.
-
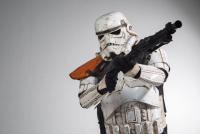
Thought I'd share some new pics of me in my "newly weathered" AM armor (finally). These are not my official pics I'm submitting. Just thought I'd see how it all looked. I still need to add some foam inside my left shin to keep it from rotating when I walk, add my mortar tube / radar dish to backpack, add some type of velcro/elastic to keep my chest piece pulled down and I also need to attach my shoulder ammo pouch to my backpack strap. Otherwise, I think I'm looking good.
-
Thanks for the reply guys
-
The only thing I have left to do is to add the mortar tube and radar dish to my backpack and then I can submit photos. I seem to be running into a delimma though. I measured the diameter of the AM end caps (normally used for the thermal detonator) and they seem to measure roughly 2 3/4" in diameter. I am only able to find the black ABS tube in my local Lowe's and the closest I can find is 2 1/2". Any suggestions as to what I should do? I considered opting out for just some ABS / PVC tube end caps but also could not find any? i'm also wondering if the AM thermal detonator control panel (used on the mortar tube) is also going to be a problem when trying to fit it on. If I have trouble with the control panel I'll just hit it with the heat gun....but the end caps are stumping me. Has anyone else had a problem with using the end caps / control panel that the AM armor kits come with?
-
I am now finished w/ the weathering of my armor. Now the only things to weather are my pauldron, backpack and T21 blaster. This afternoon I attached the battery packs / thigh ammo (...whatever it's suppose to be) to the lower right thigh. also, here's a shot of my paint pallet after weathering all of my armor. I used the top of a pizza box to mix acrylic paints.
-
Thanks. I'm hoping to at least acquire MEPD PO status....hopefully. I'm almost ready to submit
-
spent most of the day weathering the rest of my armor...check it out
-
Got a few more pieces weathered tonight. It's getting there....hope to be finished weathering within the next few days I'm really pleased with the dirty / oily weathering process. Highly recommend it. And it's simple too
-
Thanks for the great comments. Really makes me want to keep going. Got the shins, right arm shoulder bell, right arm forearm & right arm bicep all weathered up. Each have about 3 layers of acrylic paint. I'm using the Liquitex BASICS brand paint by the way. It's about $4/tube I believe if you're interested in weathering yours.
-
Weathered some more pieces tonight. I did my other shin, 1 shoulder bell and 1 bicep. I still need to weather the insides but I'll do that last. I also need to hit these pieces with the greasy / oily mixture of paint. Tonight I just focused on using the Burnt Umber.
-
thanks....i'm really pleased with it. I am going to continue with more tonight. I'm having a lot of fun with the weathering process
-
My buddy in the Carolina Garrison came to my house tonight to coach me in the start of my weathering. I did the dirty / oily mix. I love the results. Using a little burnt umber, grey and black (in 3-4 layers) I finished weathering my shins. Love the results. Check it out.... Can't wait to finish the rest of the armor
-
looks great Isaac!! I'm starting to weather mine this weekend. I thought you were going TK? I think the TD looks better anyways Don't worry about the backpack. It's a very fun build. My pack took about 3 months to find all the parts (which was half the fun) and to assemble it. It's not as complicated as it seems. Although I can't seem to find the proper tube for the mortar tube to fit the endcaps that come with the AM kit IF INTERESTED....check out my backpack build http://forum.mepd.net/index.php?showtopic=9830
-
Anybody got a good way to attach knee plate.
silverboyd replied to Sandwatcher's topic in Sandtrooper Armor
i sanded the back a bit...sanded a small area on the shin where I'd be attaching to and just simply used E6000. It's on there pretty strong it seems -
Attaching Ammo Pouches
silverboyd replied to Steve Lieberman's topic in Pouches, Pauldrons, and other Accessories
I think I may try to do the same thing with the MP40 pouch to attach it to my waist belt. I have plenty of rivets. So basically (in review)....I will cut off the angled loops, stretch them out and reassemble them to the back of the pouch using rivets and rivet washers? Sounds easy enough. Here's what I did to attach the MP40 pouch to my belt. I did just like what was stated above. I used a combination of rivets along with extra strength hot glue. Seems like an odd combo but it's very strong and has held on nicely. I wanted to keep things simple. The hot glue reinforcing is sort of messy looking (who's going to see it) but it works And here is the pouch w/ the belt going through the straps on the back. I like the end result -
Today I installed my simple speaker setup for the inside of my backpack radio. I found some small speakers at Walmart that were only $5. Attached them to the inside via industrial strength Velcro. I also attached Velcro to the back of my iPod. Seems to work like a champ.
-
Received my new MP40 ammo pouches
silverboyd replied to silverboyd's topic in Pouches, Pauldrons, and other Accessories
Weathered my pouches using the simplest method I could think of. Actual mud from my backyard. I simply rubbed it into the canvas fabric and let it dry in the sun. I loved the way it looks. Now to just attach them to my belt and backpack. Some of the parts that look too dirty I'm going to rub off so that it doesn't look too concentrated in one area. I'm very pleased with it. -
The mortar tube is the last piece I need. I measured the inside diameter of my Thermal Detonator end caps and they are 2 3/4" diameter. I have the AM kit. The only pipe I can find is 2 1/2" (too small). Any suggestions on what to do?
-
Thanks fellow troopers
-
Even if no one sees either strap....i still wanted to go that extra step I'm awaiting more male snaps to fasten the shoulder straps to the back piece.
-
Received my new MP40 ammo pouches
silverboyd replied to silverboyd's topic in Pouches, Pauldrons, and other Accessories
Shoulder and hip pouches...from green to black. Just need to touch up the stitching on the hip pouch. Can't wait to attach them to my belt and backpack