

Juliusthegreat
-
Posts
162 -
Joined
-
Last visited
Content Type
Events
Profiles
Forums
Posts posted by Juliusthegreat
-
-
Since USA and Canada mostley uses inches it´s sometimes hard to find out the size in cm or mm. But lucky us we have google etc. Now to my problem:
I have a pipe that is 1/2" = 1.27cm but when I measure it it´s 1.6 cm inner and 2.15 cm outer measurement.
What am I thinking wrong here? Or did Google give me wrong measurement?
So anyone that can measure pipes and give the measurement (outside ones)in millimeter I would be very happy since it will be help me and maybe others alot.
1.25" =
2.5" =
3" =
3,5" =
4" =
5" =
-
Nice pictures and looks like it was a super great troop.

-
I normally use a satin black for most pieces, but tone the shine down with dirt during weathering.
I use flat black for some detailing to give it an accent or sense of different materials for different parts. The exhaust for for example.
I guess, since references are not good enough for us to detect different types of balck in packs, till today, it is up to you.
For example, I am almost certain Rolf uses the same Humbrol as for the vocoder for black parts on his packs. But that is too shiny for me, so I use satin black and end up killing shines in my pack anyway with real dirt.

Saludos.
Thanks for your input
 . I agree that making some parts in different black makes it look more like different materials. But I guess it all depends also on how much dirt you add .
 -
same result though....the clearcoat gives it a satin/semi gloss appearance
Yes that´s true. Well now I don´t have to worrie to much that I might have "wrong" black on some parts. And also since it´s going to be a bit dirty...
. -
Looks like at least two is using different black
. -
On the backpack, what black colors are you using and on what parts? I noticed that many have different on different packs. Usully the seedtray is glossy black and very often the radio is matte black or satin black.
So can anyone tell the right way to have different parts in correct black color.
Only what blue color to use was pinned so maybe this is up to the owner to choose what black color to use or?
-
This is a really great looking radio man! Good job!
Yeah, get it weathered a bit and you'll be golden!
Thank you. Always nice to hear when a good job has been done
. -
Wow Jimmy AWESOME!!!!I am not a specialist but I think it would need some dirt, rust!!!!!
Leo
Thanks, and yes it need some dirt

-
Well done! Looks great!
I did a 3 part weathering on mine.
1. Take a silver metallic paint pen and outline corners you want to be weathered then wipe off with your finger.
2. "Oily and dirty" weathering method
3. Spray portions of the pack with hair spray then throw sand colored grout on it. Allow to dry for 2-3 minutes then wipe off with a damp rag then move on to the next area of the pack
I am totally in love with the effect the grout has. Sand is packed into all of the hard to reach places like I have been out in the suck for way too long.
1. Any kind of hairspray?
2. Grout? I translated the word and I think I found what it is used for. I will have a look if I can get my hands on some.
Thanks for your weathering help.
-
wow that looks awesome! love it
does it actually work too? it looks very real.Thank you very much
. And no it don´t work. I could have made it like a real radio with parts from the one I had but I am going to put an ampifier and a mp3 player in it instead. -
After a few months (almost a year) it´s starting to be done. Now I need some feedback while I still have some chance to make changes.
The paint job might be changed depending on the weathering. I hope the weathering will make it look more used with this painting (maybe I am wrong?). I welcome all weathering tips
.The radio is all scratch built with plastic and wood. Some parts is taken from a real radio.
Not the best taken picture but thanks for looking
. -
Well, hmmmm. I am used to wearing a Fire helmet around which is heavy. this weighs no more than a baseball helmet really. Probably 2-3 lb if that.
Haha sounds good. Well I think trying to fix all in the helmet might be best for me and if it´s not possible I try get in as much as possible. On your pictures it looks like you have 2 small fans? Right now I am only using one big one. Maybe I need to rethink the fan size also.
-
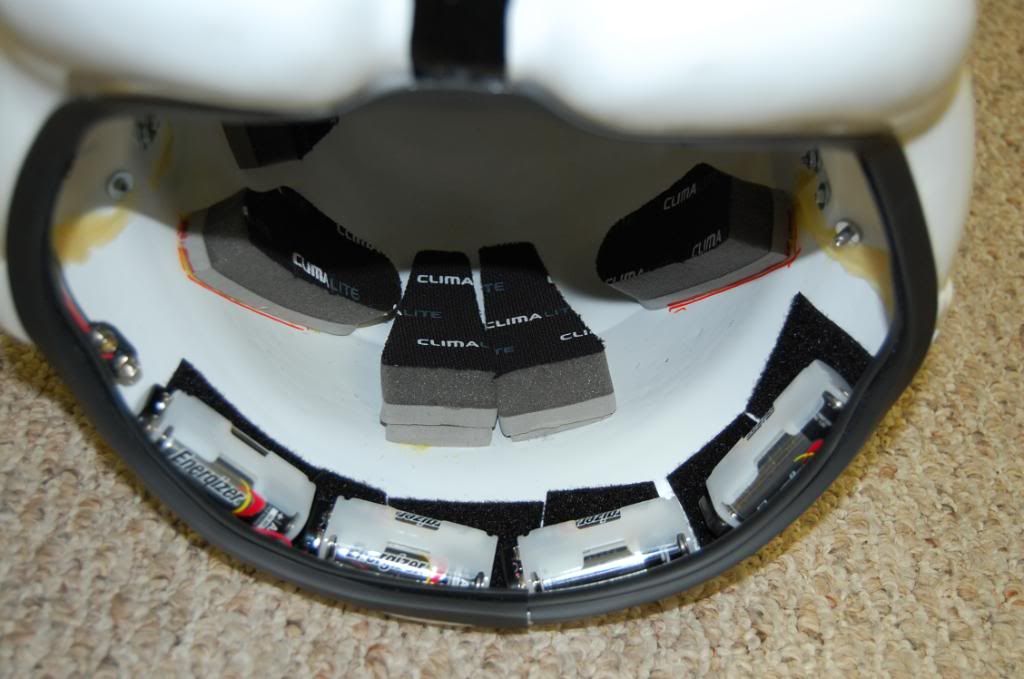
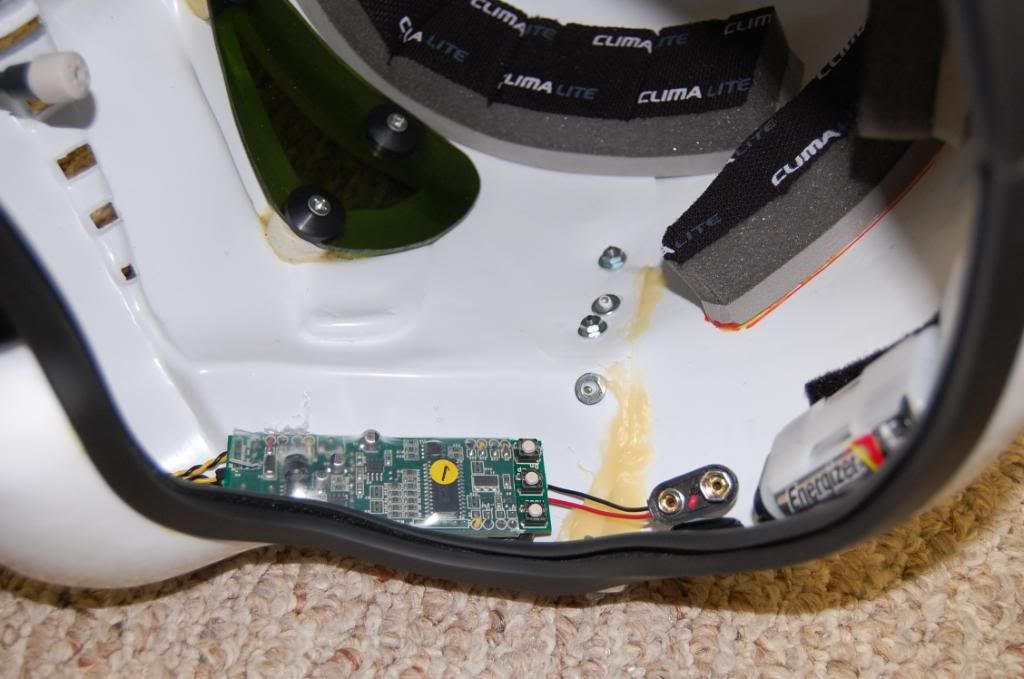
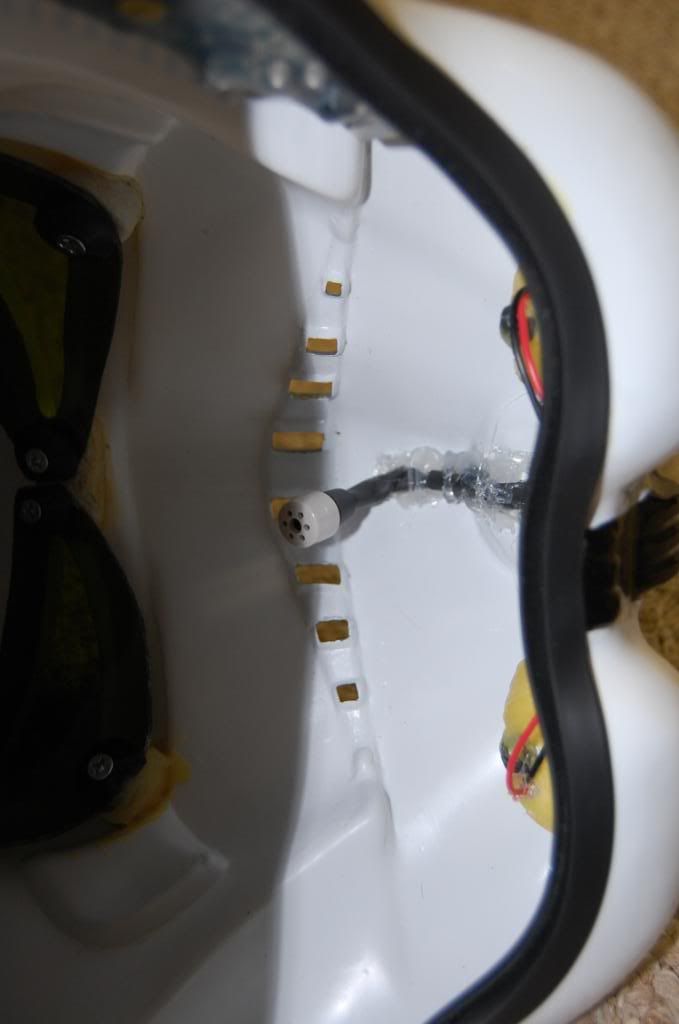
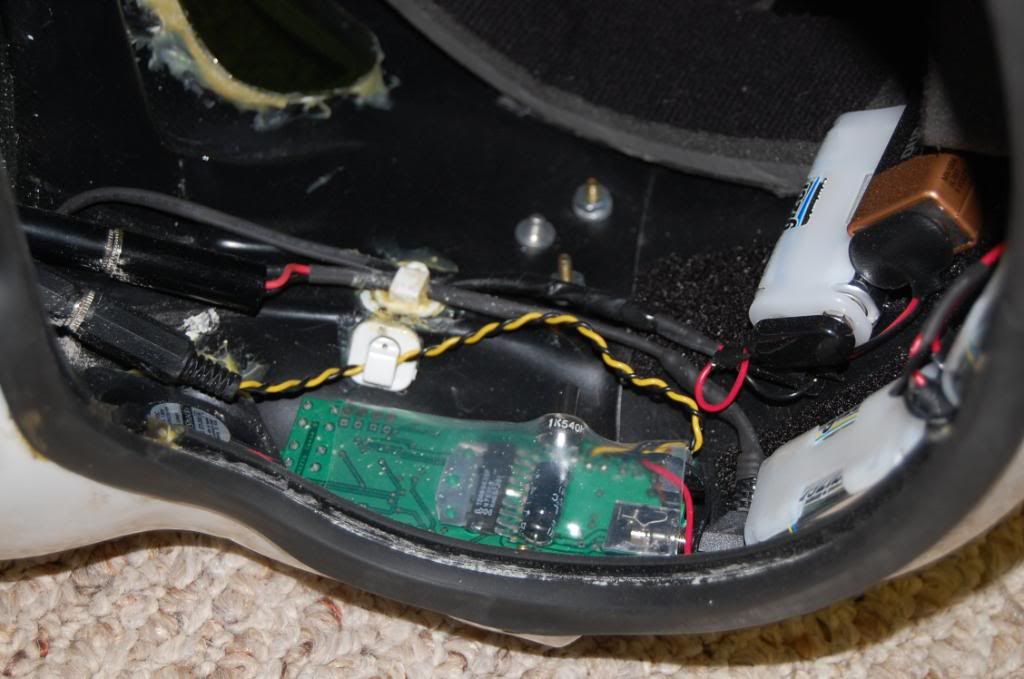
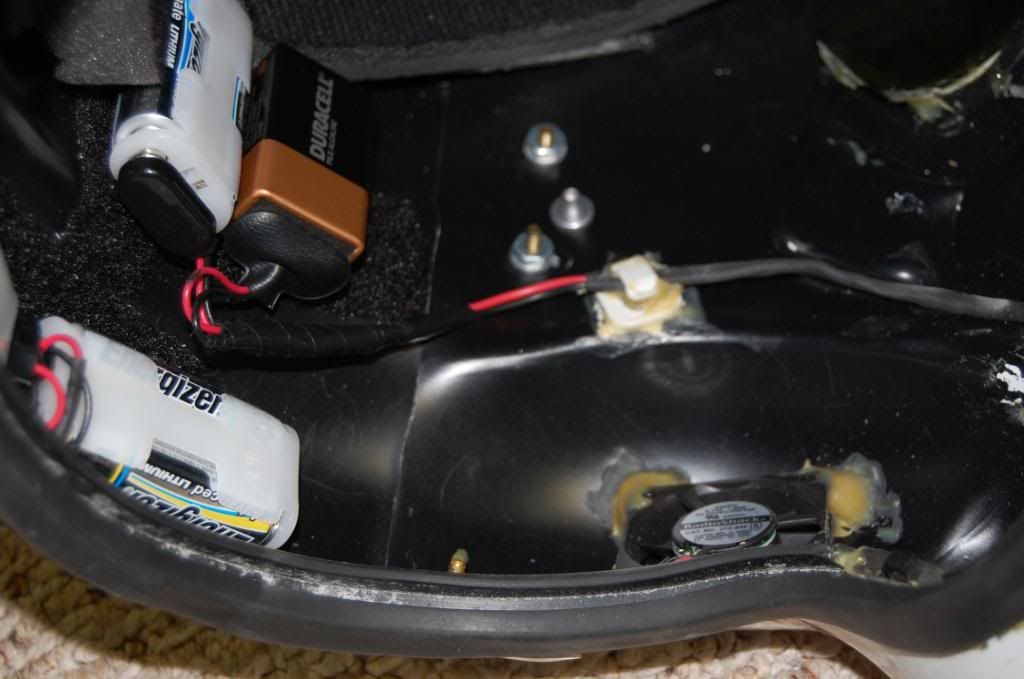
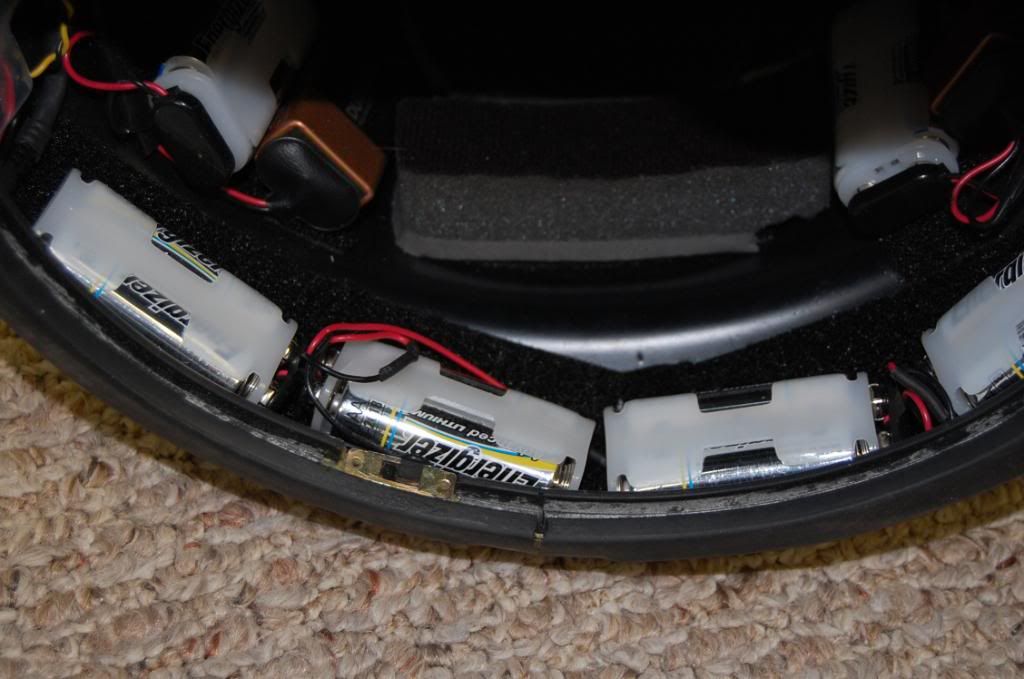
Ok, I use batteries that are lithium, much lighter and last longer. I use two slot AA battery holders with 9 volt connectors, that way they are easier to take in and out. I use one 9 volt an a 2 back of AA's for the fans. I hot glued the microphone in, and the RomFX is held in with double sided foam take stacked up to feel the voids.
Here are the pics of the insides of two of mine. Now they are not beautiful but they work very well. As for battery life, the RomFX I change batteries in about 2 times a year. So I am guessing they last about 10 to 12 hrs of continous use, or more.
The fans on the other hand are about 6 to 8 hours of run time. A little more with the lithium batteries.
Thanks for the pics, they will help alot. I will look more into this or maybe have something like it. Depends on the batteries (might change the ones I have). This way I will not have any more problem with wires but how about the helmet weight? looks like it´s kinda heavy.
-
I have an AP helmet along with a Gino, and TE2, and have all of my components in my helmets. I use Rom FX in two of them, along with stomper style speakers, and everything fits quite compact. I will post up pics later if that will help with ideas. I just didnt want wiring anywhere, and was afraid of interference with wireless on certain troops. I even have two fans in each helmet and have plenty of room in them. for air. My padding I use baseball helmet padding as well to fit snug and comfortable.

I am looking forward to see some pictures
. Would also be nice to know what kind of batteries you are using and how long you can troop on them. Thanks.
-
I've got a wireless transmitter, a TrooperCom and a walkie-talkie, along with a few batteries, microphone and an ear piece I my AP helmet - but then I also have a head the size of a grapefruit..
Before this, I had my ROM/FX, along with the batteries and the speaker that came with the ROM/FX kit tucked away in my 3+1 shoulder pouch (speaker in the small tool pouch). Using a behind-the-neck headset, wire to the ammo pouch hidden behind the neck seal and the chest plate, I was able to take the helmet on and off without having any wires get in the way.
With this setup, you wouldn't be able to use the mic tip speakers, unfortunately. But having the speaker in the tool pouch works great for me; the speaker bundled with the ROM/FX kit is really loud, and the placement is close enough to my head to make it seem like the sound is coming from my helmet.
The problem with wireless receivers/transmitters is they are either huge (my Memorex system consists of two units both being about the size of a deck of cards), or really expensive.
The headset I used I bought off of Ebay, and fairly cheap. Around USD $20 or so. Do a search for "Jensen" and "headset". You would need to get one of those tiny ones, that just has a write behind your neck, and only a single, flat ear piece. It'll be hard to fit the helmet over larger headsets, with larger ear pieces. Even for someone with a tiny head like mine.
Well actually my head is kinda small but for some reason I have alot....ALOT of batteries for my rom/fx and fan (16 of them) so either I have them outside of the helmet or I need to change batteries. But I want the batteries to last long time and also what I read somewhere that rom/fx is better to run on 12V. I might redo the speaker and put it inside the ammopouch. But I will need to fix something else with the fan. Thanks for your ideas.
-
I'd suggest that instead of fitting the mic inside your helmet you put it in your neck as if you were a spec ops of the military. That's what I do and have no problem at all taking out my bucket. For everything else there are wireless headsets or a great buddy in electronics.
Jajajajajaja!
Hope it helps you bro.
Thanks for your suggestion. Will think about that.
-
Hi,
I have batteries and Rom/FX in my ammo pouch that´s on my shoulder and that works good. In my helmet I have a fan and 2 stomper speakers. My problem I keep having is the wiring from the ammo pouch to the helmet.
Does anyone have a good solution what I can use, so when I need to take of the helmet and unplugg it myself and put down the helmet somewhere. Also I don´t want the cables to be very thick and I can say that moving batteries to the helmet is not an option (also the rom/fx) since my AP helmet is small even without those things in it.
I guess whireless microphone will need batteries in the helmet and since my fan need power I still going to need a cable. Therefore I rather have cable for all. I most want help with finding out how to best connect and what type of connectors to use. Also if someone knows a good cable that can have both sound and power. The ones I use now to connect is 3,5mm speaker connectors and I need 6 of them as it is right now. It takes alot of space and is hard to connect and unplugg myself.
Any one with some ideas for me?
-
Ok, here is my shotgun shells I made. I tried to make them like one of the packs used in SW. (think it´s the captains pack since he had orange pauldron).
Make new ones or can I use them? In the bottom I used some thin plastic and then used hotglue inside and let it dry, then painted black (and it´s not 100% done yes if you still find some white spots).
And here is the one I used as a guide:
-
First: Woow
Second: Why don´t I live next door to you
Third: Woow...again
-
I think you have done a great job so far with the radio. Will be awesome when buttons and decals are in place.
:) -
Hi guys,
I was wondering if any one has a pauldron pattern with actual dimensions, I'm contemplating making one.
Cheers guys
Aid
Hi, this might help: http://tk3936.imperial-web.com/
-
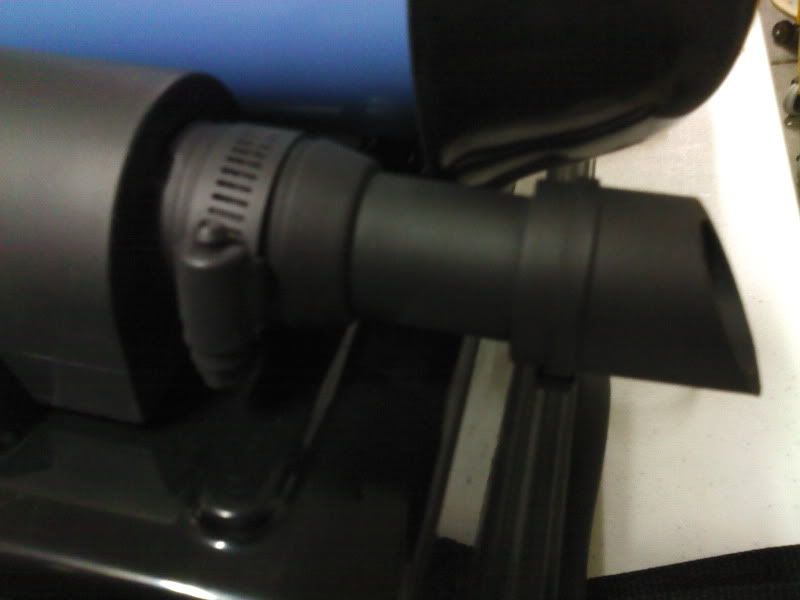
Here's my exaust port.
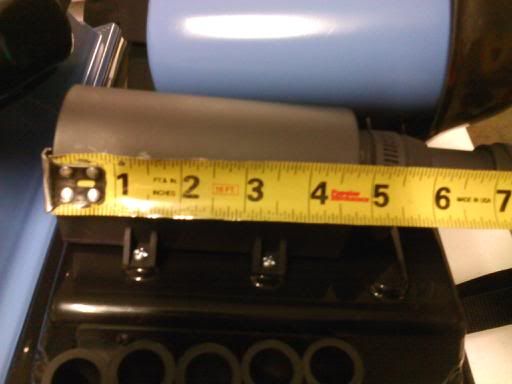
Body measures 4-3/4"
The tube measures 4-1/2" but cut it longer because it goes inside the body about 2" inside.
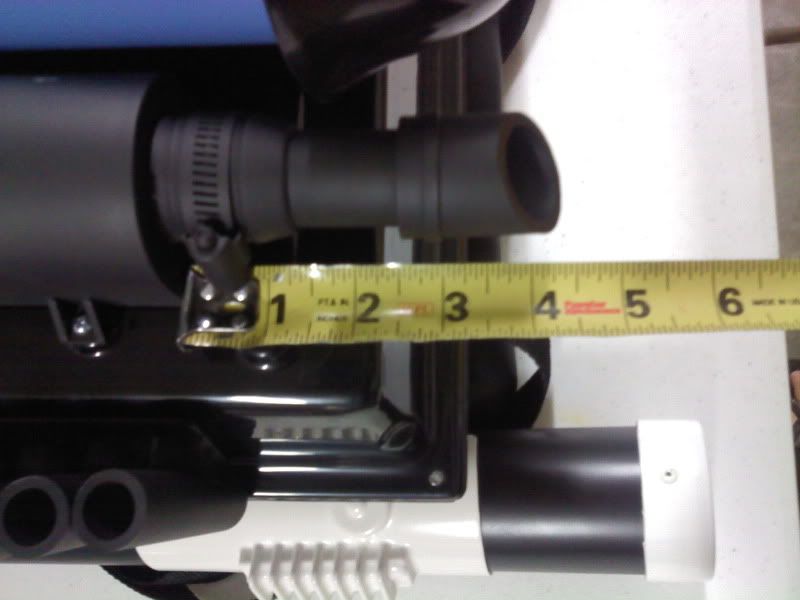
I used 1/2" pvc pipe then the cap is 3/4" pvc pipe cut at about a 45 degree angle
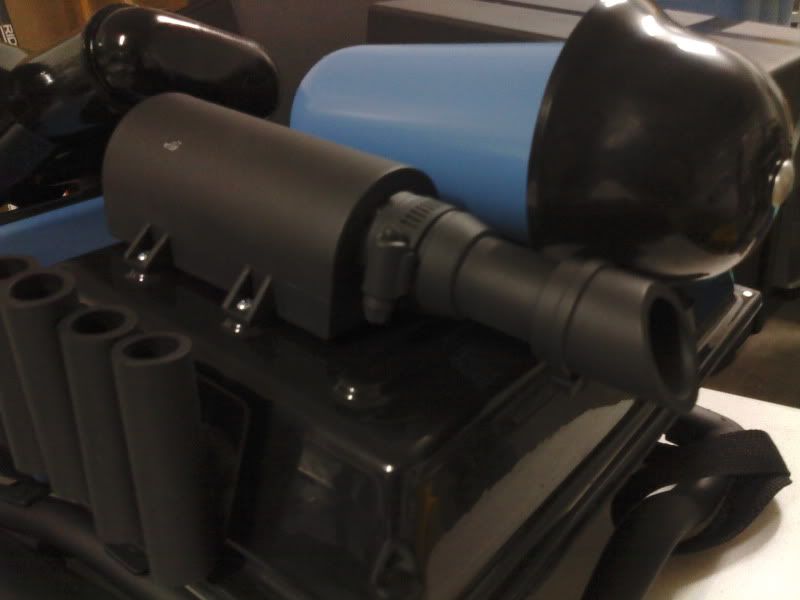
I don't know what I used for the piece that the hose clamp is clamped to. It's made of pvc and I think it goes inside a rubber hose because it has "steps". I bought it at ACE for about $0.90
The width of the body is 2-1/2"

Excuse the Phone pics, my phone kinda sucks.
Efrain
Your phone don´t suck, it´s good enought pictures. Thank you for this
-
This is all I could find.

If no one gets to post the measurements, I will go home and measure mine tonite.
Although, mine was scratch built and size might not be that accurate.
Saludos.
This helps alot. With your measurement it will be super great since I need to know how wide it is the box and also how thick the hoose is. Even if yours isn´t super accurate, it will be good enought
-
Agreed.
Thanks

Inch convert problems
in Off Topic Cantina
Posted
The kind of pipes is for making a T-21 gun so that might help you a bit.
The sizes I wrote in the first post is what I need to have.
These ones:
1.25"
2.5"
3"
3,5"
4"
5"
You just saved my day .
.