

Cricket
-
Posts
30 -
Joined
-
Last visited
-
Days Won
8
Content Type
Events
Profiles
Forums
Everything posted by Cricket
-
Hey Keith! You are correct. Basic, then PO, then SWAT.
-
Welcome Sammy! I'm also in Georgia, just a bit north of you in Peachtree City. Looking forward to watching your build!
-
PM sent!
-
*DONE* TD-10404 Requesting Deployment
Cricket replied to Cricket's topic in MEPD Police Officer Program
Hey Mikel, Thanks for those kind words! I still feel like a noob around Bondo, but not as much as before. That thermal detonator was accomplished by sanding first; it's ABS, so sanding was quick and easy to get rid of the larger print lines. Next, I slapped on some Bondo spot putty on the large flat areas and wet sanded them smooth to ensure a uniform surface. After that, I applied several heavy layers of filler primer. I didn't care about drip lines or imperfections because ultimately it was going to get sanded anyhow. So I went crazy with the stuff. After letting it cure for a few days, I hit it with a quick wet sand with 400 grit, then applied three coats of gloss white- going heavy on the last coat. This seems to do the trick with filling in any ridges/imperfections in the print. Then a few layers of matte clear, and DONE. TLDR; I didn't sand any of those tight areas at all. (too lazy!) -
*DONE* TD-10404 Requesting Deployment
Cricket replied to Cricket's topic in MEPD Police Officer Program
Thank you soooo much!!! This approval seemed more challenging to me than when I applied for Centurion over at the FISD. I'm so excited to have finally accomplished this and thrilled to join you all in the sandpits! -
*DONE* TD-10404 Requesting Deployment
Cricket replied to Cricket's topic in MEPD Police Officer Program
Both bottles replaced/painted and new thermal detonator panel created/installed. Fingers crossed that I got it right!!! Let me know if you need additional photos. Thanks! -
*DONE* TD-10404 Requesting Deployment
Cricket replied to Cricket's topic in MEPD Police Officer Program
Awesome! Thanks! -
*DONE* TD-10404 Requesting Deployment
Cricket replied to Cricket's topic in MEPD Police Officer Program
Okay, feedback on these bottles, please. The top bottle is sitting a little lower than it will be attached (it's just dry fit on there). My gut is saying that the top bottle could be shortened even more, though. The bottom bottle is fit how it will be attached after painting. Would like to make sure they look right before painting tomorrow. Thanks! -
*DONE* TD-10404 Requesting Deployment
Cricket replied to Cricket's topic in MEPD Police Officer Program
"I just realized that I didn't make myself clear about what I meant with the brush stroke direction, I meant the tube stripes as these were also freehanded on the original helmets but it's completely okay to use a stencil. " Ah, I think I get you now. I actually sponged my tube stripes on with stencils, so there are no brush strokes to speak of on those tube stripes. haha... Either way, no biggie, just thought you'd like to see how I applied mine. "It's okay if you just post some new pics of your improved pack. No need to put on all your gear again... unless you would like to do that. " Roger that! I don't know when I'll be able to wrangle my hubby to take full armor shots of me again, so it'll just be the backpack. Thanks for the info about the bottles. I dug up an old bottle of shampoo and would like to know if it should be larger or if it's good for the upper bottle. Diameter of the white shampoo bottle is 8.2cm. I've got a slightly larger bottle arriving today that should work for the lower bottle (yay, Amazon one-day delivery!). The slightly larger bottles have a diameter of 9.1cm. For comparison, diameter of the gray bottles that were previously on my pack are 7.4cm (widest part). Any feedback on the new bottle sizes would be much appreciated! And about the thermal detonator plate... it was completely stuck on the tube. No matter how gently I tried to remove it, I ended up destroying it while trying to pry it off- even though it was stuck on with e6000! Ah well. At least my removal efforts were rewarded with some bonus 'weathering' to the top end cap! I reprinted a shorter one last night, and will be painting it once the rain clears out tomorrow. Does this one look better? Would be good to get feedback on this as well before I go about finishing the piece. Thanks! -
*DONE* TD-10404 Requesting Deployment
Cricket replied to Cricket's topic in MEPD Police Officer Program
Thank you so much for taking the time to review my application! I will definitely get on those pack fixes immediately. "One thing to mention though: did you paint the helmet or did the guys and gals at RS do that? Here´s the reason why I am asking: you have clearly used a stencil which is absolutely okay but the direction of the brush strokes is wrong, it should be painted vertically. But do not worry, this isn´t going to hinder your approval." I assembled and painted the lid myself, so whatever issues are there are all me. The only stencils I used for the helmet were for the blue tube stripes and for the black stripes inside the gray areas (which are no longer there because I painted over them with gray). I'm not sure what you mean by stenciling any other areas. I'm guessing the gray areas to cover the black stripes? Again, all that was done free hand. So if there are gray brush strokes, I was just slapping the paint on to cover the black stripes. I didn't know there was a preferred direction for that. Interesting stuff! "1 the mortar tube detail is too long, you will have to trim it a little further to match screen references as no pack had such a long detail." Yeah, I kind of figured that as such. This was a 3D printed part, and it will not be any issue at all to easily trim it down. "2 The grey bottles have the right colour but they are way too shiny (while the this isn´t as obvious with the seedtrays, which is quite interesting). Also they are too thin which makes them look too long as well, so please get some new bottles which are larger in diameter (this will make it look much more screen accurate, trust me) and give them a final satin matte clear coat." My search is on! Will do. Would you have any particular recommendations? I used Wet Wipes bottles, but it would help a lot to have an actual size reference. I saw a 9.4cm width measurement from Strider's pack reference for the bottles. Would this be better? My current bottles are 7.5cm wide at the bottom. I agree that shorter bottles would look better on the pack. "Nice DLT, great details. Is that a Hyperfirm or an RS?" Thank you! It's a Praetorian Blaster. Very happy with the detail work they put into it. "-great quality build, both, armor and backpack. I assume the fitting wasn´t easy, " Thank you! I'm just 5'4", and this was my very first armor build. It took me about a year to shrink it down properly to fit. My second TK was much easier to build because I had learned what to do to make it fit. Since then, I've become the "go-to" person for sizing down armor in my garrison. haha... I've even sized down a garrison friend's TK to fit her 4'11" frame. Never too short to troop! "-your sons armor is awesome! And you have 3D printed, built and painted all of that yourself? You´ve got some serious skills and my greatest respect,great paintjob too." Thanks! Yes, I did it all myself. Lots of sanding, Bondo, sanding, priming, sanding, painting... Very glad I did it though. I learned a lot. It was my very first 3d armor build that I've totally completed, and much more work than building an RS Props TK, that's for sure! Reprinting armor parts as he grows is easy and relatively inexpensive. Oh, one last question! Will you need just new pics of just the corrected backpack, or will you need pics of me wearing the corrected backpack? Thanks again for all your feedback!!! Much appreciated! -
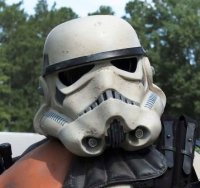
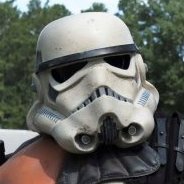
TD-10401 Requesting Deployment Name: Christine Lee 501st TD ID with a link to 501st profile: TD-10401 https://www.501st.com/members/displaymemberdetails.php?userID=23755 MEPD forum name: Cricket Garrison: Georgia Garrison Armor and Helmet: RS Props Stunt. -Helmet off photo. -One full armor, helmet on, front photo. -One full armor, helmet on, right side photo. -One full armor, helmet on, left side photo. Showing the pouches mounted on sides if you have them and the gap closed. -One full armor, helmet on, back photo. Please note that additional weathering was applied to backpack. See detail backpack pics below. -One full armor, helmet on, back photo without backpack. -Canvas or elastic shoulder straps detail photo. -Canvas belt detail photo with pouches. -Abs details close up photo. Showing the 3 buttons an TD abdominal plate. Neck seal: Geeky Pink Pauldron: Trooper1 -Detail photos of the rubber gloves and latex handguards - Detail photos of all snaps, screws and buttons on the armor. Bucket: -A close up photo clearly showing the flat green lenses. Please note that the frown mesh has been removed! I forgot to take it off when taking initial photos. And I know that my brow is on the low side. I prefer a lower brow. -Detail photo showing no stripes on all grey traps and tears. -Detail photo of hovi-mix mic tips (or replica) mounted on helmet. -Detail photos of blue tube stripes. Backpack: Self-build from assorted vintage, found, and 3D printed parts. - Detail photos from all sides, separately. Weapon: Praetorian DLT-19. -At least one picture showing the whole weapon. -Detail pictures of mods required for the specific weapons. Finally: -One (or several) full body action (or attitude poses) good quality picture. And these last few just for fun. This is me and my son. He's trying out the kit I 3D printed for him for the first time, so this was an awesome outing for both of us. Please let me know if you need additional photos! Thank you for your time and consideration to the MEPD Police Officer Program. -- Cricket TD-10401
-
Thank you!!!
-
Mic and ear sockets installed. I didn't have the enthusiasm to install the 5 pin socket on the opposite side of the box because it would require me to completely take apart the seed tray from the pack frame. Just not up for it today. Anyhow, these are 3.5mm female headphone jacks. https://www.amazon.com/gp/product/B077XPSKQD/ I drilled holes, inserted the jacks into the holes from the inside, and secured them with the silver ring nut on the outside (included). I added some hot glue on the inside for extra stability, so these aren't going anywhere! Feet installed. The feet were secured with split rivets I had left over from my TK builds. Antenna installed. I just drilled a hole, stuck it in there, and secured it with a ton of hot glue from the inside. It's not 100% accurate to the film, but it does add a little more realism to the box, methinks! Now to make time to get photos!!!
-
Hey Glen, Yes, much better photo there! Thanks! Dremel will take longer for bigger areas. It will be faster to cut larger areas first, followed by Dremel to finish and sand the areas smooth. Dremel is good for tight or curved areas. I end up with more white ABS "dust" than anything else when using my Dremel. It melts, but not as much as you think it will. Test on some scrap plastic first, and you'll see what I mean. I'm seeing a few fitting adjustments that you might want to take a look at. I've highlighted the areas in the photo below. 1. Your belt is off center. The center button should line up roughly where the middle of the ab is (green vertical line). A little rotation of that should do the trick! 2. Your thighs are rotating out. The fronts of the shins should line up with the fronts of the thighs, and currently, the thighs don't line up. This is because the thighs need to be trimmed down. Once they've been trimmed to fit correctly for length, this issue should resolve itself. (tips to do this below) 3. Your bicep looks like it's kind of jammed into your armpit, but this might be the angle of the photo. You can always trim the bicep parts from the top to allow for comfort. 4. The top backs of your shins can be trimmed for mobility and comfort. As they look now, you might end up with some fairly decent armor bites back there! The photo below shows the kind of trimming that is typically acceptable for TKs. I've trimmed the backs of all of my TK builds. Don't trim beyond the ridge of the parts. You can trim in a more square cut or a curved cut- your choice. I used a pencil to trace initial cut lines, Lexan scissors to cut the bulk of the areas out, then finished with the Dremel. Here's a pic of what mine look like: Now about thigh trimming. Here's how I do mine: Put on one thigh with your torso. Using a pencil, you're going to mark along the areas of the thighs where they hit the cod. You'll be essentially tracing the cod where it overlaps on the thigh. You will be removing more material from the inside areas of the thighs than anywhere else. Remove the thigh and trim conservatively at the pencil line. Try the thigh on again, mark where the cod hits the thigh as you move around (you may hear it or feel it as you walk), remove the thigh, trim, repeat until you notice very minimal clicking of the cod/thigh. Repeat with the other thigh. This is a tedious process, but it really works nicely to shorten the thigh and also maintain some of the original lines of the tops of the thighs. Below is a pic of my RS Props TD (converted from TK). Remember, I'm 5'4", so I had to remove quite a bit from the tops of those thighs. I even recreated the left thigh notch. That being said, I removed very, very little from the outer thighs. Bottom line: use the cod as your guide for trimming. Once the thighs are trimmed to move a little more freely around the cod/butt plate area, the thighs will have less of a tendency to rotate outwards (that cod is currently pushing on them). Hope this helps!
-
Hey Glen, I'm on the short side at 5'4", and I've built 4 TKs (and assisted sizing down several more), so I know a little about trimming for height. I might be able to give some guidance. Your photo is showing as an itty bitty image though, even when enlarged. Any chance on sharing a larger pic? The Dremel is your friend when it comes to trimming. But for cutting off a larger amount, you might want to trim off the bulk first, then finish with the Dremel. Tin snips can behave aggressively with the ABS sometimes when you cut on a curve and can leave you with extra sanding work to do. A better alternative would be to use a curved pair of Lexan scissors. I own many pairs of Lexan scissors in both straight and curved shapes, and they do an amazing job of cutting plastic.
-
Sockets, feet, and an antenna were located this week (Amazon FTW!). Planning to install them before taking pics for PO.
-
Wow, thanks! I'll begin my quest to locate the sockets and feet for the radio.
-
Greetings, Troopers! I had always intended on converting my RS Props stunt TK to a TD, but wanted to make sure I had another shiny white TK to replace it. I eventually built another RS Props TK (Hero), but was still afraid of pulling the trigger on the conversion process for my Stunt. Last year I participated in a photo shoot with smoke grenades while wearing my Stunt TK. Let's just say that smoke bombs and ABS do not get along. My armor ended up STAINED beyond belief! I tried Novus and even 220 grit sandpaper to try to remove the stains from the smoke bomb pigment, but nothing worked. That crud was in there deep. This was my sign. Time to get this kit dirty! Here are some of the pics from the photo shoot before the conversion. At least the photos turned out pretty cool. I began conversion by taking my armor apart and removing the ab button plates and sniper knee parts. I glued the new sniper plate in place and began weathering. I used oil paints in raw umber, burnt umber, and burnt sienna as my base "dirt" to begin with. Weathered shin on the left, unweathered on the right. Here's what the process looked like. I like using oil paints very much because they give you loads of time to work with them due to the slow dry time. Lots of opportunity to blend, blend, blend! Once I was done blending with a cotton rag, I took a clean rag and wiped, wiped, wiped... After going over all the armor, it looked like this: I really liked this look, but I felt that while it looked dirty, it was still too polished and shiny for what I thought a Sandtrooper should look like. I let the oil paint weathering sit for a week before moving on to the next phase: adding SAND! During that time, I jumped into building my pack. I snagged a K2 Karrimor frame off of eBay last year, complete with red kidney/back straps! Woo! I cut off the top part of the frame to begin with. I painted it black, removed the lower cross support bar, and bent the frame in the middle. Bending that frame was scary! The pack was still too tall for my liking, though. When I put the seed trays on it (using Woodman's trays), there was a large space at the bottom that I didn't like. So I removed another 5cm of length from the top ends of the frame and shifted the top crossbar down accordingly. Here's what it looked like once cut for the second time: Before and after the shortening of the frame: I used my 3D printer to make this greeblie. I added the hose clamp to the tube before hitting it with black paint. I also 3D printed out the thermal detonator plate and end caps for the mortar tube because I didn't have anything else that fit the 2" black tube! And assembled it on the seed tray with my vintage Brexton lunch box, wet wipe bottle, and rubber black plunger cap: I bought a cistern part from Gordonator a few years ago. Added some zip ties, sanded, and Bondo'd the part to make it look like it should before painting: Made some shotgun shells with 1/2" PVC pipe, some EVA foam cut to fit inside, a little tulle netting, and leftover stems from pop rivets: I am using a Crashmann Sonix radio kit for my pack. To make the "leather surround" part for the box, I used stretch pleather and EVA foam. I didn't have enough EVA foam to completely surround the entire length of the box, so I measure the entire box and made two pieces in a length to meet at a corner. Then I used basting spray to secure the foam to one long piece of pleather. The basting spray helps keep the edges stuck down before sewing. I created stitching along the edges and wrapped the pleather/foam piece around the box, using hot glue to secure it in place. Done! I figured out how to put all the parts together, and then I ended up with this: Side view: View from the top: Side view: Back view: I tackled adding sand to my armor to give it good texture and make it truly sandy! Using a mix of grout, sand (duh!), fuller's earth, and a little yellow ocher oil paint, I painted it all over the armor, wiping it off until I had just enough sand texture. Had no idea it would be such a messy process! It did not want to wash off my skin. I should have worn gloves. Ah well. The sandy texture really knocked the shine off this kit! Close up so you can see some of the sand detail. That stuff is STUCK on. I can't even scratch it off. A garrison friend suggested I add a little more dirt to my boots and lower shins, and I agreed that it needed more. Here is the result: And the lid: And before anyone wants to mention my brow height, let it be known that I like the brow where it is for now. So I took the armor out for a spin last weekend, and ended up taking pics! I sent in submission pics, and was approved by my GML in less than two days! So now I'm officially TD-10401, but I want to add PO to my rank. I'll be taking more pics this weekend, and should be submitting my application to the appropriate department soon. As always, any feedback (good or bad!) is greatly appreciated. Can't wait to be an official L2 member of the MEPD!!!
-
Christine Lee requesting Sandtrooper section access, TD-10401. https://www.501st.com/members/displaymemberdetails.php?userID=23755 Let's find some droids!!! Thank you!
-
Source for T-21 Electronics?
Cricket replied to Cricket's topic in T-21, DLT-19, RT-97c Heavy Blasters
Thanks, Daniel! One of my garrison mates pointed me over to Paul at TRamp, and whaddya know... he builds exactly what I'm looking for. Credits have been paid, so now I can work on other projects while I wait for it to arrive. -
Hey Troopers, I have been looking for over a year for pewpewpew for my T-21 build without any success. Could anyone point me to where I could find a lights and sound upgrade for the T-21? Any tips appreciated!
-
Nagging FRUSTRATING problems with audio and Helmet
Cricket replied to Plainsrunner's topic in Sandtrooper Electronics
I repositioned my amp into my ab plate and I no longer have any feedback issues at all. I can crank it up and be heard very well even in crowds now. I don't hear myself as well as when it was in my chest, so from time to time I verify that I can be heard from other troopers. I don't know if you have room or not for the amp in your ab, but I can confirm that it solves the feedback issue. -
Hey Strider, Any chance on getting the reference images of the Sandtrooper backpacks uploaded again? None of the images show up anymore (thanks, Photobucket!). I was hoping to use this as a resource, but didn't save your images before they disappeared.
-
Hello! Requesting 501st access please. Christine Lee TK-10401 http://501st.com/members/displaymemberdetails.php?userID=23755 Thank you!

