

jinxed
-
Posts
27 -
Joined
-
Last visited
About jinxed

Recent Profile Visitors
1,239 profile views


jinxed's Achievements
(1/14)
10
Reputation
-
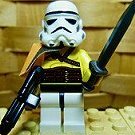
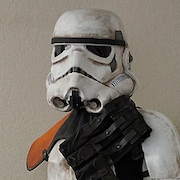 jinxed changed their profile photo
 -
Working on it right now sir!
-
Brad Click - TD 14192 Requesting Sandtrooper Access. https://www.501st.com/members/displaymemberdetails.php?userID=28423
-
BOOM! Approved. TD 14192
-
Thanks! GML was hoping to complete my review by end of week, so if there's changes I'll know soon. Yea, my belt was goofy in the last pic. It wasnt like that in my submission pics. I took it off to get a pic of the side rivets, then stuck it back on still in the helmet. You know you cant see a thing in those. The wife snapped that one as I was walking around.
-
Well, I got the final details done on the armor and submitted application photos to my GML. Hopefully soon, I'll get that ID# then start working towards PO!
-
Confiscated macrobinoculars
jinxed replied to jjcalus's topic in Pouches, Pauldrons, and other Accessories
THAT is super cool! Adding a film frame would be a nice touch. I have a SubAssault game that will eventually get made over, but also found another "macrobinocular" type toy at the thrift store that's a working night vision. It'll get made over too, but both will be kept in working order. Nice to have lights and sounds already built in sometimes. Plus the kiddo loves to play the sub-assault. Going to have to keep my eye open for junk 8mm. Such great potential.- 1 reply
-
- 1
-

-
WOW!! Ok, so things escalated kinda quick. We dont frequent the conventions and are pretty much out of the loop on that kind of stuff. But for the last couple years, my wife has been volunteering a booth at the Denver Comic Con for the library. So for grins my kiddo and I have dressed up in something and tagged along basically to check out the other cool costumes. This year she was working Sunday, which we decided would be cool fathers day gig. Saturday afternoon I found out that my armor maker Cal from Far Away Creations was going to be down there with his landspeeder. There was no way I was going to miss the opportunity to get a photo with it in my kit. That said, I had been wrestling with my weathering, and hadn't even started the helmet, boots, belt, and pauldron. I had no pouches attached, no idea if my mic set up would work, or even how to get it in the armor. Regardless, I basically pulled an all nighter rushing through the minimum bits, and threw it all in a bin Sunday morning as we headed out. I met up with Cal who graciously let me use their "behind the booth" area to suit up, and just like that, my first public outing. Heck of a way to test out everything. My shoulder pouch isnt dyed yet and was just strapped to the pauldron, way outta whack. I rushed the helmet weathering and it's really ham fisted. I didnt have time to work on my TK Boots, so the CaBoots had to make the cut. No fans in the bucket and my sound was feedbacky and hard to hear. BUT...I was in heaven for about 3 hours! Got some great feedback from other con goers, and more importantly some 501st members. Nothing fell off or broke, everything seemed to stay put, and felt pretty comfortable. Biggest issue was my voice box. People couldnt hear me. If I turned it up, feedback was horrible. So for the day it was mostly thumbs up and waving. A few details to take care of and I should be able to submit pics to my GML and get my basic approval!
-
BIG thank on this Hausi. I had a couple days I thought the wife was going to bury me in the backyard. I played around with the "wash and dab" and finally was getting some results I liked AND could replicate. I basically took almost everything off and re-worked it back up. Still not 100% happy with all the areas, but MUCH closer to what I wanted it to look like. It's weird, I thought things like the ammo belt that were really detailed would be most difficult, but for me its the bigger smooth areas. Time to take a huge breath and do the helmet... Here's where it's at now:
-
Well. I've lost my way. I kept going with what I had, adding in the "oil layer" and although it looked genuinely dirty it was just way too much. I actually think it looks cool, but much too far away from what I see on screen or where I want it to be. I tried to lighten it, but totally killed it. My rag was removing all the nice subtle areas I wanted, and not doing a thing to the overly dark areas. Man trying to paint ABS is just a binary operation...it's either on or off, no in between. I have been trying over and over with different techniques but just cant hit the mark. If I do come up with something I like, I can't replicate it on a different piece. Especially having issues getting any kind of subtle weathering on the big areas. Being an artist, this has been particularly frustrating.
-
OK, something about curiosity and a cat...or cat litter. I ran across the street and picked up a bag of "fullers earth" and a can of aquanet. Cost me a total of $2.89 I did a little test on a scrap ammo belt. Certainly a messier procedure. What say you to this??
-
This is the part I have been dreading. I actually like weathering stuff, but THIS is such an elusive thing. SO much conflicting mental acrobatics going on. Many reference pics show the actual armor looking completely slathered in gunk, others look quite minimal. The old on film vs real life conundrum. Early on I decided that the PandaTrooper tutorial was the way to go. I actually really like his finished submission pictures and have been striving to achieve that quality. Got all the paints, supplies and went to work. Working the pieces one by one, close up, I was content. Then I pieced the back together and took it outside for a photo as a way to step back from it. Immediately I felt like it looked way too splotchy. The darks too dark and the lights too light. It looks crusty, not dusty. So I pulled a couple pieces back, and this time used the paint much more sparingly smearing it around instead of dabbing it on. Then used a bit wetter rag to blot off the excess with less dry time. It looked a bit better and "less is more". So I re-worked everything I had done thinking I had it....but I'm still on the fence. I dont want all the features to look like they are cartoon outlined but I feel thats what I got going on. I am considering switching to the hairspray/grout? I have to say I quite like the results Rob achieved in his thread. Especially the all over dusty effect without harsh lines and spots. That bust shot with the pauldron is awesome. My concern is with the hairspray always feeling tacky and adding a weird glossy lacquered look? This was my first go Too splotchy so I wiped down the majority, and did another pass much lighter. Took a comparison shot. Thinking I was happy, I reworked the rest of the pieces I had done. Still not sure it looks right? Maybe it's just being too close and not seeing the whole.
-
OK. I need your eyes. Before I weather everything, I want to be sure there's nothing jacked up. I re-did my shoulder strapping per some suggestions. It helped a ton with the gaps and rotation, thank you!! Mainly I'm concerned with the build/spacing/details on the armor. Photographing bright white is tough! Some things I'm not happy with, or know is missing: I got my neck seal from Darman on FIST, but cant get it sit right in the back. It's sticking out pretty bad and nothing I do makes it better. So for now, ignore that. I am still waiting on my S-trim for the bucket. Yes, my Caboots are not correct, but I got them when they were. TK Boots is out of 9 D so until I can find some, it's the best I have. I have silicone hand guards to glue on my gloves, but wanted to be sure my arms were sorted to adjust spacing.
-
Just waiting on S-trim and bucket will be complete and ready for weathering!
-
Well, I'm not sure what was more nerve racking, painting the tube stripes and coach lines, or skipping coffee to do so. No need to send emergency crews...I'm fully caffeinated now. So I did some testing on the tube stripes. Initially I planned to mask the top and bottom, then paint the lines and remove tape to clean them up. Didnt like the super crisp ends with wavy centers. Decided to draw them in pencil and just freehand fill them in. I think they have much more "tidy messiness" to them. Then came my big worry...doing the coach lines on the grey. I tapped into every bit of my past hand lettering and sign making experience, which isn't a ton. BUT, I am super chuffed with the result and VERY relieved it's done without too many glaring bodges. Went ahead and did the vocoder too while I had the black paint out. QUESTION...is the vocoder supposed to be gloss or matte? I have a dullcoat if needed, but was thinking that the weathering is pretty much going to dull everything.
-
Got the ears as close as I'm able. Butchered a hardhat and got my insert ready. Then dismantled it to get some color on it. First and second coats of grey done. Really cool how these start to come to life with the details. Freehanding the paint was a nice zen step in this process. Gonna have to lay off the coffee when I get to the coach lines. Thought about using the tube stripe decals to trace as a "stencil" , but I think I'm just going to freehand those too.