


Hawkeye
-
Posts
72 -
Joined
-
Last visited
About Hawkeye

Recent Profile Visitors
1,979 profile views


Hawkeye's Achievements
(1/14)
0
Reputation
-
best method to weather canvas pouches?
Hawkeye replied to murdock's topic in Pouches, Pauldrons, and other Accessories
Your pouches are looking great so far. There are all kinds of threads in the "Pouches & Misc Parts" area about canvas pouches & the different weathering methods & their results, usually with plenty of photos to give you a good idea. Personally, black spray paint, a little overall dry-brushing with a tan paint, then a good kick around the kids' sandbox, followed by some hairspray & dry clay or fullers earth has worked for mine. Stay tuned, I'm sure the other guys here will soon help you out with this. -
Spray the part you are working on with hairspray first, then sprinkle the earth onto it. I like to have a damp to wet rag handy to 'touch up' the dirt until I get the look I want. Good luck & enjoy getting dirty!
-
I have to agree with you Guys, There's nothing better than watching ANH with my three kids, aged 6, 4 & 3, and have them all say there's Dad! everytime a trooper is on screen. My 6 year old son is forever correcting anyone who calls me a stormtrooper, explaining that I'm in fact a Sandtrooper!
-
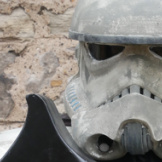
Hey Guys, I've been working on a set of armour loosely based on the custom sideshow stormtrooper from SDCC 2009. I've freehanded various words in Aurebesh on the armour, this is a first for me & I'm hoping I got it okay. The arm on the right is ready for weathering, I thought I should hear what you all think before I go any further. It's all sitting on the "Dewback skin" that I'm using for my kama.
-
Let me know if you're ever thinking of stopping into Canada. I'm in Toronto & I'm sure we'd find room for a Sandy brother in for a visit.
-
*done* TD7052 Requesting Deployment
Hawkeye replied to rangefinder's topic in MEPD Police Officer Program
Great job on your armour & awesome photoshoot! Glad to have another Sandy in T.O! -
Sandy Clone Helmet Build
Hawkeye replied to Hawkeye's topic in Pouches, Pauldrons, and other Accessories
Thanks for the feedback guys! It's great to hear your thoughts on this little project. It was a fun build & I was able to show my kids a first-hand example of the "Reduce, Reuse & Recycle" they're studying in school. Now onto the armour & accessories to match this helmet! All the best. Luke -
Hey Guys, I've enjoyed the Imperial Commando helmets a number of you have built & after seeing the SDCC 2009 Sideshow 'Dune Sea Tusken Nomad' & Humbrelcreations' 'Pre Sandtrooper' custom figures I got to wondering what the 'Missing Link' trooper might look like, a trooper left behind in the desert, who bridges the newer trilogy with the orginal trilogy. I had a 3/4 completed fibreglass helmet sitting on a shelf for two years I didn't like because of it's soft details. I'm hoping this helmet is the start of a complete 1:1 take on elements of these figures. Please let me know what you think. If you have any interest, I'll try to post parts of this project as I complete them. The blue Tic Tac box, coffee container & large washers shown weren't used in the build: Bondo & parts glued in place: Head & Shoulder shampoo caps used instead of Tic Tac box for top vents: Two coats of primer, two coats of paint & two coats of clear coat: Hand painted details, awaiting brow trim, aerators & weathering, the orange trim a nod to our pauldrons:
-
Scratch-Built Binocs
Hawkeye replied to Hawkeye's topic in Pouches, Pauldrons, and other Accessories
Hey Guys, Here are a couple of photos of some of the supplies I used to build my binocs. The main container I used is about 8 1/2" tall, 8" wide & about 3" deep. This is why I needed the toothpaste tube! I realize there are some parts not in the photo, I'll try to list the parts here: Long wooden fireplace matches, used for the 'ribs' A small green screw cap from a lemon-shaped juice container, the centre of the dial to the left of the eye pieces A red cap from the end of the axle of a child's wagon or ride-on-car, the red button between the eye pieces A clam-shell blister package with square 'buttons' which hold the halves together (from a door handle set from Home Depot),for the three buttons below the eye pieces & the 'lens' on the front of the binocs A sheet magnet, for the inside of the 'lens' Assorted screws, to hold things together & for show I now wish I had taken more photos during the build, if you have questions about things I'll try my best to explain. Most importantly, I found the website partsofsw.com had great reference photos to help in my build. -
I was involved with the Boy Scouts for over ten years as a leader & my call-name was Hawkeye, seemed natural to continue to use it. My TD 7174 is a combination of my birth year of 1971 & my wife's of 1974. Figured that I should pay tribute to her somehow as she puts up with the ongoing weathering & prop projects!
-
Bit late to the party but here are a couple of my favourite shots of my three biggest fans: With the droid we were looking for: Me & Mini-Me, my oldest:
-
Scratch-Built Binocs
Hawkeye replied to Hawkeye's topic in Pouches, Pauldrons, and other Accessories
Thanks for the kind words guys! It was a fun build from start to finish. It almost has me banned from the kitchen though (could be a good thing). My wife is now nervous anytime I'm looking for tupperware, she doesn't know if it's for food or if it's going to be "cut up & painted!" I can't get freakengine's tutorial up now either, I could try to post a few photos & descriptions of the parts I used if that might be of any help. -
Hey Guys, I've been lurking around here too long & thought I should start contributing. With the better weather I've been able to start & finish some projects. Here is a pair of binocs that I built using freakengine's tutorial. Let me know what you guys think.
-
Hey Guys, Saw this & thought you might get a kick out of it. http://www.collegehumor.com/video:1931187 Luke
-
*done* 3165 Requesting deployment *done*
Hawkeye replied to SCORCH's topic in MEPD Police Officer Program
Congrats on your deployment! Beautiful work all around, especially the weathering & the blast marks!