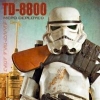
iconoclasta_88 Posted July 13, 2009 Share Posted July 13, 2009 A week ago the Mexican Garrison had a photo shoot in a professional set for some photography school practice, and we asked for a few shots of ourselves for garrison and personal use. It was lots of fun, but also tiring. Have your picture taken involves lots of waiting and lots of heat from the lamps. But we had a great day and hopefully some amazing pictures. I still dont have all of the pictures, but could get this few ones of myself. I guess I will get the rest of them soon, but in the meanwhile, I wanted to share these with you guys! What do you think? Saludos... Quote Link to comment Share on other sites More sharing options...
RoCKo Posted July 13, 2009 Share Posted July 13, 2009 Great armor, great pictures, looks like a lot of fun! and bro, i love the combination of armor and your dreads... i wish i still had more hair!!! Quote Link to comment Share on other sites More sharing options...
hpdblues Posted July 13, 2009 Share Posted July 13, 2009 A week ago the Mexican Garrison had a photo shoot in a professional set for some photography school practice, and we asked for a few shots of ourselves for garrison and personal use. It was lots of fun, but also tiring. Have your picture taken involves lots of waiting and lots of heat from the lamps. But we had a great day and hopefully some amazing pictures. I still dont have all of the pictures, but could get this few ones of myself. I guess I will get the rest of them soon, but in the meanwhile, I wanted to share these with you guys! What do you think? Saludos... Very nice sir! Very nice. T Quote Link to comment Share on other sites More sharing options...
lordvader74 Posted July 13, 2009 Share Posted July 13, 2009 How in the world do you get all that hair in that bucket?? Great pics bro. Looking really good. Way to represent the MEPD! Quote Link to comment Share on other sites More sharing options...
freakengine Posted July 14, 2009 Share Posted July 14, 2009 How in the world do you get all that hair in that bucket?? I was gonna ask the same thing. Awesome pics!!! Quote Link to comment Share on other sites More sharing options...
TD_MD Posted July 14, 2009 Share Posted July 14, 2009 Muy buenas las Fotos!!!! Como fue que se dio esto???? muy interesante y benificioco para ustedes como para los alumnos de Fotografia!!!! Muy weno tu Rasta!!! Quote Link to comment Share on other sites More sharing options...
6170 Posted July 14, 2009 Share Posted July 14, 2009 Wow great set of picture! Muy Chingon Jeffe Quote Link to comment Share on other sites More sharing options...
kenthork Posted July 14, 2009 Share Posted July 14, 2009 it's a beauty, and pictures are fantastic. Quote Link to comment Share on other sites More sharing options...
dutchy Posted July 14, 2009 Share Posted July 14, 2009 Those pics are just smack down georgous!! Really like the 1st one.. Looking great hermano!! Quote Link to comment Share on other sites More sharing options...
Scootch Posted July 14, 2009 Share Posted July 14, 2009 Yes I agree with Dutchy, great pix bro! Quote Link to comment Share on other sites More sharing options...
Rolf Posted July 14, 2009 Share Posted July 14, 2009 Great!!! pictures and armor. I love when people take there time, to make good photos of there gear. A normal troop, whit cars going by etc just don´t give the right feeling of ANH. Yours sure do! Thanks for the pics buddy Quote Link to comment Share on other sites More sharing options...
iconoclasta_88 Posted July 15, 2009 Author Share Posted July 15, 2009 Great armor, great pictures, looks like a lot of fun! and bro, i love the combination of armor and your dreads... i wish i still had more hair!!! Thx a lot bro! I like how it looks too, what I dont like is that its a big big problem to wear a bucket with them... Very nice sir! Very nice. T Thanks T! Your helmet... and lots of work on the whole thing! How in the world do you get all that hair in that bucket?? Great pics bro. Looking really good. Way to represent the MEPD! Well, I just stuck it all from underneath into the bucket and all around my face and head. Not very comfortable. THX a lot bro! I was gonna ask the same thing. Awesome pics!!! THX!! Muy buenas las Fotos!!!! Como fue que se dio esto???? muy interesante y benificioco para ustedes como para los alumnos de Fotografia!!!! Muy weno tu Rasta!!! Muchas gracias. Pues un amigo me pidio el favor de contactar a la garrison para una practica de su curso de fotografia. Asi que, fuimos! Muchas gracias hermano. Wow great set of picture! Muy Chingon Jeffe LOL! Muchas gracias!! it's a beauty, and pictures are fantastic. Thx a lot bro... Those pics are just smack down georgous!! Really like the 1st one.. Looking great hermano!! Thx my hermano! I really loved how the pictures came out. Yes I agree with Dutchy, great pix bro! THX!! Great!!! pictures and armor. I love when people take there time, to make good photos of there gear. A normal troop, whit cars going by etc just don´t give the right feeling of ANH. Yours sure do! Thanks for the pics buddy Yes, all the hard work and time invested in building and armor really shows up whith good pictures. Just to jump into the set makes the whole armor looks and shine different! Thx bro! Saludos... Quote Link to comment Share on other sites More sharing options...
iconoclasta_88 Posted July 15, 2009 Author Share Posted July 15, 2009 Here are a few more pictures! Saludos... Quote Link to comment Share on other sites More sharing options...
TD2802 Posted July 16, 2009 Share Posted July 16, 2009 Those would make great recruiting materials. Good job! Quote Link to comment Share on other sites More sharing options...
Rolf Posted July 16, 2009 Share Posted July 16, 2009 I must say it the best FX suit, whit a accurate helmet TD version put together i have seen . I don´t like to point fingers at this great!!! put together suit. But you ask me to over pm bro, so i try... even its a bit hard . 1. Love your scratch build MG-15, one of the best i have seen. To reach the top, try to get a sci-fire MG-15 one day maybe. 2. If you will go mad man, sell the suit. Either keep the helmet, and buy a TM body armor. Or a TE2 body armor, or full TE2 kit. (love your TE2 helmet, as it is) 3. Love your Sith armor replica of the Stolla Wien. Maybe get you hands in the once from Sci-fire over time. 4. Maybe get one of the UK siphons for your back pack. I got the link. 5. Nice! radio, but remember to paint the metal dot dials black. 6. The move a long back pack radio are all black, so maybe take off the radio green fm dial off, and get it all black. 7. Your MP38/40 pouch looks really nice, only the extra small tool box, need to have a leater string - and a linger strap going down. I got a good link if you need one. 8. The pauldron looks real nice and accurate, to take it a bit higer. I might go for the trooper1 pauldron, or wait for the sci-fire pauldron run. 9. Maybe get a set of R2Dan Latex hand plates. I think it was my 9 list there. Love your helmet. And remember, you have done a freaking GOOD!!! job. I could not have done it better, whit the items you have to work whit. A+ from here bro. Rolf Quote Link to comment Share on other sites More sharing options...
iconoclasta_88 Posted July 16, 2009 Author Share Posted July 16, 2009 I must say it the best FX suit, whit a accurate helmet TD version put together i have seen . I don´t like to point fingers at this great!!! put together suit. But you ask me to over pm bro, so i try... even its a bit hard . 1. Love your scratch build MG-15, one of the best i have seen. To reach the top, try to get a sci-fire MG-15 one day maybe. 2. If you will go mad man, sell the suit. Either keep the helmet, and buy a TM body armor. Or a TE2 body armor, or full TE2 kit. (love your TE2 helmet, as it is) 3. Love your Sith armor replica of the Stolla Wien. Maybe get you hands in the once from Sci-fire over time. 4. Maybe get one of the UK siphons for your back pack. I got the link. 5. Nice! radio, but remember to paint the metal dot dials black. 6. The move a long back pack radio are all black, so maybe take off the radio green fm dial off, and get it all black. 7. Your MP38/40 pouch looks really nice, only the extra small tool box, need to have a leater string - and a linger strap going down. I got a good link if you need one. 8. The pauldron looks real nice and accurate, to take it a bit higer. I might go for the trooper1 pauldron, or wait for the sci-fire pauldron run. 9. Maybe get a set of R2Dan Latex hand plates. I think it was my 9 list there. Love your helmet. And remember, you have done a freaking GOOD!!! job. I could not have done it better, whit the items you have to work whit. A+ from here bro. Rolf Rolf, Thx for your comments bro, they are a lot of help... and thx for those kind words. They are really encouraging. I asked for your criticism to improve my armor, and this will be very useful for me. Sometimes Im so used to my own armor that I "can't" see what I have done right and wrong. For instance, once I put it together, it never crossed my mind again to paint black the whole radio. I will now try and build a new one to resemble more the Sonix Victory 75. And that will be all black! (and will maybe paint this one all black as well). Do you think you could PM or post the links for the UK syphon and for the MP38/40, Even if I cant order for now, maybe I can try and make these ones look closer to the originals. Thanks a lot bro, I will save and in time get the parts and props I need to upgrade my TD to the best it can be. And starting now, I will work in a new radio box. Also, at the moment Im hopping to get a new TE2 armor kit. Muchas gracias!! Saludos!! Quote Link to comment Share on other sites More sharing options...
TD-443 Posted July 16, 2009 Share Posted July 16, 2009 HOLY SH!T! That is a nice rig you got there! Awesome pics too! Just awesome! Quote Link to comment Share on other sites More sharing options...
Rolf Posted July 16, 2009 Share Posted July 16, 2009 Rolf, Thx for your comments bro, they are a lot of help... and thx for those kind words. They are really encouraging. I asked for your criticism to improve my armor, and this will be very useful for me. Sometimes Im so used to my own armor that I "can't" see what I have done right and wrong. For instance, once I put it together, it never crossed my mind again to paint black the whole radio. I will now try and build a new one to resemble more the Sonix Victory 75. And that will be all black! (and will maybe paint this one all black as well). Do you think you could PM or post the links for the UK syphon and for the MP38/40, Even if I cant order for now, maybe I can try and make these ones look closer to the originals. Thanks a lot bro, I will save and in time get the parts and props I need to upgrade my TD to the best it can be. And starting now, I will work in a new radio box. Also, at the moment Im hopping to get a new TE2 armor kit. Muchas gracias!! Saludos!! Your welcome bro . Your upgrades sounds good. I can´t wait to follow your progress. The MP38/40 pouch: http://www.army-specials.com/product_info....05815f4cb8dc19b The UK siphon: http://www.partridges.uk.com/catalog/ciste...-flow-p-71.html Quote Link to comment Share on other sites More sharing options...
kenthork Posted July 16, 2009 Share Posted July 16, 2009 It makes some time that I wonder a question concerning the uk toilet syphon. why did you think this syphon is the better (picture 1) while it is this syphon (picture 2 and 3) who seem use on the movie. where did you find the reference pictures for the first?? picture 1 picture 2 picture 3 Quote Link to comment Share on other sites More sharing options...
Rolf Posted July 17, 2009 Share Posted July 17, 2009 I´m not sure its better. But # 3 siphon whit the blue top, have a very nice long tube + the blue top hat, and it also goes down nicly. But where it start to go wrong is where it ends, whit the stripes on... there we cut it off, and add the round 70´burger stackers... On the new found # 1 siphon, we don´t need the round 70´burger stackers to be add on. Because it all ready have the right nice shape of going down in a round design, like the ones we see in ANH. It can be pretty bad looking, if you are not a top pro... when you cut the # 1 siphon, and then try to let it fade down/together whit the 70´burger stackers. I will show: Here you see my # 3 pack done, whit the # 1 siphon/70´burger stackers add together. (its looking ok cool i think, but you can also see the # 1 siphon don´t go down and add 100% up good together whit the 70´stackers) And here my pack # 4 whit the # 3 new found siphon on: (here there are not cut and add together parts, and it just gown down nice and smooth/round like we see it in ANH) I know the new # 3 siphon can look off, but you just need to cut off the extra stuff on the side tube, and top. And here you go: Hope you use the info bro. Cheers Quote Link to comment Share on other sites More sharing options...
Scootch Posted July 17, 2009 Share Posted July 17, 2009 Somewhere there is a toilet that will not flush. Quote Link to comment Share on other sites More sharing options...
kenthork Posted July 17, 2009 Share Posted July 17, 2009 thanks rolf for your great explanation, in detail as always i just going to give my opinion: concerning the "new find siphon". it's not too bad but it sure that it's not it that was use in ANH. (no ref pics) and for upgrade it, it will be better to put (glue) on it many lines on the "burger stacker part" for accurate look. concerning the "anciant syphon". i think it is the siphon we can see in ANH, and even if it is not the one it always more accurate that the new. i know it need more work modification to have a good result. On the new found # 1 siphon, we don´t need the round 70´burger stackers to be add on. Because it all ready have the right nice shape of going down in a round design, like the ones we see in ANH. for mine i do the maximum for it going down in a round design, i adjust the two piece in a maximum (no glue or other), and i think the result is not too bad for my first try. see pics before and after painting. it's cool to have a great dicussion on it, it's like this that we will found the better for our costume. really sorry iconoclasta_88 for the extra topic who don't to be here in your post ^_^ Quote Link to comment Share on other sites More sharing options...
iconoclasta_88 Posted July 17, 2009 Author Share Posted July 17, 2009 ...it's cool to have a great dicussion on it, it's like this that we will found the better for our costume. really sorry iconoclasta_88 for the extra topic who don't to be here in your post ^_^ No worries bro! Its great to hear all this. Personally, I think neither syphons are the ones used in ANH. I must agree with both of you. For me, the first syphon looks better regarding the 2 pipes and top, but the second syphon looks better regarding the "stacker" part and union. But it still needs the divisions or levels. I would say that kenthork's syphon looks really great, also Rolf's syphon from pack #3 does. I wonder is working out the union of the stacker part of new syphon or an actual hamburger stacker into syphon number 1 with a little bondo would do the trick... What do you think? Saludos... Quote Link to comment Share on other sites More sharing options...
kenthork Posted July 17, 2009 Share Posted July 17, 2009 it's one anciant topic which is a near compromise between the two. the new siphon is more accurate with the four plastic lines on the "hamburger stacker part" http://forum.mepd.net/index.php?showtopic=5378 at the end of the topi the author say " We must be the only people in the World who study a toilet syphon in this much detail" Quote Link to comment Share on other sites More sharing options...
Rolf Posted July 17, 2009 Share Posted July 17, 2009 No worries bro! Its great to hear all this. Personally, I think neither syphons are the ones used in ANH. I must agree with both of you. For me, the first syphon looks better regarding the 2 pipes and top, but the second syphon looks better regarding the "stacker" part and union. But it still needs the divisions or levels. I would say that kenthork's syphon looks really great, also Rolf's syphon from pack #3 does. I wonder is working out the union of the stacker part of new syphon or an actual hamburger stacker into syphon number 1 with a little bondo would do the trick... What do you think? Saludos... I think your right bro. Both siphons get there better sides. As you say: For me, the first syphon looks better regarding the 2 pipes and top, but the second syphon looks better regarding the "stacker" part and union. But it still needs the divisions or levels. Lets find the real version asap troops Quote Link to comment Share on other sites More sharing options...

Recommended Posts
Join the conversation
You can post now and register later. If you have an account, sign in now to post with your account.