bigwam Posted November 25, 2020 Share Posted November 25, 2020 I would like to start a WIP about the build of my new Sandtrooper. Why a new one? Well, the old one is getting on in years and after almost 60 uses the first signs of fatigue are showing. I have chosen the "Roadblock Private" as a model. I have almost finished the backpack: Like my first armor, I wanted one from Troopermaster again. I was very satisfied with the quality. In the meantime Paul has revised his forms and I now have the replacement armor. You can see a few differences. He has based himself even more closely on the original. I will gradually show the differences in the construction. The armor is now trimmed: Now it's time to adjust. I'll start with the forearms. Here is the comparison to the old ones: 3 Quote Link to comment Share on other sites More sharing options...
bigwam Posted November 26, 2020 Author Share Posted November 26, 2020 Today, i work on the forearms and Biceps. Before I cut the coverstripes wrong again, I put paul's picture next to it. I still remember that when I made the first armor I cut without thinking and then I was missing material ... 1 Quote Link to comment Share on other sites More sharing options...
Hausi Posted November 26, 2020 Share Posted November 26, 2020 Such shiny white armor. This is going to be great! Quote Link to comment Share on other sites More sharing options...
OnkelPaschulke Posted November 27, 2020 Share Posted November 27, 2020 I guess I‘ll have to build one on my own in the future, too... :-D looking forward for the weathering. Gesendet von iPhone mit Tapatalk Quote Link to comment Share on other sites More sharing options...
troopermaster Posted November 27, 2020 Share Posted November 27, 2020 Hi Thomas, When sizing the arms, they have a kind of flat spot on the back side. This is how the original armour was and is where the joining strips are supposed to go, as long as you can get your arms into them. Obviously make them as big as necessary but I thought I would mention it just in case you are unaware since this armour is slightly different to the previous version you got from me. Also, no return edge on the wrist or inner elbow curve Quote Link to comment Share on other sites More sharing options...
bigwam Posted November 27, 2020 Author Share Posted November 27, 2020 Thanks Paul, I know about the return edge. I leave a really small piece because of the stability. It is not really a return edge, only half an milimeter. But i can cut it away. 1 Quote Link to comment Share on other sites More sharing options...
bigwam Posted November 28, 2020 Author Share Posted November 28, 2020 The forearms were actually done. After Paul's post, I took everything apart again. Returnedges all cut off. Cut the forearms there like Paul said. When I found pictures on his FB page, it all made sense to me: This coverstripe gave me a headache. But now that I see it cut off, everything was clear. The shins are finished in front. I know they're a bit wider, but I have big calves. I had to do it like this with the Latvian. Based on the pictures I cut the stripes accordingly: Before that, I had shown German thoroughness. Everything exactly in the middle. The ends are nice and clean, rounded off, no sharp edges. Like my first trooper (photo below): Then I saw these pictures and the pictures of Paul and I thought F *** off. No more thoroughly. Let's make it accurate: corners, edges, sharp corners, crooked and crooked ... The day's work is done. Biceps ready, shins almost, forearms dry, thighs trimmed. Quote Link to comment Share on other sites More sharing options...
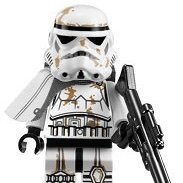
troopermaster Posted November 29, 2020 Share Posted November 29, 2020 16 hours ago, bigwam said: No more thoroughly. Let's make it accurate: corners, edges, sharp corners, crooked and crooked ... This is the way! The less precise you are when building the armour, especially when cutting the joining strips and finishing them, the more accurate your armour will look. I know it's hard for some people but in order to look like the troopers on screen, you have to build your armour the same way. You can still take great care and pay attention to what you are doing, but focus more on authenticity rather than ideally, and the end results will be much better in my opinion. Another thing that most people focus on too much (and I think you have too) is sticking to the 15mm width on the strips on the arms and 20mm on the legs. It's common for the strips on the arms to be 20mm and the legs 25mm, and these sizes look better when you are a bigger guy. Look at the strips on this guy. They look to be 18-20mm wide on both the biceps and forearms. 1 Quote Link to comment Share on other sites More sharing options...
bigwam Posted November 29, 2020 Author Share Posted November 29, 2020 Work for this day is done. Yesterday I removed all returnedges of the forearms (inner elbow curve and wrist), cut the forearms a bit and glued them together. Today I cut the coverstripes according to Paul's pictures. Thighs are also cropped and dry. Yes, my coverstripes are 15 mm on the biceps and forearms. Thighs are 20 mm. I had to do 24 mm on the lower legs because of my calves. I already had it with my old armor, you don't notice (the big boy in the front): And here my daily work: 1 Quote Link to comment Share on other sites More sharing options...
bigwam Posted December 1, 2020 Author Share Posted December 1, 2020 Used a vacation day and continued working: Shoulder rubbers revised and a snap button sewn on: The rest is almost done: Tonight I sewed and glued hooks on the elastic: What is still to be done? - Adjusting the shoulder bells and biceps - Attach a widening to the kidney (i'm a little bigger ...) - Build a helmet. I have four kits here (DA, RWA, TM & RS). I still have to choose one. Quote Link to comment Share on other sites More sharing options...
bigwam Posted December 2, 2020 Author Share Posted December 2, 2020 Just a little bit of work today. Prepared for widening: Sand down the ABS plate to 0.3mm so that the transition fits, bend and glue on the counterplate. Adjust Bells & Biceps: Quote Link to comment Share on other sites More sharing options...
bigwam Posted December 3, 2020 Author Share Posted December 3, 2020 Today, a little work on the kidney. Yesterday glued, today filled, sanded and painted. But only in the grinding area. Found a color that exactly matches the ABS. 1 Quote Link to comment Share on other sites More sharing options...
troopermaster Posted December 3, 2020 Share Posted December 3, 2020 Nice job on blending those shims! It's one of the things that I'm not crazy about doing, but I'm impressed with the finished result! Can you tell us which colour and brand of paint you used for anyone wanting to do the same thing please? 1 Quote Link to comment Share on other sites More sharing options...
Sn4k3 Posted December 3, 2020 Share Posted December 3, 2020 Today, a little work on the kidney. Yesterday glued, today filled, sanded and painted. But only in the grinding area. Found a color that exactly matches the ABS.Impressive, most impressive.Amazing work on those shims, please, do tell us the secretSent from my GM1900 using Tapatalk Quote Link to comment Share on other sites More sharing options...
bigwam Posted December 4, 2020 Author Share Posted December 4, 2020 What secret? The colour? Today i had the first fitting. Everything fits perfectly. Biceps, forearms are only fixed with tape, now I'll stick the rubber on. Then shorten the belt and the shims. Then I'll think about the helmet. 3 Quote Link to comment Share on other sites More sharing options...
bigwam Posted December 6, 2020 Author Share Posted December 6, 2020 Remaining work done. Shims shortened, screws inserted, rubbers glued. I also built a second pair of thighs, so I don't have to take off the doll in the background completely if I want to put on the old trooper. Now the helmet is still missing, next construction site. Quote Link to comment Share on other sites More sharing options...
troopermaster Posted December 6, 2020 Share Posted December 6, 2020 10 hours ago, bigwam said: Button plate corners should be cut at angles if you want to go for uber accuracy 1 Quote Link to comment Share on other sites More sharing options...
jcalus Posted December 7, 2020 Share Posted December 7, 2020 It is looking really good! Sent from my SM-A505W using Tapatalk Quote Link to comment Share on other sites More sharing options...
bigwam Posted December 15, 2020 Author Share Posted December 15, 2020 On 12/7/2020 at 12:39 AM, troopermaster said: Button plate corners should be cut at angles if you want to go for uber accuracy Wow, ok - i will do so! Quote Link to comment Share on other sites More sharing options...
mikelbrierly Posted December 30, 2020 Share Posted December 30, 2020 Do folks ever paint their whole kit? I haven't seen that if so, but if ever there was a place that that kind of accuracy would happen it's here On 12/6/2020 at 5:39 PM, troopermaster said: Button plate corners should be cut at angles if you want to go for uber accuracy Quote Link to comment Share on other sites More sharing options...
mikelbrierly Posted December 30, 2020 Share Posted December 30, 2020 Also Bigwam your build is beautiful!! As is your helmet display there in the background. (I'm jealous of your magnet collection too ) Quote Link to comment Share on other sites More sharing options...
bigwam Posted December 31, 2020 Author Share Posted December 31, 2020 Thanks Mikel Quote Link to comment Share on other sites More sharing options...
troopermaster Posted December 31, 2020 Share Posted December 31, 2020 On 12/30/2020 at 4:10 PM, mikelbrierly said: Do folks ever paint their whole kit? I haven't seen that if so, but if ever there was a place that that kind of accuracy would happen it's here There's no need to paint the armour, unless it has started to yellow or you have parts from different makers and the ABS is different shades of white. The original armour was not painted. 1 Quote Link to comment Share on other sites More sharing options...
bigwam Posted January 17, 2021 Author Share Posted January 17, 2021 For the helmet I wanted to choose between TM and RS because I had both kits here. My son made the decision for me when he told me - the TM kit is his. Then the decision is made, forced to RS. Quote Link to comment Share on other sites More sharing options...
bigwam Posted January 17, 2021 Author Share Posted January 17, 2021 After almost 2 hours I am finished with my teeth and so far satisfied. I didn't get the same perspective when taking photos, but I think you know what I'm talking about. It is about the distance and height of the teeth to each other. The picture below is also "wider" than my cell phone took, so the teeth look narrower and higher on the sides. I am also of the opinion that Davin Felth has a fourth tooth gap, which you just don't see in the film images. In the pictures shown below you can see a small hole. 2 Quote Link to comment Share on other sites More sharing options...

Recommended Posts
Join the conversation
You can post now and register later. If you have an account, sign in now to post with your account.