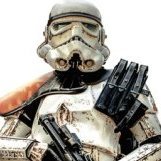
Koryu1212(Dan D) Posted July 8, 2018 Share Posted July 8, 2018 Posting my original build progress off my Garrison forum (Imperial Sands Garrison) of my variation of the “Stop that Ship” trooper. From the date I received my BBB to the day I finished was one month! And it was my first build! I trolled this and the FISD forums a lot, and had help from my Garrison Mentor too! Kit is an ATA...and without further preamble... Quote Link to comment Share on other sites More sharing options...
Koryu1212(Dan D) Posted July 8, 2018 Author Share Posted July 8, 2018 BBB was April 1st, which aside from being April Fools Day, is also the United States Navy’s Chief Petty Officers birthday...of which I happen to be. (Master-at-Arms, or Navy’s version of Military Police) Entire kit was put together in my barracks room; spending about a couple of hours each night after work and most of the day on weekends. I am geographically separated from my wife, which means she stayed back at my home of record. Sent from my iPhone using Tapatalk Quote Link to comment Share on other sites More sharing options...
Koryu1212(Dan D) Posted July 8, 2018 Author Share Posted July 8, 2018 Since I’ve already completed this build, I’ll break it down by stages; starting with trimming and so forth...Began with shoulder bells and hand plates, followed by abdominal, butt piece, kidney, chest and back, biceps and forearms, shins and thighs finishing with sniper plate and ab buttons along with the ammo belt and thigh ammo pack.I saved the helmet till the very last, which I highly recommend since you gain more confidence working with the bigger items that are easier to fix if you mess up especially when it comes to doing the ears for your helmet, but more on that later...Save all your trimmings which you can use to make ABS paste for repairs! Sent from my iPhone using Tapatalk Quote Link to comment Share on other sites More sharing options...
Koryu1212(Dan D) Posted July 8, 2018 Author Share Posted July 8, 2018 After trimming gave everything a quick dunk in my tub to wash off any casting residue...I also acquired a sewing machine from the base MWR (Morale Welfare and Recreation)...first time using one, but you’ve gotta love YouTube! Learned how to sew a “box stitch”. My Garrison mentor showed my how to add nylon webbing to the elastic, which adds a reinforcement to the snaps and keeps them from pulling out of the elastic...I also became friends with the staff of my local JoAnns and began receiving things from Imperial Procurement (read Amazon) Pauldron, split rivets, tube stripe templates and helmet fans from TrooperBay...neck seal from Imperial Seamstress out of England. My boots where ordered from Imperial Boots.Pouches from Blaster8266...E-11 “Standard” grade from HyperFirm and nomex flight gloves from off EBay...I also purchased some Italian made leather gloves (not pictured)...Sent from my iPhone using Tapatalk Quote Link to comment Share on other sites More sharing options...
Koryu1212(Dan D) Posted July 8, 2018 Author Share Posted July 8, 2018 Our Garrison held their monthly armor party so prior to that I went ahead and cut all my cover strips and made a lot of snap plates. I used Tandy line 20 snaps.Sent from my iPhone using Tapatalk Quote Link to comment Share on other sites More sharing options...
Koryu1212(Dan D) Posted July 8, 2018 Author Share Posted July 8, 2018 Results from the armor party...my mentor made my canvas belt for me and showed me how to “butt join” using CA glue (Zap-a-gap) and accelerant...measure twice, glue once Sent from my iPhone using Tapatalk Quote Link to comment Share on other sites More sharing options...
Koryu1212(Dan D) Posted July 9, 2018 Author Share Posted July 9, 2018 Glueing it all together...again my mentor showed me the “how to glue a butt join” at our Garrison armor party starting with the biceps and forearms. From there I measured, trimmed and glued the rest together by myself...starting with the thighs and then the shins...Starting to add the cover strips...thighs than the forearms and biceps finishing up with the shins. For the back closure on my shins I used white Velcro...Reference picture of a screen used thigh off of FISD...I filled in the gap at the bottom of each thigh piece with ABS paste I brewed up using my shavings and acetone. It came out the consistency of white out and worked beautifully! Also glued my ab buttons...Sent from my iPhone using Tapatalk Quote Link to comment Share on other sites More sharing options...
Koryu1212(Dan D) Posted July 9, 2018 Author Share Posted July 9, 2018 Thigh ammo pack install...waist belt and thigh pack were bent using a heat gun and two paint stir sticks...My trim lines...Trimmed and Holes drilled...Tools to bend over and flatten out the split-rivets...One side at a time...And, done! I added a little bit of CA glue in specific spots to hold it in place...Sent from my iPhone using Tapatalk Quote Link to comment Share on other sites More sharing options...
Koryu1212(Dan D) Posted July 9, 2018 Author Share Posted July 9, 2018 Sniper plate install...basically followed Pandatrooper’s tutorial...Added some internal ABS strips to form a base for the backplate to adhere to...Sanded that flush...Added another piece of ABS for reinforcement...Holes marked and drilled...Rivets placed and set (unsure you use backing washers)...And, done...Sent from my iPhone using Tapatalk Quote Link to comment Share on other sites More sharing options...
Koryu1212(Dan D) Posted July 9, 2018 Author Share Posted July 9, 2018 Time to start strapping it all together.Abdominal and Kidney plate fit and split rivet install...Blue tape test fit...Holes marked for split rivet install...I used Billgrams guide for placement off of FISD forums...Han snap...Codpiece split rivet placement...Butt plate snap placement...Viola...Sewed small and large Velcro hook panels and added pile Velcro to sides...Test fit...Sent from my iPhone using Tapatalk Quote Link to comment Share on other sites More sharing options...
Koryu1212(Dan D) Posted July 9, 2018 Author Share Posted July 9, 2018 Canvas belt snap to abdominal install along with the ABS ammo belt and leather pouch mount...Test fit and center marked...Male snaps marked and installed on abdominal armor; marked and placed on canvas belt...ABS ammo belt attached via rivets to canvas belt...Test fit...My fix for attaching small Spanish pouch to belt.Using a heat gun I bent an ABS strip around the “D” ring...Measured against width of canvas belt...Trimmed it to width and added hook Velcro to ABS strip. Added pile Velcro to belt with lock tight (I sewed it later).And my “Stop that Ship” load out...Sent from my iPhone using Tapatalk 1 Quote Link to comment Share on other sites More sharing options...
Hausi Posted July 9, 2018 Share Posted July 9, 2018 Nice job so far mate! That's a very interesting and innovative way of attaching the sniper plate. Keep up the good work Quote Link to comment Share on other sites More sharing options...
dutchy Posted July 10, 2018 Share Posted July 10, 2018 Now this is a WIP thread!! It's good to see that you've documented every step of the build process so far Quote Link to comment Share on other sites More sharing options...
Koryu1212(Dan D) Posted July 10, 2018 Author Share Posted July 10, 2018 2 hours ago, dutchy said: Now this is a WIP thread!! It's good to see that you've documented every step of the build process so far Thank you! Will try and finish up posting the rest of the build tonight... 1 Quote Link to comment Share on other sites More sharing options...
Koryu1212(Dan D) Posted July 10, 2018 Author Share Posted July 10, 2018 Strapping everything together.My Thigh garter system set-up...Glued snap plates...Box stitched nylon webbing to the elastic. I also stitched some hook Velcro as a back-up to the snaps...Female snaps set...Pile Velcro added just above the snap plate...Snapped into place...Measured and triple-stitched the loop for the belt...I used a Mil-spec belt since it is very stiff and even though the thighs do not weigh a lot, the stiffness of the belt helps with balancing the load between the hips and lower back...Test picture...Sent from my iPhone using Tapatalk Quote Link to comment Share on other sites More sharing options...
Koryu1212(Dan D) Posted July 11, 2018 Author Share Posted July 11, 2018 Strapping continued...Sewed several elastic straps...Female snaps added and started “snapping” together...Using my last split rivet I installed the “crotch” strap...I placed a piece of pile Velcro over the rivet so I wouldn’t tear a hole in my under armor and I used 2” heavy duty elastic, triple stitched with nylon for the female snaps since that is a high stress point ...And there you have it, all strapped together...Test picture...Sent from my iPhone using Tapatalk Quote Link to comment Share on other sites More sharing options...
Koryu1212(Dan D) Posted July 11, 2018 Author Share Posted July 11, 2018 Arms and biceps and shoulder bell assembly.I used dental floss to sew on the “sew on snaps”...Female snaps added to both the shoulder bells and biceps...think I nailed the length!Test fit with pauldron...Used same 2” elastic on the biceps to forearm assembly...set them on the “inside” right at the elbow joint so that the elastic is “hidden” by my under suit...snap plates glued...Elastic and nylon webbing box stitched and measured; added female snaps...1” elastic sewn with hook Velcro to go around the biceps...And there...all done! Sent from my iPhone using Tapatalk Quote Link to comment Share on other sites More sharing options...
Koryu1212(Dan D) Posted July 11, 2018 Author Share Posted July 11, 2018 Hand plates.I used my heat gun and formed the plates around the back of my hand (nomex is heat resistant after all)...1” elastic with nylon webbing stitched so the CA glue would be able to form a strong bond with the ABS...With nomex gloves...I recently bought a pair of women’s unlined Italian leather driving gloves and sewed a 3” elastic cuff around them and have my nomex as a back up...the leather ones are what I am wearing in my troop pictures posted elsewhere on this site Sent from my iPhone using Tapatalk Quote Link to comment Share on other sites More sharing options...
Koryu1212(Dan D) Posted July 11, 2018 Author Share Posted July 11, 2018 The next day I found a package on my desk!Not going to lie...I couldn’t wait to get back to my barracks room LOLFits like a glove! I had to add some Velcro to the top of my boots to keep my shins from pushing up and rolling around, and so far it’s held up very well! Went ahead and added some nylon screws to my return edge on my chest plate and painted all my rivets...Strapping completed...Time to break out that last box Sent from my iPhone using Tapatalk Quote Link to comment Share on other sites More sharing options...
Koryu1212(Dan D) Posted July 12, 2018 Author Share Posted July 12, 2018 Helmet build. Just like my suit I’ll break it down by trimming, and assembly...As I am emulating the “stop that ship trooper “ I downloaded several pictures off of Star Wars Helmets... Trimming...Penciled in my cut lines first starting with the cap-n-back...Then the faceplate...Starting with the cap-n-back; I punched a hole at the junction near the forward traps to prevent tearing and used lexan scissors to cut the brow...used an Xacto knife on the rest...Results...Sent from my iPhone using Tapatalk Quote Link to comment Share on other sites More sharing options...
Koryu1212(Dan D) Posted July 12, 2018 Author Share Posted July 12, 2018 Trimming continued...Faceplate...Took a deep breath and broke out the dremel with sanding and cutting wheels...Sanded out the teeth first...just enough to be able to finish cutting out with Xacto knife...Switched over to cutting wheel for eyes...I cut them out from the inside...Not too bad...Sanded smooth...Cut out the teeth with Xacto knife and sanded with these little sanding sticks I found at Hobby Lobby...Finished sanding...Again, quick dip in the sink to wash off any casting residue...Sent from my iPhone using Tapatalk Quote Link to comment Share on other sites More sharing options...
Koryu1212(Dan D) Posted July 12, 2018 Author Share Posted July 12, 2018 Assembly...brow trim and riveting face to cap...Measure brow trim...Drilled and set first rivet...Second one set...Think I nailed it! Drilled and set the remaining rivets...Sent from my iPhone using Tapatalk Quote Link to comment Share on other sites More sharing options...
Koryu1212(Dan D) Posted July 12, 2018 Author Share Posted July 12, 2018 Now comes the most dreaded part of the build...the ears! So this is how I did it and only used one set...pictures uploaded medium resolution for details I penciled in my cut lines...and for the cap I read somewhere on the FISD forum that you must leave a straight cut out just before the ear curves, which is indicated by the arrow coming off the “cap”...I also used blue tape to mark a straight line around the cap...Using the cutting wheel, I first made my cuts around the cap...starting with the “right” ear...I then switched to a cutting bit and cut just outside my cut-line...Repeat for the “left”...Sanded the “cap” flat on both...And using a sanding wheel, I started removing a LITTLE AT A TIME off the curve checking both the front and back...starting with the “right” ear...Close enough...repeat for “left” ear...Good enough since the originals were gapped all over the place...holes marked and drilled on both ears and helmet...Both ears bolted down tight...And, done Sent from my iPhone using Tapatalk Quote Link to comment Share on other sites More sharing options...
Koryu1212(Dan D) Posted July 12, 2018 Author Share Posted July 12, 2018 Time to put my commercial art degree to use Laid down one coat of grey on my teeth first then switched brushes and painted the black lines around the traps, tears, ears and vocoder...While I waited for that to dry I cut and shaped my lens and painted my hovi-mics...After waiting a day for the black to dry I “cut in” the grey on the traps, tears and added a second coat to my teeth...“Joker” smile and another coat to the vocoder...Pressed in my mesh on my hovi-mics while I waited a day for that coat to dry and then added another...Installed my lens as well...Sent from my iPhone using Tapatalk Quote Link to comment Share on other sites More sharing options...
Koryu1212(Dan D) Posted July 12, 2018 Author Share Posted July 12, 2018 Adding the paint chips, runs and crack as per the “Stop that Ship” helmet as well as hand painted in the tube stripes...Damage penciled in...Blue tape was used to mask the run and crack...chips and crack painted with testors olive drab...At this point I painted in the tube stripes...Adding in the paint runs using my ABS paste mixture...Results...Time to “get dirty”!!Sent from my iPhone using Tapatalk Quote Link to comment Share on other sites More sharing options...

Recommended Posts
Join the conversation
You can post now and register later. If you have an account, sign in now to post with your account.