Wook1138 Posted July 22, 2018 Author Share Posted July 22, 2018 First crack at weathering - let me know what you think. So, I’m trying to find a balance between what looks good on camera and what looks good in person. I found that my previous test looked pretty good in person but seemed pretty soft in pictures. Because of this I decided to punch up the weathering a bit. I started with the shins since I tend to weather too much and the shins are typically the dirtiest part. Started by using a sponge to apply burnt umber acrylic paint. I kept on dabbing until the paint was pretty much dry. Wiped away most of the paint with a damp shop towel. Did the same thing with black paint but only in some areas and used more of a wash than applying paint straight out of the tube. I did two coats with the airbrush. One layer was a brown-grey colour and the other is sand coloured. So, four different colours in total were used. Final Reference In sunlight with a clean thigh for comparison. So, then I jumped into it. First try was too dark. So I had to tone it down with white paint. Compared to shins. Closer pic with flash. The shins look too different than the chest. The shins are richer in colour and contrast. Question is, which gets redone? I think I will give the chest another go tomorrow - it looks too "painted on" anyways. Or am I letting the OCD get the best of me? Quote Link to comment Share on other sites More sharing options...
Airborne Trooper Posted July 23, 2018 Share Posted July 23, 2018 The "stripes" on the chest color looks off to me. I like the texture and color on the right shin the best. Quote Link to comment Share on other sites More sharing options...
Wook1138 Posted July 23, 2018 Author Share Posted July 23, 2018 The "stripes" on the chest color looks off to me. I like the texture and color on the right shin the best. This is the second try. No black added yet. Sent from my iPhone using Tapatalk Quote Link to comment Share on other sites More sharing options...
Airborne Trooper Posted July 23, 2018 Share Posted July 23, 2018 1 Quote Link to comment Share on other sites More sharing options...
Wook1138 Posted July 23, 2018 Author Share Posted July 23, 2018 I happened across this pic. Looks like the trooper second from the right with the white pauldron is wearing the captain’s armour - aside from the cheese grater hand guards. Sent from my iPhone using Tapatalk Quote Link to comment Share on other sites More sharing options...
Wook1138 Posted July 26, 2018 Author Share Posted July 26, 2018 Update on weathering. It is a slow process but I am adding washes of black acrylic paint and burnt umber acrylic paint over the armour to build up the dirtier areas. Just the arms and helmet (hard parts) left to do then I can dust the armour with a couple layers of airbrush. Sent from my iPhone using Tapatalk Quote Link to comment Share on other sites More sharing options...
Wook1138 Posted July 30, 2018 Author Share Posted July 30, 2018 Weathering of everything but the helmet and soft parts is done. I also removed the paint run line from the helmet and redid it with a better colour. I also added the cheek crack and some random spots of HDPE green to simulate paint chips. Of course I won’t have as many chips as the non-screen capture reference pics since they are way after the fact, but they do give ideas as to where the paint may have chipped off. Overall the weathering is stronger than I planned, much stronger, but I’m generally happy with it. Quote Link to comment Share on other sites More sharing options...
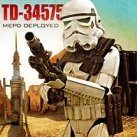
Wook1138 Posted August 1, 2018 Author Share Posted August 1, 2018 Last major weathering hurdle - the bucket. There isn’t much reference for the left side or back so I took some artistic license. I still need to attach the Hovi mics and install the lens. Reference Quote Link to comment Share on other sites More sharing options...
Hausi Posted August 1, 2018 Share Posted August 1, 2018 Helmet looks good already, nice job but I'll stick with one of my previous posts in this thread: there will have to be larger gaps on the ears. Quote Link to comment Share on other sites More sharing options...
Wook1138 Posted August 1, 2018 Author Share Posted August 1, 2018 4 hours ago, Hausi said: Helmet looks good already, nice job but I'll stick with one of my previous posts in this thread: there will have to be larger gaps on the ears. Thanks... and yes, I need larger gaps. 1 Quote Link to comment Share on other sites More sharing options...
Wook1138 Posted August 1, 2018 Author Share Posted August 1, 2018 Helmet looks good already, nice job:duim: but I'll stick with one of my previous posts in this thread: there will have to be larger gaps on the ears. Hey Hausi, how is this? Does the back of the ear have the same gap? Thanks. Sent from my iPhone using Tapatalk Quote Link to comment Share on other sites More sharing options...
Wook1138 Posted August 2, 2018 Author Share Posted August 2, 2018 Took some pictures in the sunlight. It knocks down the weathering a bit. I'm glad I went heavier with the weathering than I planned. By the way, do most TDs use the thinner green acetate lens or the heavier, darker lens (like from Trooperbay)? I have the thinner lens in there now as I believe that is more screen accurate but it seems it would be pretty easy for people to see my eyes - even with my balaclava on. Sent from my iPhone using Tapatalk Quote Link to comment Share on other sites More sharing options...
Wook1138 Posted August 2, 2018 Author Share Posted August 2, 2018 First test fit with the weathering and pauldron. Still need to make my thigh garter (temp setup being used) and proper shoulder straps. And yes, those are my dancing shoes (need to weather boots, pauldron, and pouches). I didn’t bother with the pouches but the wife snapped a few pics of the fitting so I tried some poses. Daniel, I was in a hurry and totally botched the pose. Next time And I need to finish the T-21. Sent from my iPhone using Tapatalk Quote Link to comment Share on other sites More sharing options...
Hausi Posted August 2, 2018 Share Posted August 2, 2018 Your gear suits you very well, looks awesome, mate! As far as the ears are concerned, the gaps will have to be even larger, mine were large from the beginning and I had to make them even larger. In some scenes you can even see the light shining through those gaps. You already know my and M4vrick's SWAT threads. 1 Quote Link to comment Share on other sites More sharing options...
Airborne Trooper Posted August 3, 2018 Share Posted August 3, 2018 I’m more of a fan of the thicker green lenses for the purpose of people not being able to see through them. 1 Quote Link to comment Share on other sites More sharing options...
Wook1138 Posted August 3, 2018 Author Share Posted August 3, 2018 2 hours ago, Airborne Trooper said: I’m more of a fan of the thicker green lenses for the purpose of people not being able to see through them. Yeah, this was my first time wearing the thin lens. I can totally see my eyes in the pic. I agree, screen accurate or not, I’m putting in the dark lens. Quote Link to comment Share on other sites More sharing options...
Wook1138 Posted August 11, 2018 Author Share Posted August 11, 2018 Darker lens and s-trim installed. Need to add some fans. More ear trimming. Baby steps. Yeah, I could probably stand to trim a bit more off. Compare pics after and before distressing the MP40 pouches. I used 220 and 600 grit sandpaper and a wire brush. Distressing small Spanish pouches. After and before. I roughed up the pauldron but the effect does not really show very well in photos, so I won’t show that. Pauldron after some black and brown paint washes. Boots got brown and dark grey washes. Everything got a few light coats of a dark grey/ sandy colour. I have pouches for both versions of the docking bay capt and cantina capt - so I should be good for whatever. Backpack #3 from CrookKnight should be shipping anytime now. Quote Link to comment Share on other sites More sharing options...
Harenatrooper Posted August 12, 2018 Share Posted August 12, 2018 I just wanted to say this looks amazing. I’m building my first ever armor and I’m doing a Sandtrooper. Wanted to thank you for putting up this build thread. It’s been super helpful to me. I refer to it all the time. Quote Link to comment Share on other sites More sharing options...
Wook1138 Posted August 12, 2018 Author Share Posted August 12, 2018 1 hour ago, Harenatrooper said: I just wanted to say this looks amazing. I’m building my first ever armor and I’m doing a Sandtrooper. Wanted to thank you for putting up this build thread. It’s been super helpful to me. I refer to it all the time. Thanks!! I'm glad it helped. Troopers helping troopers. 1 Quote Link to comment Share on other sites More sharing options...
Wook1138 Posted August 13, 2018 Author Share Posted August 13, 2018 DLT-19 upgrade. Since I want to also have the option of trooping as the cantina captain, I guess I need to dirty-up my DLT-19. I added some wire to the t tracks and added a bit of weathering. The DLT-19 is a 3D print I put together last year - it was actually the first thing related to the 501st that I built. This was my gateway build. Used dremel to make some notches in t-tracks. Installed wire. I used 19 gauge black wire. Might be a little thin but it is what I had on hand. Reference from Looksirdroids website. Light wash of light brown paint. It does not show up very well in photos. 1 Quote Link to comment Share on other sites More sharing options...
Hausi Posted August 18, 2018 Share Posted August 18, 2018 Beautiful work, your paint job looks very much like the real deal! 1 Quote Link to comment Share on other sites More sharing options...
TheSwede Posted August 18, 2018 Share Posted August 18, 2018 Awesome work Greg I said it before but can`t wait to see it all finished 1 Quote Link to comment Share on other sites More sharing options...
Wook1138 Posted August 18, 2018 Author Share Posted August 18, 2018 1 hour ago, Hausi said: Beautiful work, your paint job looks very much like the real deal! Thanks! Quote Link to comment Share on other sites More sharing options...
Wook1138 Posted August 18, 2018 Author Share Posted August 18, 2018 1 hour ago, TheSwede said: Awesome work Gred I said it before but can`t wait to see it all finished Yeah, me too. 1 Quote Link to comment Share on other sites More sharing options...
TheSwede Posted August 18, 2018 Share Posted August 18, 2018 11 minutes ago, Wook1138 said: Yeah, me too. Well then...get on with it Quote Link to comment Share on other sites More sharing options...

Recommended Posts
Join the conversation
You can post now and register later. If you have an account, sign in now to post with your account.