TheMaddHatter Posted April 5, 2017 Share Posted April 5, 2017 Name: Sean Macready 501st ID: TD-42887 MEPD Forum Name: Smacready Garrison: Southern California Garrison photo gallery: https://www.icloud.com/sharedalbum/#B0g5fk75v8zjOH Quote Link to comment Share on other sites More sharing options...
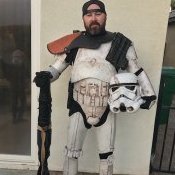
SCRIBBLER Posted April 5, 2017 Share Posted April 5, 2017 @ Sean - Thank you for your interest in joining the proud officers of the MEPD, Brother! Let's begin... APPLICATION REVIEW (PART 1) Name: Sean Macready Legion ID #: TD-42887 Forum Name: Smacready Garrison: Southern California Garrison I.) HELMET: a.) Green Lenses -- (See Comments) b.) Paint Color on Traps / Tears -- CHECK c.) Correct Number Of Teeth -- CHECK d.) Mic Tips -- CHECK e.) Vocoder Color (Black) -- CHECK f.) Tube Stripes -- CHECK g.) Rank Bar -- CHECK h.) Brow -- CHECK i.) Side Screws (Ears): CHECK ** Additional Comments -- -- DEPLOYMENT OFFICER NOTES:: Just need to confirm that you have green lenses in your bucket! The ol' flashlight in the helmet trick is the usual go-to move here. Other than that, your lid looks aces! II.) Armor / Suit Details: a.) Canvas / Nylon Straps -- (See Comments) b.) Neck Seal -- CHECK c.) Black Undersuit -- CHECK d.) Shoulder Bells -- CHECK e.) Biceps -- CHECK f.) Forearms -- CHECK g.) Pauldron -- CHECK h.) Chest / Back Plate -- CHECK I.) Kidney / Butt Plate -- CHECK j.) Ab Plate / Side Rivets / Cod -- (See Comments) k.) Thighs -- CHECK l.) Shins / Calves -- CHECK m.) Sniper Plate -- CHECK n.) Boots -- CHECK o.) Gloves -- CHECK p.) Hand Plates / Guards -- CHECK q.) Ammo Belt (Waist) w/ correct Angled Edges -- CHECK r.) Ammo Belt (Right Knee) -- CHECK s.) Canvas Belt -- (See Comments) t.) Pouches -- CHECK u.) Weathering -- (See Comments) v.) Crotch Snaps -- CHECK -- DEPLOYMENT OFFICER NOTES:: Great looking armor and gear, Troop! You are almost there! I was going to note that your 'dirty details' might need some work (muting on some of the heavier weathered sections) but the dark accents look lighter in the outside pictures. So you might be ok. I would recommend that you experiment with adding a little light ochre / cream washes / accents to some of the darker areas to mimic the 'Tatooine Sand' look. What I do need is to see mods and updated pics of the following (Per CRL: SANDTROOPER): - Canvas/ Nylon Shoulder Straps - Correct Upper Right AB snap - Side Rivets (Left Side) 6 total - Canvas Belt appears a bit 'clean'. Could be the lighting, but you may need to dirty it up a bit more. Once those requests check out we can move onto the final phase of your deployment process! III.) BACKPACK: a.) Details -- CHECK b..) Weathering -- CHECK -- DEPLOYMENT OFFICER NOTES:: Excellent looking pack and all details meet the requirements! IV.) WEAPON(S): T-21 a.) Details -- CHECK b..) Weathering -- CHECK -- DEPLOYMENT OFFICER NOTES:: Outstanding T-21! The true BFG! Quote Link to comment Share on other sites More sharing options...
spOOL68 Posted April 5, 2017 Share Posted April 5, 2017 Looking good Sean! Almost there! Quote Link to comment Share on other sites More sharing options...
jcalus Posted April 5, 2017 Share Posted April 5, 2017 Nice work! Gear looks great.Sent from my HTC One_M8 using Tapatalk Quote Link to comment Share on other sites More sharing options...
TheMaddHatter Posted April 5, 2017 Author Share Posted April 5, 2017 Looking good Sean! Almost there! Thanks so much! I really appreciate it.Sent from my iPhone using Tapatalk Pro Quote Link to comment Share on other sites More sharing options...
TheMaddHatter Posted April 5, 2017 Author Share Posted April 5, 2017 Nice work! Gear looks great.Sent from my HTC One_M8 using TapatalkThanks a ton!Sent from my iPhone using Tapatalk Pro Quote Link to comment Share on other sites More sharing options...
TD42115 Posted April 5, 2017 Share Posted April 5, 2017 Almost there trooper.. Quote Link to comment Share on other sites More sharing options...
TheMaddHatter Posted April 5, 2017 Author Share Posted April 5, 2017 Almost there trooper.. Pretty easy stuff to get through. Hopefully done soon! Sent from my iPhone using Tapatalk Pro Quote Link to comment Share on other sites More sharing options...
trooper1 Posted April 5, 2017 Share Posted April 5, 2017 Your almost there yes indeed. may I ask what Pauldron you are wearing. Just looking for the puffy segments, and didn't recognize the larger neck straps. Quote Link to comment Share on other sites More sharing options...
TheMaddHatter Posted April 6, 2017 Author Share Posted April 6, 2017 Your almost there yes indeed.may I ask what Pauldron you are wearing. Just looking for the puffy segments, and didn't recognize the larger neck straps. I believe it is Trooper bay. Not a fan of the neck strap. It was a thicker leather material. It sat very high and affected the way my bucket sat. I ended up changing them out for a thinner vinyl. Sent from my iPhone using Tapatalk Pro Quote Link to comment Share on other sites More sharing options...
TheMaddHatter Posted April 6, 2017 Author Share Posted April 6, 2017 StrapsSent from my iPhone using Tapatalk Pro Quote Link to comment Share on other sites More sharing options...
TheMaddHatter Posted April 6, 2017 Author Share Posted April 6, 2017 Ab snapSent from my iPhone using Tapatalk Pro Quote Link to comment Share on other sites More sharing options...
TheMaddHatter Posted April 6, 2017 Author Share Posted April 6, 2017 RivetsSent from my iPhone using Tapatalk Pro Quote Link to comment Share on other sites More sharing options...
TheMaddHatter Posted April 6, 2017 Author Share Posted April 6, 2017 LensesSent from my iPhone using Tapatalk Pro Quote Link to comment Share on other sites More sharing options...
TheMaddHatter Posted April 6, 2017 Author Share Posted April 6, 2017 Updated beltSent from my iPhone using Tapatalk Pro Quote Link to comment Share on other sites More sharing options...
Airborne Trooper Posted April 6, 2017 Share Posted April 6, 2017 The ab snap is incorrect. You need a male snap there, the base is what's exposed on the exterior of the armor. The actual snap part is on the inside. Just swap out the female snap you have for a male one. Also, you're going to need to add a shim to your kidney. Per the CRL: For level two certification (if applicable): Armor side gaps are closed or nearly closed. No more than 1/2 inch (12.7 mm) gap on either side. This is done by adding a shim (or shims) of a similar type and color of material as the Abdomen and Back Armor. Shims fit flush and may have seams, though ideally they will be seamless to the Abdomen and/or Back Armor, resulting in a single seam between the two rather than extra seams where the shims are joined. You're definitely on the right track to deployment! Quote Link to comment Share on other sites More sharing options...
SCRIBBLER Posted April 6, 2017 Share Posted April 6, 2017 @ Sean - Your mod updates look better! You are almost there! There are just a few more minor details that need to be taken care of, Brother! Let's continue... APPLICATION REVIEW (PART 2) Name: Sean Macready Legion ID #: TD-42887 Forum Name: Smacready Garrison: Southern California Garrison I.) HELMET: a.) Green Lenses -- CHECK ** Additional Comments -- -- DEPLOYMENT OFFICER NOTES:: Perfect! You are good to go here! II.) Armor / Suit Details: a.) Canvas / Nylon Straps -- CHECK g.) Pauldron -- CHECK j.) Ab Plate / Side Rivets / Cod -- (See Comments) s.) Canvas Belt -- CHECK u.) Weathering -- CHECK -- DEPLOYMENT OFFICER NOTES:: Great looking armor and gear, Troop! A couple of tweaks and you'll be all set. You are almost there! - Ab Plate As noted, you will need to add a shim to close the gap a bit on your sides (Kidney Plate). Not to the point of closure or even hairline thin. Just enough to lessen the space. We understand that body shapes are all different here. We are just trying to get everybody as close to uniform in appearance as we can! Outstanding work so far! - Correct Upper Right AB snap You'll have to swap yours out for the more accurate piece. The placement is spot on though! PER CRL -- One snap on the top right hand side of the Abdomen Armor: -- Back of male side of snap shows on outside of Abdomen Armor. Quote Link to comment Share on other sites More sharing options...
ritzmike Posted April 6, 2017 Share Posted April 6, 2017 Nice rig man!Sent from my iPhone using Tapatalk Quote Link to comment Share on other sites More sharing options...
TheMaddHatter Posted April 6, 2017 Author Share Posted April 6, 2017 @ Sean - Your mod updates look better! You are almost there! There are just a few more minor details that need to be taken care of, Brother! Let's continue... APPLICATION REVIEW (PART 2)Name: Sean Macready Legion ID #: TD-42887Forum Name: SmacreadyGarrison: Southern California Garrison I.) HELMET:a.) Green Lenses -- CHECK** Additional Comments -- -- DEPLOYMENT OFFICER NOTES::Perfect! You are good to go here! II.) Armor / Suit Details:a.) Canvas / Nylon Straps -- CHECKg.) Pauldron -- CHECKj.) Ab Plate / Side Rivets / Cod -- (See Comments)s.) Canvas Belt -- CHECKu.) Weathering -- CHECK -- DEPLOYMENT OFFICER NOTES::Great looking armor and gear, Troop! A couple of tweaks and you'll be all set. You are almost there!- Ab PlateAs noted, you will need to add a shim to close the gap a bit on your sides (Kidney Plate). Not to the point of closure or even hairline thin. Just enough to lessen the space. We understand that body shapes are all different here. We are just trying to get everybody as close to uniform in appearance as we can! Outstanding work so far! - Correct Upper Right AB snapYou'll have to swap yours out for the more accurate piece. The placement is spot on though! PER CRL -- One snap on the top right hand side of the Abdomen Armor: -- Back of male side of snap shows on outside of Abdomen Armor. The shims I'll figure out but I'm confused on the ab snap. The photo I showed was the "back of a male side of snap." It's the same as I used for my TK. I don't see any thing specific about the actual look. I see the example and it looks like it is one of many types of backings. Can you clarify? Sent from my iPhone using Tapatalk Pro Quote Link to comment Share on other sites More sharing options...
Airborne Trooper Posted April 6, 2017 Share Posted April 6, 2017 The visible part should be the eyelet which is connected to the stud. You have the button portion Quote Link to comment Share on other sites More sharing options...
SCRIBBLER Posted April 6, 2017 Share Posted April 6, 2017 Exactly! It should look more like this as opposed to flat side. Quote Link to comment Share on other sites More sharing options...
TheMaddHatter Posted April 6, 2017 Author Share Posted April 6, 2017 51 minutes ago, SCRIBBLER said: Exactly! It should look more like this as opposed to flat side. Got it. Quote Link to comment Share on other sites More sharing options...
SCRIBBLER Posted April 6, 2017 Share Posted April 6, 2017 Quote Link to comment Share on other sites More sharing options...
TheMaddHatter Posted April 7, 2017 Author Share Posted April 7, 2017 Kidney shims Sent from my iPhone using Tapatalk Pro Quote Link to comment Share on other sites More sharing options...
TheMaddHatter Posted April 7, 2017 Author Share Posted April 7, 2017 Ab snapSent from my iPhone using Tapatalk Pro Quote Link to comment Share on other sites More sharing options...

Recommended Posts
Join the conversation
You can post now and register later. If you have an account, sign in now to post with your account.