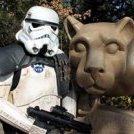
Jplatzer Posted January 12, 2017 Share Posted January 12, 2017 Name: James Platzer 501st TD ID: TD 11029 http://www.501st.com/members/displaymember.php?userID=18309&costumeID=2 MEPD forum name: jplatzer Garrison: Garrison Carida Weapons: E-11 Sent from my iPhone using Tapatalk Quote Link to comment Share on other sites More sharing options...
LoveMonkey Posted January 12, 2017 Share Posted January 12, 2017 Your kit looks good. However, in order to reach level 2 (deployment), you'll need a backpack. Quote Link to comment Share on other sites More sharing options...
Airborne Trooper Posted January 12, 2017 Share Posted January 12, 2017 You also need to replace the 4 button strip with a 3 button one and the nylon that attaches the chest and back over your shoulders needs to be replaced with elastic. Quote Link to comment Share on other sites More sharing options...
Baron Posted January 13, 2017 Share Posted January 13, 2017 Kit looks pretty good. Aside from what the fellas above mentioned, you'll need to change the tube stripes from the decals that are on it and hand paint them on. And you will need a back pack for P.O. And I don't think the Hasbro conversions are allowed anymore either. Good luck man!!!!! Quote Link to comment Share on other sites More sharing options...
Felice Posted January 19, 2017 Share Posted January 19, 2017 Hi James! Welcome and thank you for your interest in becoming an MEPD Deployed Officer! There are some changes and some missing things but I will start the Review for a better orientation. Application Review Name: James Platzer Legion ID: 11029 Forum Name: jplatzer Garrison: Garrison Carida Helmet a. Green lenses: see comments b. Paint color of traps / tears: check c. Correct number of teeth: check d. Mic tips: check e. Vocoder color: check f. Tube stripes: see comments g. Rank bar on ears: check h. Brow: check i. Side screws (ears): check j. Weathering: check *additional comments* I Need to see a Detail Picture of your green lenses please. And it seems to be that your tube stripes are decals. For PO they Need to be Hand painted RESULT ON HELMET PENDING Armor details a. Elastic straps shoulders: see comments b. Neck seal: check c. Black undersuit: check d. Shoulder bells: check e. Biceps: check f. Forearms: check g. Pauldron: check h. Chest / back plate: check i. Kidney / butt plate: check j. Ab plate / side rivets / cod: see comments k. Strapping system: see comments l. Thighs:check m. shins / calves check n. sniper plate: check o. boots: check p. gloves: check q. hand plates / guards: check r. ammo belt (waist): see comments s. ammo belt (right knee): check t. canvas belt: check u. pouches: check v. weathering: check *additional comments* You have to replace the four button stripe on your Ab plate with a 3 button one. I have to see the mal rivet on the top right side of the Ab plate and I have to see the 6 side rivets of the Ab and Kidney plate-please. I also have to see the rivets on the cod section. I can't see the screws in the chest plate which show the simulated original strapping (don't Need to be functional). Can you Show me a more Detail Picture of your waist ammo belt please? Thank you dude! RESULT ON ARMOR PENDING Backpack a. details: b. weathering: *additional comments* You will Need a pack for PO RESULT ON BACKPACK PENDING Weapon a. details: see comments b. weathering: check *additional comments* To use a toy blaster is ok but you have to follow the CRLs. So please replace the scope and Show me the correct number of t-tracks (must be 6). Thank you. RESULT ON WEAPONS PENDING You have some homeworks James but we are a big brotherhood and here to help! Good luck and see you soon. Cheers, Felix Quote Link to comment Share on other sites More sharing options...

Recommended Posts
Join the conversation
You can post now and register later. If you have an account, sign in now to post with your account.