deadvision Posted May 27, 2015 Share Posted May 27, 2015 I think I know what you mean and I think I'm going to so the same. I do think there is the one snap on the right side that is exposed that is the face of it and not the back. That I can't cheat with a little paper holder Correct. I couldn't get around that. I did barely have room for it so it was okay. Quote Link to comment Share on other sites More sharing options...
TheDon Posted May 27, 2015 Author Share Posted May 27, 2015 Working on my strap system now and I have a few questions. My sides do not line up vertically but I figure the belt can help line them up. Net how do I mount the belt? I think I've seen a few posts where people have riveted it across the kidney and butt plate or maybe that was just a canvas patch with snaps? Do I trim the butt plate sides to line up with the kidney plate, I have AM armor so I figure the butt plate has some extra on the wings. Lastly, I need to trim the butt plate where the snaps mount to and redo the snaps After browsing the centurion area on FISD and the SWAT section here I did some work. I trimmed the butt piece where the snaps go so now it looks normal. Added the two snaps. I just need to trim the wings on the butt piece. Also, how in the world do you guys suit up on your own. I tried putting my boots on then my shins and it wasn't happening. Quote Link to comment Share on other sites More sharing options...
TheDon Posted May 29, 2015 Author Share Posted May 29, 2015 So looking over pandatroopers build I saw he was using elastic snaps and Velcro for his side closer system. I think I'll do the same since got the life of me I cannot get the sides to line up perfectly. Trimmed my butt plate sides yo be flush to the kidney plate. I suspect I needed yo trim an inch or two from the kidney plate but we shall see once I put the OIL panel and chest in. Quote Link to comment Share on other sites More sharing options...
deadvision Posted May 29, 2015 Share Posted May 29, 2015 Post a pic of the problem. Maybe we could help. And I don't think it's made to line up exact. Quote Link to comment Share on other sites More sharing options...
deadvision Posted May 29, 2015 Share Posted May 29, 2015 And to attach my belt I installed snaps directly onto my ab armor. Have you taken a look at the TK 4510 videos on youtube? They offer very solid building instructions. Quote Link to comment Share on other sites More sharing options...
TheDon Posted May 29, 2015 Author Share Posted May 29, 2015 So here are my gaps. When I measured and taped the sides up the tape helped line it all up nice and tight. I'm thinking of making Velcro patches to go over the elastic straps to help close it up. Not sure if you can see but I wonder if my kidney plate needs to be trimmed or should I trim the back armor. Lastly I need to figure out where to trim the shoulder plastic so I can make the shoulder elastic pieces. Quote Link to comment Share on other sites More sharing options...
FIVE Posted May 29, 2015 Share Posted May 29, 2015 The gaps look fantastic! The belt will easily close that up! I don't think any trimming is needed.Again, with the belt on you'll pull the "bottom" part inward and the "top" will probably flush out. What exactly do you need to know on the shoulder?? Quote Link to comment Share on other sites More sharing options...
TheDon Posted May 29, 2015 Author Share Posted May 29, 2015 The AM armor has some pretty long shoulder tabs so I need to trim them from the chest and back plate. How much of a tab should remain on the chest and back plate? Quote Link to comment Share on other sites More sharing options...
FIVE Posted May 29, 2015 Share Posted May 29, 2015 Ah! Look at this for reference. Quote Link to comment Share on other sites More sharing options...
TheDon Posted May 29, 2015 Author Share Posted May 29, 2015 Looks like a pile of garbage. I see how the chest and back plate are. Quote Link to comment Share on other sites More sharing options...
TheDon Posted May 31, 2015 Author Share Posted May 31, 2015 Chest plate and back plate have been trimmed a bit. Still need to trim the sides of the chest plate but I've got all of the snap plates in place and I'll make snap straps today to get everything together. Quote Link to comment Share on other sites More sharing options...
TheDon Posted May 31, 2015 Author Share Posted May 31, 2015 Put it all on, except the belt to see how it all fit. And it's pretty good! I need to adjust my left thigh, te bottom edge is pinching my knee skin and it left a nice mark. Totally need fans for the helmet, it gets very warm. Hands get very warm even with the harbor freight gloves I used and not the chemical gloves. I'll work on the belt next and get pictures of the side so you all can give me an idea where to trim the chest plate Quote Link to comment Share on other sites More sharing options...
deadvision Posted May 31, 2015 Share Posted May 31, 2015 Looking good brother. Now get dirty! Quote Link to comment Share on other sites More sharing options...
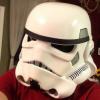
TheDon Posted June 1, 2015 Author Share Posted June 1, 2015 Thanks!! I now know the feeling of putting the armor on for the first time and seeing yourself in a picture. It's awesome. I'm probably going to go the pandatrooper route for weathering Quote Link to comment Share on other sites More sharing options...
trooper1 Posted June 1, 2015 Share Posted June 1, 2015 Cool!!!! I like it alot Quote Link to comment Share on other sites More sharing options...
TheDon Posted June 2, 2015 Author Share Posted June 2, 2015 Any suggestions on attaching the ammo pouches to my belt? I bought a small Spanish for the right side thinking I had to match an orange pauldron TD ( tuck and roll TD). That pouch has loops to o on the belt but my canvas mp40 pouches do not. I know the shoulder pouch is best on a backpack. ( next on my list once I get basic approval) Quote Link to comment Share on other sites More sharing options...
TheDon Posted June 3, 2015 Author Share Posted June 3, 2015 Snaps installed on the ab so the belt doesn't move. I may have extra holes in my armor.. We'll just call them "speed holes". A leather hole punch is very useful for putting holes in the belt(s). Hood the belt position is ok because it's all riveted together and glueing up now. Tomorrow I just need to make straps for my ab and back. Trim the ab sides, glue finish strips onto the biceps and then get weathering!!!! Quote Link to comment Share on other sites More sharing options...
TheDon Posted June 9, 2015 Author Share Posted June 9, 2015 Pretty much done. I'll take some basic photos for you all to critique before I send them in. No hand plates, waiting for glue to dry. Quote Link to comment Share on other sites More sharing options...
TheDon Posted June 10, 2015 Author Share Posted June 10, 2015 So I wore my armor today at an event at my church that was for middle school kids. Kind of a test flight of the sorts. Helmet lenses fogged up after 15 minutes, I didn't have a sweat band on my head so I need one. Afterwards I broke my canvas belt. I used rivets and washers to mount it to the belt and one pulled out. I'm going to repair the belt and use snaps. My hand guards with glued on elastic worked great with the harbor freight gloves I found. Stock aker microphone is terrible so I just ordered a throat mic. I'm considering wiring in two reed switches on the armor for PTT function since I was having issues with the ICOMM PTT button. Work to do tomorrow to get it ready for Approval. Fix belt Weather hand guards Make straps for chest to ab Figure out how to mount canvas ammo pouches to self...also make wood blocks to go in pouches. Quote Link to comment Share on other sites More sharing options...
TheDon Posted June 11, 2015 Author Share Posted June 11, 2015 So I made the elastic for the shoulder bells a little longer and they feel better now. I'm going to have to wear my ammo pouches at the hip and use snaps to attach them. I tried to get one to go on my left shoulder but I think the combination of elastic for my chest to back plate is causing me issues. I did cut some wood to fit in the pouches so they look full. Weathered the hand guards as well. I have one regret and that's with my canvas belt. I should have used snaps to attach the plastic to the canvas belt. One rivet pulled out and I had ripped the canvas. So I sewed some canvas over it and installed snaps for that spot .. I used snaps on the armor to help mount the belt and I didn't heat bend the belt since it bends well enough and you can sort of see the snaps. I suspect I might not pass approval with that. Quote Link to comment Share on other sites More sharing options...
TheDon Posted June 13, 2015 Author Share Posted June 13, 2015 I sent in my photos and did my application yesterday. Now I wait! I spent a lot of time researching others and looking at the reference photos and I feel good about my submission. Quote Link to comment Share on other sites More sharing options...
THE TROOPER Posted June 13, 2015 Share Posted June 13, 2015 All the best Joe on your submission. About the fogging......I would get a pair of fans in there, or, they make a special spray for divers to use on their lenses so they don't fog up. It's called spit. EBay or Amazon 7 bucks and it lasts all day bro . Get you some of that!!!!! x Quote Link to comment Share on other sites More sharing options...

Recommended Posts
Join the conversation
You can post now and register later. If you have an account, sign in now to post with your account.