Jancelot Posted August 11, 2014 Author Share Posted August 11, 2014 Gluing on the thighs continues. In the meantime I finished the strapping (snaps not pictured). I also added an extra layer of ABS on the belt holes to keep the Chicago screws from popping the covers off. Quote Link to comment Share on other sites More sharing options...
Jancelot Posted August 12, 2014 Author Share Posted August 12, 2014 How do you afix the shoulder ammo pack to the suit? Does it go on the backpack strap? How do you keep it in place? Quote Link to comment Share on other sites More sharing options...
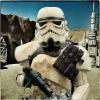
Jancelot Posted August 17, 2014 Author Share Posted August 17, 2014 Thighs complete and sniper attached. Thigh support, shoulder straps, and hooks on the greaves are next. Then test fit time! Quote Link to comment Share on other sites More sharing options...
Vf2112 Posted August 17, 2014 Share Posted August 17, 2014 Very nice almost to good to get dirty... Almost Quote Link to comment Share on other sites More sharing options...
Jancelot Posted August 22, 2014 Author Share Posted August 22, 2014 I've been working on the thigh support system. Picked up elastic for shoulders and thighs. Will have a test fit this weekend. Then on to weathering! Quote Link to comment Share on other sites More sharing options...
Jancelot Posted August 25, 2014 Author Share Posted August 25, 2014 Weekend went a bit sideways, but I did manage to whip up a batch of pouch stew. Quote Link to comment Share on other sites More sharing options...
Jancelot Posted August 26, 2014 Author Share Posted August 26, 2014 Home late from work, but had to do the fitting. Realized right away that the shoulder straps can be shortened by almost 2 inches. I'm still blown away by how much more room there is compared to the AP. Great for me. Definitely need to make a few adjustments. Torso comes up and the thighs with it. Let me know what else you see. Quote Link to comment Share on other sites More sharing options...
Jancelot Posted September 4, 2014 Author Share Posted September 4, 2014 Finished up the straps including obtaining elastic for the shoulders and thighs. Test fit tonight felt great. A few tweaks to make here an there but nothing critically out of alignment. What do you all think? Weathering supplies are on the way and will commence this weekend! Quote Link to comment Share on other sites More sharing options...
millenium1 Posted September 4, 2014 Share Posted September 4, 2014 Looks fantastic Christopher All the best with your weathering, i am 3 quarters done with mine I have a TM Sandy too Brother Quote Link to comment Share on other sites More sharing options...
Vf2112 Posted September 4, 2014 Share Posted September 4, 2014 Very nice fit like the backdrop too Quote Link to comment Share on other sites More sharing options...
syllander Posted September 4, 2014 Share Posted September 4, 2014 Great looking trooper man! Fits you well and looks like it's right out of the movie. Now go find the nearest dirt pile and dive in! My TM should ship in the next few days...very excited! Quote Link to comment Share on other sites More sharing options...
Baron Posted September 4, 2014 Share Posted September 4, 2014 Looks great! Good luck with the weathering. Are you planning on SWAT? Quote Link to comment Share on other sites More sharing options...
Jancelot Posted September 5, 2014 Author Share Posted September 5, 2014 Looks great! Good luck with the weathering. Are you planning on SWAT? Possibly. Not sure how many references there are for Sergeant Roadblock v2. Also, I like the flexibility of wearing a custom combination of screen accurate pouches (storage room for keys, trading cards). I was considering going with one roadblock and one small spanish on my belt. Oh, I want the option to swap out my blaster. Quote Link to comment Share on other sites More sharing options...
SMOKE Posted September 6, 2014 Share Posted September 6, 2014 I am right behind you Chis! Your armor looks great! You inspired me to get my done soon! Quote Link to comment Share on other sites More sharing options...
Vf2112 Posted September 6, 2014 Share Posted September 6, 2014 Yeah the roadblock pouch definately comes in handy Looking great brother Quote Link to comment Share on other sites More sharing options...
Jancelot Posted September 12, 2014 Author Share Posted September 12, 2014 Looking good, Mark! Slow and steady. Alright, wife and kid are out of town for 10 days. Major project time coming up. Funny thing, I have a TK troop at LDAC tomorrow and my other helmet is damaged. So I had to paint the trap stripes back on the bucket and strategically pull the brow trim down some. Doh. I'm looking to compile ref pics for SWAT level weathering for Sergeant Roadblock v2. So far the first pic seems to be the best one I've found. Too bad it's not in color, but the details are very nice. The second is him in the background again. Looks like the should pouch is a bit higher in that shot. Does anyone else have any others? I'm going to pull some shots off the BluRay tonight. *edit: compiling a list here Quote Link to comment Share on other sites More sharing options...
Vf2112 Posted September 12, 2014 Share Posted September 12, 2014 Good choice Ready!? GO!!! Quote Link to comment Share on other sites More sharing options...
Jancelot Posted September 15, 2014 Author Share Posted September 15, 2014 Hit the legs with burnt umber this evening. Using a modified version of Pandatrooper's technique. It was born out of panic when I realized my paint had dried very quickly. Grabbed #0 grade steel wool and saved the day. I'll hit it with the black and warm gray next. What do you think? Quote Link to comment Share on other sites More sharing options...
millenium1 Posted September 15, 2014 Share Posted September 15, 2014 Very effective and natural looking, looking forward to seeing the next passes Quote Link to comment Share on other sites More sharing options...
SMOKE Posted September 15, 2014 Share Posted September 15, 2014 Looks great! Great to see a white pauldron variant! Quote Link to comment Share on other sites More sharing options...
Smally Posted September 15, 2014 Share Posted September 15, 2014 Hi Chris, Firstly, great job on the build so far buddy, it looks great. Always remember to go to the original source for information/reference - especially when looking to apply for SWAT. If you compare your weathering to that in your reference pictures, you can see that it is too much and all in the wrong areas (following the seems). As for the 3 stage pigment paints used for weathering, this is an old method that we tend to avoid nowadays. We now know that Mollo used one colour for the Tunisia filming where the road block scene took place. Therefore I'd suggest using one colour, maybe burnt umber acrylic, for both the base weathering as well as detailing. This will be a lot more accurate and will flow much nicer on the armour. The weathering on the Road block SGT v2 would be easy to replicate with one colour, a spray bottle, and a sponge. 1) Dilute the paint with some water and spray onto the armour. Dab any running streaks with paper and then allow to dry. Repeat this process over and over until you've built up a nice base layer. 2) use the reference pictures and start detailing. Be very light at first as its easy to add more than to take off without rubbing off the base layer. 3) Once you're happy with the results, use a clear lacquer and seal the paint onto the armour - tip: use a CHEAP can of clear lacquer as when it is sprayed it'll apply in rough appearance and will be rough to touch once dried. This is the only good thing about cheap lacquer Keep up the hard work mate, and great choice in trooper to replicate Quote Link to comment Share on other sites More sharing options...
Jancelot Posted September 15, 2014 Author Share Posted September 15, 2014 Hi Brad. Thanks! Very helpful. Do you have any links to the info on Mollo? I always enjoy reading up on the backstory. Agreed, the weathering I have on and around the strips is far too much relative to the images. I'll have a go with the method you mentioned. Sounds similar to how I weathered my Snowie with tempura powder paint which is is a pleasure to use. Overall, per usual with pictures, I imagine the weathering is washed out in that top shot. Especially given the low quality of that image. The weathering in the middle and bottom images look much dirtier. Below I cropped the second from the left trooper. Chest pattern looks to match, minus the shoulder pouch. Honestly, I'm still on the fence about SWAT. At least for my initial pass. I'm absolutely on board for all of the build details on the list. But when it comes to exactly replicating a trooper I'm not so excited. For one, the weathering would have shifted quite often for an actual trooper. But mostly concerning the whole pouch arrangement and blaster restriction previously mentioned. That said, I do love a challenge and I imagine I'll go for it sooner or later. First goal is to get to approval and start trooping my TD! Quote Link to comment Share on other sites More sharing options...
Jancelot Posted September 16, 2014 Author Share Posted September 16, 2014 Knocked the weathering down in prep for take 2. Quote Link to comment Share on other sites More sharing options...
Smally Posted September 16, 2014 Share Posted September 16, 2014 Hi Chris, This information about the technique Mollo used came straight from Anthony Forrest himself. Myself, Justus, Dave Harris and Joe Versku (all members on here) have interviewed Anthony a few times over the years and he explained in one of those meetings that Mollo used a mixture of Tunisian sand/dirt, oil, and boot polish. This was all mixed together and produced a colour similar to the Burnt umber acrylic we use. You're right when you say "weathering washed out" as this is bound to happen over time, however there are two other things to remember that dulled down what we saw on screen 1) Camera filters 2) natural sunlight Both of these contributed heavily on dulling down the weathering on screen. Anthony said that he recalls the armour being heavily weathered when filming. Take a look at these pics, although not the best quality, we can see the heavily weathered armour in the first picture and in the second we can see a clean bit of armour behind AF's ammo belt: Sorry I couldnt shed any more light on the subject (pun intended ) Quote Link to comment Share on other sites More sharing options...
Vf2112 Posted September 16, 2014 Share Posted September 16, 2014 Awesome info bro awesome !!! Quote Link to comment Share on other sites More sharing options...

Recommended Posts
Join the conversation
You can post now and register later. If you have an account, sign in now to post with your account.