tytlinez Posted December 17, 2013 Share Posted December 17, 2013 Hi everyone. I just started my sons TD and finished the bucket. I will hopefully start the build thread soon as soon as I have some more time to work on it. Here is a quick shot of us with is first bucket try on. He is only five years old and he could not be more happy. Quote Link to comment Share on other sites More sharing options...
rottie Posted December 17, 2013 Share Posted December 17, 2013 nice!!! i see the tube strips made it..... where did you get the paldren? Quote Link to comment Share on other sites More sharing options...
DirtyBoy Posted December 19, 2013 Share Posted December 19, 2013 nice pic Quote Link to comment Share on other sites More sharing options...
Wolfman Posted December 29, 2013 Share Posted December 29, 2013 Yes! Where did you get the pauldron. My girls armor is built. Just need to strap it up. I had planned on making her pauldron (she wants it pink 😜) but that one looks awesome! Also I build T-21's. I was planning on scaling it down and building a couple to sell. Where did you find that one? Quote Link to comment Share on other sites More sharing options...
tytlinez Posted February 16, 2014 Author Share Posted February 16, 2014 I am making progress on the micro TD. My computer is down so i will load all of my build pics at once when it is fixed. Here is the progress with lots of little TD parts but joined with cover strips glued and ready to strap up! Quote Link to comment Share on other sites More sharing options...
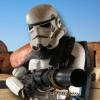
tytlinez Posted February 16, 2014 Author Share Posted February 16, 2014 Sorry fellas on the late response on the little pauldron and T-21. I bought them from Quartermaster on whitearmor. He had them from his son and I am not sure who made the little T-21 but it is pretty awesome. The pauldron is one of Panda Troopers and I purchased a mini move along from Dirty Boy that is just amazing. I have contacted Pandatrooper about matching spanish pouches in miniature. I will post a bunch of photos very soon on all the progress on it. This is the third set of armor I have built and I made it to police officer standards. I know he is only five but what the heck. If I am doing it, do it up! Here is a quick photo of me sizing little man up for the thighs. Quote Link to comment Share on other sites More sharing options...
Captain Jack Posted February 16, 2014 Share Posted February 16, 2014 Awesome job Tim. Looking good. I know this suit will be top notch. Keep up the good work bro. Quote Link to comment Share on other sites More sharing options...
Mr.Sandman Posted February 16, 2014 Share Posted February 16, 2014 Looking good..I wan't to something for my son too. Quote Link to comment Share on other sites More sharing options...
tytlinez Posted February 25, 2014 Author Share Posted February 25, 2014 Well, here goes! I have been working on my little guys TD armor that I purchased from Walt. I have been taking photos along the way while I have been building and just now put them into photo bucket. I apologize I have so many at once. I have been trying to build this as accurate as I possibly can with what is available. I can't use traditional strapping as I want to build it so he can be in it for a few seasons. This is for all the dads and little dudes out there that want to be on the bad side!Lots of little parts showed up at our house and I had a very excited little man.Mini hand guards and the smallest back plate I have ever seen.I ordered next this little move along pack from Dirty Boy-Thanks brother!Eyes, Teeth and rivets in the bucket ready for ear trimming and fitting.I installed the lens next.Hand painting the tears, vocoder and traps next.Next I installed the Hovi Mic tips and prepared the screen.And finally completed! Noah walks around with it on all the time now asking when the rest will be done.His bucket just joined our family at the table.I did the biceps and shoulder bells next.Forearms next. I trimmed them to fit and butt joined and used cover strips on every part.Thighs and Greaves next on the list.Cover strips on the back of the greaves closing to the inside per new CRLTD sniper plate had to be built up a bit to sit flush.Drying pieces and parts.Time for some fitting of the chest, back, abb,butt and kidney platesSplit rivet detail on the cod piece.Trimming the butt and kidney plates.Six split rivet detail on abb and kidney plates.Installing the button plateBelt next. I have the corners cut, belt sized and button covers in the accurate postion. Quote Link to comment Share on other sites More sharing options...
Captain Jack Posted February 26, 2014 Share Posted February 26, 2014 Looking awesome bro. Great work as always. Little man will be rocking it. Quote Link to comment Share on other sites More sharing options...
Cantina Security Posted February 26, 2014 Share Posted February 26, 2014 Fantastic work bro. Your boy has to be loving that ... Quote Link to comment Share on other sites More sharing options...
LeMaxim Posted February 26, 2014 Share Posted February 26, 2014 Fantastic! Looking forward to see this complete. Quote Link to comment Share on other sites More sharing options...

Recommended Posts
Join the conversation
You can post now and register later. If you have an account, sign in now to post with your account.