

Wook1138
-
Posts
181 -
Joined
-
Last visited
-
Days Won
17
Content Type
Events
Profiles
Forums
Everything posted by Wook1138
-
Sniper knee plate. A lot easier than a TK knee (for the AP kit at least). Added some pieces of plastic to the back and glued into place. I hope it is enough to hold. The shin is curved and the plate is flat, so I piled on the E6000 and will hope for the best. Reference - in addition to RoCko's pics. Also trimmed this guy. Reference pic
-
Yes it does. They are trimmed fairly thin. Thanks!
-
A few more things done on the build. Pretty much all the gluing is done with a few small exceptions. All holes are drilled and I think I'm ready for some strapping. Anyway, here is what I've been up to. Sizing the shins and thighs. Here is my crazy method of figuring out how much to trim off each side so that it fits and the seam will run at a nice angle down my leg. I hope it works. Belt and thigh ammo belt trimmed and ready for installation. Kept my trim to about 4mm - default for how Mark pulls these pieces. My 45° cut on the belt is 10mm to fit my canvas belt properly. The canvas belt is sitting a bit low in the picture, but it does meet up with where the 45° cut meets the outside edge. I had to do a whole whack of hot bathing and heat gun. I needed to reshape my kidney piece and make it not so wide. I traced the original shape on to cardboard for reference and used hot baths to squish the outsides in a little. This caused buckling of the top and bottom return edge, so I had to use a heat gun and some pieces of wood to reshape the return edge. Sorry no after pics, but it worked out pretty good - mind you, I am terrible at hot baths and heat guns. Also had to reshape how the back meets the kidney. This is an issue with my TK as well - no amount of strapping adjustments could fix it. the back seems to pivot at the outer edges when fitted to my body. This is the return edge along the top of the kidney and AB. The AB side flares up so I also had to reshape that too. Again, no "after" pics. But all is good now. Also shaped my shins to they close better and my posterior to avoid "butt flare". Marked the hole for the cod. Measured about 1-1/8 inch from end and drilled with 1/8" bit for a split rivet. Posterior. Two 5/32" drill holes for line 24 snap bases. I think I measured about 1" from edge and then another 7/8" for second hole. 5/32" hole for snap in right Ab connection. The hole ended up being about 18mm from edge and top. 1/8" holes for split rivets along left ab to kidney connection. the holes are 10mm from seam. 20mm upper return edge and there is about 58mm between each hole. So, at this point, all the arms and legs are assembled except for the 25mm back coverstrips for the shins. I still need to drill holes on the Ab for the belt and assemble belt. And some trimming of coverstrips here and there. Also need to finish up the helmet. And then... I can finally start getting dirty. Need to trim for the three-button button plate and the sniper knee. Anybody know how thick this thing should be? Time to do some research... .
-
GilFran007 quest for 501st approval
Wook1138 replied to GilFran007's topic in Ambassador/Armorer Program
yeah, I should have picked up that bucket when it was on sale. Looking good! -
I have not been working much on the armor these last few weeks - summer weather and young kids keeps a guy busy enough. I have managed to get a few things done. So I have my arms glued together and ready for strapping. My thighs have the inner cover strip glued in. My right thigh needed some extra work so I glued the top half first and the bottom half is setting tonight. The shins have an inner cover strip in place and one shin has the outer cover strip glued on - then I ran out of magnets. Managed a little more work on the helmet. I painted the frown and started on the traps and tears. I will need to expand the traps and tears a bit - the return edge is tricky to assess on the softer AP helmet. Taking a picture with the flash really brings it out so it is easier to compare to the reference material. I broke off a piece from the upper left corner of the left eye (right corner in pic). You can kind of see it in the first picture above. I added some ABS paste and will sand it down tomorrow. Doesn't look like much in the picture, but I almost threw-up when it happened. Gotta love that ABS paste! I also started the tedious process of sanding my T-21 3D printed model. I'm using a rust coloured filler primer - I might use this with liquid mask to create a worn rusted look eventually. I'll see what I think then I actually start to paint. This is actually my second coat of filler primer. the pieces on the left have been sanded up to 600 grit. I will need at least one more coat of primer - probably two.
-
TheSwede`s "look Sir! droids" SWAT build [RS]
Wook1138 replied to TheSwede's topic in Sandtrooper Armor
Looking sharp, Daniel! -
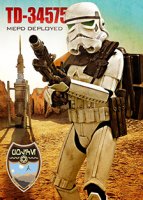
*APPROVED* TD-21027 Requesting SWAT Deployment #48
Wook1138 replied to Hausi's topic in MEPD S.W.A.T. Program
I was wondering what that was. awesome job! -
Found some time to work on my helmet again today... happy stormtrooper day (TK 4-21). I had no idea that was a thing until today. Anyway. I think I finished my paint blemishes and I fine tuned the shape of the brow some more. I still have to finish shaping the ears and cut some length off the brow. I found this on someone’s SWAT application - used it as a partial check list Here are mine. The lighting isn’t great and you can’t really even see the large run on the top, but weathering should bring out some detail.
-
Short answer: practice. I used a small brush, dipped it in the ABS paste, and carefully brought it to the exact spot I wanted. As the “paint” transfers to the helmet, I dragged the paint brush upwards when it starts to look like the drip is getting too large. The ABS paint sets very quick, so if it looked like it might start to run, I just gently blew on it and tilt the helmet back. The paint forms a skin very quickly so you can use that to keep things in place. Oh, and luck. I actually had no intention of doing this when I did but I was testing the consistency of the ABS paste and it was working on a piece of scrap, so I went for it.
-
Thanks Vincent!
-
So I just bit the bullet and went ahead with the defacing of a perfectly good TK bucket. I mixed up some ABS paint. Which is essentially coloured acetone, and proceeded to slop it onto my helmet. This will take a few attempts and some sanding and polishing, I’m sure. It is just a few drops here and there, but still nerve wracking.
-
Yeah, I noticed that in the pics (and have seen more than one SWAT applicant get called on it too ). It took a lot of effort to get rid of the gaps on my TK build... and now for my TD I have to add them. Agreed! After staring at reference images, it is amazing how different they can look. And armor or not, it is usually the person's face we look at most... well, usually.
-
Picking away at things. I’m upgrading my TK right now for a big troop in a couple weeks, so not much time left for the TD. I got the ears rough trimmed and on for my first of many rounds of seeing where I need to trim. This guy has spaces, so I don’t need to close the gap. Question: is his right ear thinner than his left? All the pics I've seen seems to suggest so, but the angle is hard to figure out. Here are the ears. The tape are reference markers for paint blemishes on the original. The original has a very roughly painted surface. I won’t be replicating every bump of course - just the ones that are seen onscreen or have been pointed out in previous SWAT applications. Of course, SWAT applications are notorious for becoming more strict every application. I did consider painting the helmet HDPE-like green and then painting over with white - but I didn’t want to do that for the whole suit. Plus, I want the whole thing to still look good in person to the general public. I want it to look like how they think they remember the armour looking, if that makes sense. Maybe others will chime in and change my mind about that. I’m trying to test how I’m going to add the paint drips. Just using white paint doesn’t work well - it is a warmer white and just interacts with light differently than ABS. So I’m planning on using ABS paste. Really runny ABS paste as it turns out. Paint is on the right. My first attempts at ABS paste on the bottom. Final test on the left. Should work but the ABS does dimple so... who knows. You can’t tell from the pick, but I was able to fine tune the locations of the blemishes by overlaying pics in photoshop.
-
Here is another composite of my helmet and the original. I put tape on according to the measurements I did with the marked tape to size and locate the brow in the right spot. I realized that the original appears to have extra plastic trimmed from the bottom- good news for my big Mellon. Made some marks and trimmed for the brow Adjust the locations of the bottom screws. I might shave a bit more off in the center part of the brow but I’m pretty happy with how it is looking. I had to shape the sides a little so the brow ran parallel with the top and bottom of the traps. Compared with my TK bucket. Oh yeah. This came in the mail a couple of days ago. Thanks m4vrick (Vincent)!! I still haven't decided what I'm going to do about a pack. I like the ones CrookKnight sells - I just worry about the 3D printed canteen - I'm clumsy enough to break that off when trooping. This should be more durable.
-
As interested as I am, I'm afraid what my OCD would do with that information
-
Starting with the helmet. For those who haven't worked with AP armor, it is sanitized compared to something like RS. So the helmet is pretty smooth. Adding the details will be a balance of getting it to look like the reference material but not making it look to out of place with the rest of the armor. Anyway... . helmet I trimmed around the ears but used a drill to avoid a sharp corner (I get nervous with sharp corners as they invite tearing). Then I scored and snapped the extra off. And then with reference pics in hand I started to carefully shape the eyes to match the original. So, this will be a slooooow build. I used up all my favours with my family during my TK build. Anyway, all I’ve managed to do in a week is get one eye more or less shaped and started to test the positioning of the brow. Having a number of detailed images of the helmet is great – the light plays tricks with the subtle return edges so many angles of the same thing are necessary. And the return edges on the AP armor are a little soft, so that makes things a little tougher when you’re trimming to match the original. Still have some work to do. Also, that brow is as far up as it will go without trimming. So… I guess I will be trimming the brow area of the helmet. Also, it looks like the brow in the reference pick is thinner too. I will also need to trim the opening at the bottom of the helmet a little more than I did with the TK so my head will fit in. To match my helmet to the original, I’ve been taking pictures of my helmet to match the reference pictures (relative camera location and lens zoom) and overlaying the images in Photoshop. I think I have a set-up that matches the original photos. Now I just have to mark up my helmet with some tape with reference points and I should be able to place things like tube stripes, paint runs, and cracks in the right location. I’m terrible at free-handing anything.
-
So, I have this thread going over at FISD - but I'll post here too. I recently finished a TK and now I'm starting another build - much to my wife's chagrin. The goal is to build as close as I can for SWAT approval. Both kits are from AP so this build should be very similar to my TK build - except of course: TD is dirty TD has a pauldron, pouches, and sometimes a pack TD does not have plastic shoulder bridges or large button panel on ab. They also don't have the 4 button panel - they have a three button panel (not painted) TD is dirty TD does not have the black lines on the traps or tears of the helmet Sniper knee plate if different shape. TD is dirty TD does not have holster or TD (or drop boxes) on the belt The fun part about the TD build is that one is encouraged to build a specific onscreen trooper. There was no question for which trooper I wanted to build. This guy: The captain that talks to Garindan. The first shot above was one of the most memorable trooper scenes for me back in '78 (didn't get a chance to see the movie until '78 - longest year ever). The best part about this trooper is that the helmet is still around (it was recently at auction - I think it went for $250K, but don't quote me). Anyway, there are pictures of the helmet floating around. Starwarshelmets.com is a good place to see these images. Here is an example: This guy. There is one snag to the whole process. For basic approval in to the 501st as a TD, you need at least two pouches with one of those being a proper shoulder pouch. So I will need to add a shoulder pouch in addition to the belt pouches. For level 2 (PO), I need a backpack. This trooper does not have one - so If I want to advance to level 2 I need the pack (and from what I understand, I don't need said pack for level 3). To put together a proper pack takes some time - so I won't be doing that right away. My plan is to build the actual armour as close as possible to what would be expected at Level 3 (SWAT) and just go for basic approval for now. I have a variety of pouches so that I will be able to emulate other characters - most notably the Cantina Captain who wears the exact same armor as the Garinden captain. He also has a pack (#3) - so this might be a Plan B. Gear collected so far: First two pics are from trooperbay. Sniper knee, original strapping kit (the screws showing on the outside of the armor is a upper level requirement), three button plate (as well as all the other button plates), S-trim, and strip stencils. Although the stencils are the "sandtrooper" stencils, they don't match this helmet - so I will need to modify. Collection of pouches and my pauldron from Trooperbay. I couldn't decide on which pouch configuration I was going to do, so I ended up with a little of everything. I have a canvas shoulder pouch and two more leather MP40 pouches in another pic. I'll have plenty of pouches - I can pretty much emulate both versions of the docking bay 94 captain and the cantina captain. From Anthony (blaster 8266) . Nice!! I can use these for the Cantina Captain if it comes to that - plus I need the shoulder pouch for basic approval. 3D print of a T-21 from TK421 propstop Sling, sling swivel, tubing for theT-21. Some wire for my DLT-19 as well. I'm still missing a few greeblies for the T-21, but I think I have them sorted out. Need some wire around the t-tracks and some dirt, but this DLT-19 should be good to go if I decide to emulate the Cantina Captain.
-
If you are, this is bit that confused me about pouches. The way this is written, it conveys that you can go with the standard configuration, OR, you can follow the option of replicating a screen used configuration. The standard configuration calls for a minimum of two pouches: one pouch on the left shoulder and one on the right hip. A third worn on the opposite hip is allowed. Option: If choosing to replicate a screen used configuration of equipment, the number of pouches may be altered. See the MEPD SWAT page for more details. Note: Screen used configurations also include specific color Pauldrons and individual backpacks styles. If we require "one pouch on the left shoulder and one on the right hip" no matter what - then the "Option: if choosing..." point is totally moot - or it is merely there as a guide for picking the third pouch. You could even state that the shoulder pouch should be a MP40 (38) canvas or leather ammo pouch and the belt pouches should be leather - I don't recall there ever being any other kind of pouch on the shoulder. They don't always have the shoulder pouch, but when they do... . As for the pouches (and backpack) I just think that whatever is "good enough" for SWAT should be good enough for Basic and PO. I realize the level of detail is different, but the basic components should be built upon, not taken away IMO. If that makes sense. Don't get me wrong - I'm not trying to find an easy way through this (if anything, I'm possibly making it harder on myself ). I'm just saying that there are people that are not going to build a pack for a pack-less trooper just to pass PO. Therefore there are fewer TDs out there that have pushed their build as far as they could have. Sorry for beating the dead horse.
-
Relax trooper He retracted that statement. You need PO before SWAT, and you need a pack for PO. Yeah, kind of a wrench in the works for no pack troopers.
-
No worries. That actually makes more sense. To summarize, if I'm going for the no-pack, Garindan trooper (Stop that ship) for SWAT approval, I will need (in addition to orange pauldron, two small Spanish pouches, spot-on weathering, and the T-21): Basic approval: shoulder pouch PO: Any backpack that passes PO requirements and shoulder pouch. SWAT: luck and patience. Unleash the OCD. I've been going through a number of the SWAT and PO applications - but is there a place/thread that outlines the backpack requirements (reference gallery with descriptions) for Basic vs PO vs SWAT aside from what is in the CRL. Thanks again.
-
Thanks for the response! Ahhh. To echo Daniel... I did not know this! Over at FISD we had to go through level 2 before 3 so I just assumed the same here. Thanks for the clarification! So, no backpack needed for SWAT if going for packless character - big check! The way I read it , the CRL indicates that if I am going for a particular character, then I don't need the shoulder pouch if that character does not have one. But the previous posts above indicate that I need a shoulder pouch for basic regardless. If that is the case, then, yeah, I find the CRL confusing (but I find most things confusing). I'm just trying to sort things out for myself so I can make the most of this build. Thanks.
-
So, a few more questions... I want to build my armor as close as possible to this guy - the docking by 94 captain who talks with Garindan. There is great reference material out there, especially for the helmet, so that is all good. From what I've read, this is the same armor as the Cantina captain. I've also seen this alleyway captain referred to as well. Is this because it is the same armor or is this reference for the pack? I know for PO and SWAT that I need a pack. Since the character I am going for does not actually have a pack - do I need to build a character specific pack if I apply for PO/SWAT at some point? Would I have to build a #3 pack? I admit, I've been looking at some of the reference pics (and "researching" ANH ) and I'm finding it hard to discern details from the on-screen packs as outlined in some of the newer SWAT applications. Also, and I hate to go back to this, but for the CRL - the below is indicated for basic approval regarding pouches. Option: If choosing to replicate a screen used configuration of equipment, the number of pouches may be altered. See the MEPD SWAT page for more details. Note: Screen used configurations also include specific color Pauldrons and individual backpacks styles. If the shoulder pouch is absolutely required (as had been mentioned in previous posts), the wording in the CRL should be reworked. For a new trooper, this is confusing (well, at least for me it was). Thanks in advance!
-
Thanks! Shoulder pouch will be present.
-
Hi there. I'm just about to start my TD build (I recently finished a TK build over at FISD and could not be happier about that experience). I know I want to emulate the Docking Bay 94 captain (the guy who talks to Garinden). I have the pouches needed for this character and the "stop that ship" character (yeah, I know, same guy - different pouches apparently). I've also ordered the canvas shoulder pouch and leather MP40 pouches (from Blaster 8266) for the Cantina Captain (for when/if I get a backpack). My question is - do I need a shoulder pouch for basic approval if I'm emulating a particular character? Also, I haven't researched backpacks very much yet - I was planning on going for basic approval without a pack. I know I will not have the time to build a pack completely from scratch. I looked at Crooked Knight's (Imperial Trooper Packs) back packs. They look awesome but cost almost as much as my armor did. Any recommendations for a guy who can't spend too much time sourcing all the parts but wants a decent pack at the end of the day? Does anyone offer kits? Thanks!
-
Thanks everyone for the warm welcome. I’m still in the process of getting my TK up to Centurion status (hopefully) over at FISD, and I have my second kit in hand and ready for another build. I haven’t had a lot of time to browse this site, so where is the best place to post and view build threads. Thanks!

