yoshix
-
Posts
163 -
Joined
-
Last visited
-
Days Won
13
Content Type
Events
Profiles
Forums
Everything posted by yoshix
-
-
Finally got some pictures today
-
Lol! Thanks guys. I really appreciate it!
-
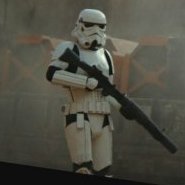
Got some photos today This has been a really long and hard project but I'm happy with how it looks. I think the backpack really exceeded my expectations.
-
Backpack is mounted to the back plate. Also I moved the suspenders to conect at the front of the sholder straps. I think this will help prevent the torso from riding up. Everything is weathered other than the helmet.
-
I'm just so proud, I wanted to post up here as well. Big thanks to Krookknight for sending me some of the 3d printed parts. And yes, I did flip the top boxes to be the right way. More pictures of me wearing it to come.
- 11 replies
-
- 1
-

-
- jedha backpack
- jedha
- (and 1 more)
-
Darnit! I just noticed I flipped the top two boxes. I'll have to correct them tomorrow
-
Tomorrow I'll start weathering, shouldn't take me too long. I hope to get pictures Saturday, completed with the pack on
-
Thanks man! I just saw you're in Orlando, I'm in Naples. I try to come up your way for cons and such
-
And D O N E This thing looks so good!
-
Thanks guys! I'd love to go for SWAT but at the moment I don't think I'm good enough. I keep seeing the armor with a critical eye. If only we could get our hands on one of the screen used armors. I would totally buy this armor again from an armor maker that could say he took molds from the originals.
-
Seven tries to get four good boxes. I remade the three white inserts to fit the boxes. I made a plywood base and gave it some legs to raise it up. It' not completely painted or even glued down. I am so close to being done. I should have the backpack done tomorrow, I just need to figure out how I want to attach it to the back plate.
-
I glued the 3d printed top of the "pump" to a piece of wood. rough cut After sanding and bondo. This will give it more hight. Then I painted it black I cut the 3d printed pump down as I wanted to make it larger. It took a little bit of thinking but finally decided on vacuum forming. This is my super cheep setup. I forgot to take a picture of the mold, but I used CDs that I cut in half and put spacers between them This is the pump and top glued together. It looks like a mess now but it will look good afternoon sanding and paint.
-
I cut the brow line down. Hard to tell the difference, but it' an 1/8 inch smaller between the black rim and the eyes. I resined the jar to try to get rid of the "valley" where the paper was. So the sides are straight. Afte sanding. I have it painted but forgot to take a picture. My styrene is in, so hopefully tomorrow I'll make some good progress with the vacuum forming
-
Right on
-
So my references show that this shouldn't be entirely white. I used some plasti dip to paint it black. Much better
-
Really happy with how this turned out. I wanted the jar that hangs down to be removable as this thing is awkward to transport and/or to sit upright. I found a good sized jar that I wanted to use, traced out the lid and used a sanding bit on the dremel to make the hole large enough for the lid. I got some super cheep sanding head replacements from amazon and they broke after getting just a little hot. I entered through like 5 heads to get this deep. The cap fits in there nicely and solid after glueing.
-
Thank you! Lol! Was just too big to be contained by one fourm.
-
So the blue I have is just a little too bright, so I just barely hit it with some dark grey primer. In the photo it looks more grey than it actually is. Because the shake weight needs to sit up higher, I carved out a track in this piece of wood and screwed it to it. Then painted it black so you don't see it. Used the same white glossy paint for the canisters as I did for the armor. It is a great feeling to finally get this stuff attached. It looks really good! I hit the ends of the canisters with some brown because that's how the sixth scale fig looks, also some black weathering for the top blue cone. I am so happy with it!
-
I drilled holes in the clips and counter sunk them just a little to try to hide the screws that will hold them on. They came with holes underneath to hold the grenades in but I couldn't get it to line up right. So my solution was to cover the holes with a piece of plastic. Then when I screwed them on they stay straight. After painting.
-
This is the size I'm looking forward. Those two aren't any good but I ran out of styrene so I'll have to wait to get some more in.
-
Unfortunately the small 3d printed boxes that go inside the large boxes and a bit too small so I'll have to remake them. To keep them light weight I'm going to try vacuum forming them. I made this from plywood then realized isn't too detailed to get a good imprint out of it, so I cut it in half.
-
I got the canisters sanded up and I didn't need to apply a second coat of resin, so that' a plus. Cut the ends off of the original canisters and glued them on the new ones After priming them they start to look like soup thermoses. Also started priming a few of the other parts. Sandy and priming a few time to try to get rid of the lines from the printing I don't remember if I took pictures of my frame before or not but here it is
-
Thank you!
-
So very close, I had hoped to be done by Sunday, but I've having to remake more of the backpack parts than I had hoped. So hopefully if the next two weeks Had a great test fit. Sorry for the blurry photo, the sun was going down and that was all the time I had yesterday. I learned a lot. I need to change some things