

yoshix
-
Posts
163 -
Joined
-
Last visited
-
Days Won
13
Content Type
Events
Profiles
Forums
Posts posted by yoshix
-
-
Johan Warden
TD-42131
https://www.501st.com/members/displaymember.php?userID=19164&costumeID=140
Your MEPD forum name
Yoshix
Florida Garrison
-One helmet off photo.

-One full armor, helmet on

-One full armor, helmet on, right side photo.

-One full armor, helmet on, left side photo.

-One full armor, helmet on, back photo.

-One full armor, helmet on, back photo without backpack.

-Undersuit detail photo.


-Abs details close up photo.

-Detail photo of gloves and handguards

Bucket (pictures can show details individually or in groups):
-A close up photo clearly showing the flat green lenses.

-Detail photo showing wire screen mesh is dark grey

-Detail photo


Backpack:


Weapons:
-At least one picture showing the whole weapon

-Detail pictures of mods required for the specific weapons. (Flashlight)

Finally:
-One (or several) full body action (or attitude poses) good quality picture.


-
 2
2
-
-
14 hours ago, Dragon_a said:
Yep those are the right ones.

What about this line? I'm assuming it's a simple stitching that you remove on yours, or is it only on the back and the front is plain?
-
Weathering:

This is what I had in mind to create the mud effect. The one in the middle looks like a good match, then here and there a small amount of brown (on the left) to make it less uniform. At first I was thinking I should try to thicken it but to be honest now I'm not so sure. I found this technique online of boiling cornstarch in water and adding it to acrylic paint to thicken it. Let me know what you guy think.
-

So has this been confirmed as the bandoliers from the film? I was going to make mine from scratch then I saw that they a pretty cheap, if its the correct ones. To be honest I would only wear it for the approval.
-
On 8/3/2019 at 11:38 AM, Fraulein said:
It was probably the waxy finish that kept it from taking the dye.
Agreed
14 hours ago, Dragon_a said:Definitely keep the wrinkles in. I doubt troopers were ironing their ponchos in the trenches

Lol, its the trekkies that aren't allowed to have wrinkles. I just don't want too may wrinkles ya know.
-
First attempt.

They're much more wrinkles now which I'm not really sure how to get out, maybe I'll just leave them in

As you can see, one side took the bye better than the other


The leather circles shrink a little bit and got hard from the boiling water which I should have expected because I've dyef ammo pouches before and had the same issue. I don't think it's a big deal though as long as they don't fall apart.
-
9 hours ago, Dragon_a said:
on your second pic you can see the draw strings stitched into the plash in a crescent shape?
Oh, I see it now. Thank you very much!
9 hours ago, Dragon_a said:you can see a pic of mine from behind in the crl picture library:
Is that after dying it four time? It still looks green.
9 hours ago, Dragon_a said:The material isn’t wool, it is more like a canvas and, to perform its intended military function, it has a waterproof coating.
You used the dye for natural fabrics though right?
9 hours ago, Dragon_a said:The technique I found for dyeing is simple persistence, keep dyeing it until it gets to colour you want, I think mine took 4 rounds.
Thank you for the info. I would have tried it once and thought it wouldn't work or that I did something wrong. Now I know to just keep at it.
-
3 hours ago, Fraulein said:
edit - looking through all of the information on it - I believe it is cotton or canvas tarpaulin fabric. It MAY be dyeable. But it has a finish on it which makes it water repellant.
Is the texture waxy?
I just put some water on it and it seems to be water repellent. I also saturated a small area and it did soak up the water. Ill give it a try with the RIT Black hopefully this weekend. Or do you think I should try to pretreat it with something?
-
2 minutes ago, Fraulein said:
If you could link to where you got it, I could see what kind of fabric it is. It may be a cotton with a sateen finish. Which means it may not take a dye. If it is wool, then you don’t want to use hot water to dye it.
Thanks for the info, I didn't know that about wool.
-
So it took a little less than a month for shipping from Russia to get this.

I would like to make this trooper eventually and have many questions.
First off, this thing is much bigger (and heavier) than I thought it would be. Its about 65" x 65". When I first tried it on I noticed it drags the ground. Then I thought, there must be a way to make it shorter and noticed that I can attach the bottom to the middle like so.

Which makes me believe thats the inside so its hidden away. Leaving the top to hang down like a hood.
Second, how is this thing supposed to sit? I'm pretty sure I figured out how it attaches, tied to my sholder straps. The reference photos I have dont really show too may details/ stitching etc. Its hard to tell what side to wear it on. Anyone have any reference photos from the back without a backpack on?
My assumption is that it's made of wool so I'm not exactly sure how I want to dye it.

This is what I have on hand at the moment so I may have to go out and buy another black RIT for natural Fabrics. Let me know what you use to dye yours.
My next question is, what are we using for weathering/mud? Acrylic paints, spray paints or maybe something thicker?
-
On 3/22/2019 at 5:12 AM, Dragon_a said:
Finally, the crystal patrol crl is going to get done

Yes! Everything has been submitted, just waiting for it to go live any day now.
-
1
-
-

I finally took this costume out for a troop on the beach. We made a video to promote trash pickup awareness. I had a few things go wrong, including my vocoder falling off and having to superglue it back on and the velcro not holding together to keep my ankles tight together. I think I'm going to replace that with snaps.
Surprisingly although the helmet is so small, I was able to fit my fans in there so I wasn't dying or fogging up with the warm humid weather.
-
2
-
-
11 minutes ago, henselmonster said:
Killed it dude! Send over those pics (minus blaster) and we can get started on the new CRL! PM incoming
Thank you so much
Photos inbound! Photos sent to Dutchy as well
-

I couldn't be happier right now


Hot Toys 1/6 scale figure or 501st approved costume?
-
5
-
-
This is some excellent work, you photos look amazing! I wish you were the crl model

-
11 hours ago, Dragon_a said:
That’s really impressive. You’re right about the BS and Jim’s helmets looking a little big on us shorter guys. Unfortunately I don’t have your skills.
Eventually I'll be offering them for sale. I need to fine tune the molds a little better first.
-

I'm so close to finishing my helmet. As you can see the bobblehead problem is no more. I just need to finish painting. I'm having a bit of trouble matching the white on my armor but I think after I put a little weathering on it won't be noticeable.
The last thing I need to do is make a mold for the vocoder.
I'm really looking forward to buttoning this project up.
-
3
-
-

First time molding.
-

Sculpt is done! Its by no means perfect, but I'm happy with it. Every time I touched it i was changing something and at some point you just have to stop and say "enough is enough".
Now I'm molding. This is all so new to me and I'm super nervous to ruin what I've been working on for so long.
-
2
-
-
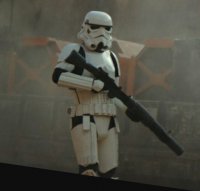
After looking extensively online for reference photos I stumbled across this.


This was from the space port on Corellia. Now, I know there is no CRL for this yet but I would imagine it would be under FISD and not MEPD because he are clean. I'm not going to lie, its pretty boss that he is carrying an E-22.
-
Oh, and I got this sweet flashlight for night ops!


-
1
-
-
Some small side notes if anyone is interested.
I would love to be the CRL model for the Crystal Patrol Trooper as well. I have the pack and orange pauldron ready, I just really want to finish up this new helmet mold first to have for the photos.
-
Hi all! After obsessing overreference photos and comparing my costume I came to two conclusions. One, my Black series helmet makes me look like a bobblehead. And two, it is missing some of the details from the scene used helmets. I know jimmiroquai makes a helmet as well but from what i can tell, it looks like a recast of the Black Series with some small differences. Which doesn't help my size problem.
So about seven months ago I decided to start working on my own helmet sculpt. Unfortunately life got in the way more than once and I have had to start and stop this thing several times.
Within the last month I have made some good progress and I thought I'd share. Please remember this is still a work in progress and there are still many areas that need to be finalized, so don't look to hard at the vocoder its just temporary. I know I need to clean up the eyes and frown, but I'm very happy with the proportions.


And that last photo is to give you an idea of the size difference compared to my ATA helmet. Today I ordered everything I need to make a mold and start casting. I hope to have a prototype in a month. That may be wishful thinking, we shall see.
So, what do you guys think? Please be soft with me, I have a hard time with criticism. I normally don't post unfinished projects.
-
1
-
-
9 hours ago, Wook1138 said:
My brackets are 2-3/8" wide (or at least that is how far apart the screw centers are). As far as where they are placed along the return edge - I do have measurements in my build, I just don't recall off hand what they were.
Wow, 2-3/8! See I would have guessed less. Thank you. Very helpful. I'm going to go check out your build thread to see what i can find.
Mim Mim what?
in Mimban Trooper Armor
Posted
I got 4 of them. I plan to use the bottom one as its a less green as the others. Looks like the front has noticeable printing on it. I assume everyone is putting the font to there chest to hide the printing, unless there is a technical for removing it.
I understand now that the light stitching on the bottom is for different magazine types and is designs for easy removal.