

bdgr
-
Posts
114 -
Joined
-
Last visited
-
Days Won
2
Content Type
Events
Profiles
Forums
Everything posted by bdgr
-
Jr. Olympics Springdale, OH August 19th
-
Aloha Shirt just arrived, and it's INCREDIBLE!
bdgr replied to BadBatch's topic in Off Topic Cantina
Nice. Shirt looks great! -
Jeremy, Welcome to the detachment!
-
Congrats! Looks great.
-
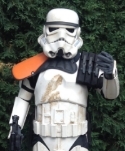
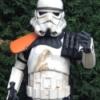
Images of the sanding backer that I used before I painted it.
.thumb.JPG.1d55838fc51da4a7d1728e8e7ee72281.JPG)
.thumb.JPG.d79c42118bcfb500ab4a9d9d324a45a4.JPG)
-
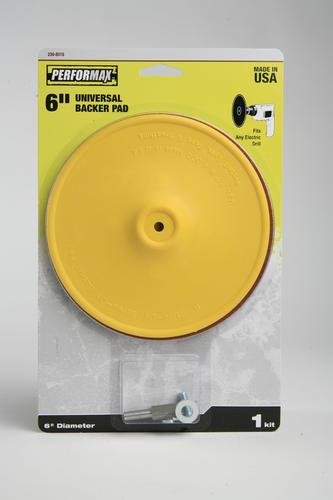
I used a sanding backer pad to mount my Tupperware radar dish. 6" diameter pads are readily available at most hardware stores and can be painted if you can't find one in black.
-
Congrats to all. Looking forward to another great year for the MEPD.
-
TD2.3 Electrobinoculars
bdgr replied to Volksjager's topic in Pouches, Pauldrons, and other Accessories
Looks very nice. -
There are larger size pad backers that will work with your 5" diameter Tupperware lid. Check out this post: http://forum.mepd.net/index.php?showtopic=12971
-
No. They are suppose to be there, since the original Sandtroopers had them. In fact, I had to add them to my ATA kit to make it more accurate.
-
Ammo pouch over shoulder?
bdgr replied to Beefie's topic in Pouches, Pauldrons, and other Accessories
If I don't have a backpack, then I attach it via an elastic loop to my left shoulder armor strap that goes from the shoulder straps to the shoulder armor. The elastic loop can be "opened or closed" with some velcro that I sewed onto the ends of the elastic strip. -
You can't be approved with one based on the CRLs, but don't let that stop you from having one for non-canon events, which are most of the trooping events. Just use loops like the TK ESB holsters, so you can easily put it on or off. As for PO or SWAT, people do it for all different reasons. Some for the challenge, others for status and being able to purchase PO/SWAT specific merchandise, and others may just want a super accurate Sandtrooper. It is just a personal choice if you want to go for PO or SWAT.
-
Authentic Sling for T-21 / British Enfield on Ebay
bdgr replied to Strider's topic in T-21, DLT-19, RT-97c Heavy Blasters
Wow. That is a lot of authentic slings being offered. -
Thanks everyone.
-
*DONE* TD-16080 requesting deployment
bdgr replied to Strider's topic in MEPD Police Officer Program
Strider, Congrats on making PO! -
Thanks. I used the multi-layer single paint method, where you dab large areas with a sponge/paper towel containing diluted Raw Umber and then dab with a clean sponge/paper towel to remove some of the paint and to get a nice weathering base. Then I used less diluted Raw Umber paint in specific areas and dabbed it with a slightly wet sponge/paper towel to get a nice multi-layered effect.
-
Eric Chan http://www.501st.com/members/displaymember.php?userID=11200&costumeID=2 bdgr Ohio Garrison [img=[url=http://i767.photobucket.com/albums/xx318/bdgr/TK%20and%20TD/IMG_9938_zps3lapnao7.jpg[]http://i767.photobucket.com/albums/xx318/bdgr/TK%20and%20TD/IMG_9938_zps3lapnao7.jpg[ Weapons: Action:
-
Comes down to which Sandtrooper you are trying to emulate. Especially if you are going for SWAT after getting Officer.
-
TD-4468 requesting MEPD Sandtrooper section access. http://www.501st.com/members/displaymember.php?userID=11200&costumeID=2
-
P3laton3 How to add the rear sight onto your DLT-19
bdgr replied to P3laton3's topic in T-21, DLT-19, RT-97c Heavy Blasters
Looking great. -
You may have to remove the strap loops past the fasteners based on the images, but it looks pretty close.
-
Bas and Felix, thanks for the kinds words. Also Felix, a big thank you for the M38 scope and the real magazine clip.
-
Modifying a Hyperfirm E-11 by bdgr. Here are the modification upgrades (numbered 1 to 10) that I did on my Hyperfirm ANH E-11 to make it into a Bapty Blaster. Image before any mods: 1. Front Sight: The front site is a single molded piece, so I carved out the gaps with a drill bit and exacto knife. 2. Scope Mounting Rail: My hyperfirms Scope mounting rail is molded as part of the blaster body without any gaps between it and the body. It isnt a separate mounted piece, so I cut it off with an exacto knife and fabricated a new scope mounting rail with a ¾ inch width piece of aluminum. 3. Removed trigger with an exacto knife. 4. Replaced trigger guard with a Bapty version. The hyperfirm has a metal wire in the inside of the rubber trigger to provide extra support. I cut away the rubber, but left the metal wire to help guide and mount the new trigger guard. I cut a ½ inch wide piece of ABS and then made a long grove on one side of the rectangular piece using a hand file. Before I permanently glued the ABS piece with the metal wire in the grove, I bent the metal wire into the proper Bapty trigger shape. 5. Removed magazine clip and replaced it with a longer real one with a wood block stuck inside it. To get the real magazine clip in, I had to cut a large enough opening in the magazine receiver using an exacto knife. 6. Modified the handle to appear smooth with no details by filling in the large detail holes with bondo/filler and sanding smooth with some fine grit sandpaper. 7. No O-ring. 8. Replaced M19 Scope with a M38 Scope and mounted it on the new aluminum scope mounting rail. 9. Added the rivets and created the seams in the back half of the blaster to make it look like it was cut off and riveted back together. I used my dremel tool with a cutting wheel to do this. 10. Closed rear site by filling with bondo and then sanded it. Below is an image of my partially modified E-11: Once I made all the modifications, I went ahead and painted the parts black. I still need to weathered the entire Bapty Blaster, but here is my completed Bapty Blaster: During this modification, I had an accident with the exacto knife and wound up at in the Emergency room. I was rushing to get a few things done before work and cut myself pretty deep, requiring a bunch of stitches on my left hand. Everything is fine now, but hind sight I was pretty lucky it was not worse.
-
I've seen people do option A (cut along the seam line, shorten the cod piece, and make it a separate piece from the ab plate). Post #12 in Pandatrooper's TD build thread shows the cut and what he did. http://forum.mepd.net/index.php?showtopic=6775&hl=
-
Found supplier for the 600ml Gio'Style Canteen in Italy
bdgr replied to P3laton3's topic in Field Backpack
Nathan, I fully appreciate your skills and your offer to potentially modify one for accuracy and cast it in Hyperfirm. It is always great to have more options out there.

.JPG.244d72610ffe5d2ae6a9edb46d636f5c.JPG)
.JPG.90807fe2313e2859644eef1a36dfc278.JPG)