Leaderboard


Popular Content
Showing content with the highest reputation on 01/24/2021 in all areas
-
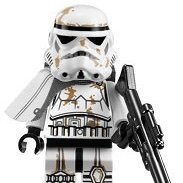
Re-painted and partially weathered with chipping and scratches. I went a little easier on the chipping this time around and happier than my first attempt. Not perfect but better than before. I got tired of sanding down the first paint job so the second attempt looks rather thick in some areas. Holding off to weather with dirt until I get my Sandy weathered. I want to match the weathering better. Still searching for a nice 38mm clear/tinted lens for the front to cover the old web cam camera I installed. (The web camera is non functional, just parts) The top side lens metal part was from an old cologne bottle top. I also used the smaller lens retainer rings from my scope kits to lock the lens in place. The red On/Off button functions to switch on the lens lighting. The gray rod on the left side among the white protruding rods is a functional push switch for the lights on this rear faceplate. The black central screw on the bottom is a fictional push switch for the sound effects. This still needs more fine tuning as it doesn’t always work. Link to see the lights in action: https://imgur.com/l7155bNhttps://imgur.com/l7155bN Last thing I need to do besides dirt weathering is add the leather strap. Already sourced 15mm wide strapping and will add it soon. Thanks for looking.2 points
-
Looks awesome! Thanks for sharing!! These are the things that make the mepd the mepd and also make wives and husbands everywhere shake their heads in disbelief at all these crazy perfectionists! Haha Sent from my iPhone using Tapatalk1 point
-
Thank you Jason!! I’m absolutely happy to share it..! Honestly there were a couple of times during the process, especially toward the end, where I cocked my head to the side looking at it and thought to myself, “holy s#!t, that worked..?!!”1 point
-
Dude, you’re the man. I was amazed at how fast you fixed that throughout the day. I even showed my girlfriend. Thanks for the peek behind your curtain of genius. Lol. That worked so well I thought it was just photoshopped. Lol. No seriously, really great work. And thanks for showing your work too. I’m sure it’ll save someone the trouble of having to buy whole new pieces. Sent from my iPhone using Tapatalk1 point
-
Hahahaha! Only as magic as the chemical reaction between acetone and ABS, I suppose, but from what I researched, that’s the beauty of ABS slurry; it’s pliable to fill cracks and seams joining ABS together ‘melting’ the edges to be joined, and then as the acetone evaporates it leaves the two pieces as one weld... As far as sturdiness, I haven’t put any more stress on it than I would normally apply to see if the parts held, but time will tell... Like you said, at least it’s not in a location that bears much, if any, stress!1 point
-
A few of you might have browsed through my PO Deployment Request, and many of you may very well have used this exact technique before, but this was first time I had ever tried using the ‘homemade ABS glue/paste trick’ to add plastic where it wasn’t before, so I figured I’d add it to my WIP. In the first review of my Request, I was made aware that the shape of the knee ammo belt on the right thigh piece was inaccurate - it needed a more rounded off edge than the slightly rounded 45° angle I had originally cut. My first attempt to remedy the situation proved inaccurate as well as it caused too much of a swooping curve back toward the fastening rivet than the correct shape. At this point I saw two options; one, I could order a whole new ammo belt, wait a week, or two, or three to receive it, only to have to cut it, shape it, drill out the old rivets, etc., or two, I could try my hand at attaching the necessary amount of ABS using leftover scraps to recreate the original squared-off edge which I could then shape to the correct curve. I went with the latter and opted for the more time-efficient solution; after all, I was in the middle of a Deployment Review!! Using scrap ABS, I fashioned triangular-shaped pieces that would complete the original squared off edge and held them in place with tape, securing the tips of the triangle pieces to the existing curve with a little bit of superglue. I then mixed up a little jar of ABS slurry from scraps of ABS and acetone and let it breakdown. When ready, I applied the glue to both sides (front and back) of the two ends of the ammo belt, knowing whatever excess would have to later be sanded. Letting that harden to the point I could no longer scratch a dent into the dried glue, I cut the new curve and began sanding down the excess. All that was left to do now was weather the new pieces, and this is what I ended up with: Here’s hoping I got it right this time , but even if it needs more work, I feel pretty darn accomplished with my first go ‘round with ABS paste..!1 point
-
Beeing inspired by @Omaha Joe mannequin I added some arms to mine this weekend... Next project will be a dewback prod. My brother in law works in a company with access to a lathe machine (is this the correct translation?!) and he'll try to build the pieces based on bigwam drawings. More to come!1 point
-
After almost 2 hours I am finished with my teeth and so far satisfied. I didn't get the same perspective when taking photos, but I think you know what I'm talking about. It is about the distance and height of the teeth to each other. The picture below is also "wider" than my cell phone took, so the teeth look narrower and higher on the sides. I am also of the opinion that Davin Felth has a fourth tooth gap, which you just don't see in the film images. In the pictures shown below you can see a small hole.1 point
-
cheers everyone!!1 point