
Leaderboard
Popular Content
Showing content with the highest reputation on 04/14/2020 in all areas
-
Hey folks, This is the Sandtrooper I eventually intend to go for :- http://www.mepd.net/?page_id=910/ (White pauldron Desert Sergeant , desert version/pack 3) I see there are 3 pouches in total, two at the hip, one on the shoulder My question is does anyone have the correct dimensions for both? (or a good source ?) I spotted these for the hip pouches:- https://trooperbay.com/sandtrooper-leather-mp-40-magazine-pouch they look to be the right size (Measures 9.75 inches tall, 6 inches wide, 1.125 inches thick) I may go for swat eventually so am keeping that in mind I want everything to be as accurate looking as I can but the pouches I have seen for sale seem very expensive so I might have a go at making them myself.1 point
-
I’ve experimented a bunch with colours, textures and in addition got some cement powder too. I’ll layer up and rub back the acrylic colours as I go and finish with a light spattered cement texture. Like with the helmet I’m being mindful I don’t paint it too dark. I don’t want to loose the detail of the suit under the mud. Plus it looks really average in photos under normal light conditions. I’ll hit the plash and bandolier similarly. First grimey pass done.1 point
-
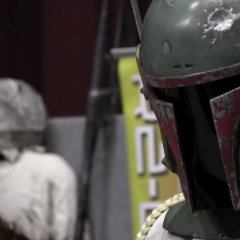
The belt is tricky to get right. The notches along the top have to sit into the ab details at a slight backward angle. Given the similarities between the R1 ST and TK belt set up, I got a Rob Kittell belt and will mount the plastic belt sections onto that with the cannister / rear section mounting on the back with velcro just like the ST. Kind of a shame that detail will just all be covered with the plash in the end. I’m using this pic for reference. Photo credit not mine.1 point
-
I used layers of colours like I mentioned up in the thread; I applied some by brush and the opted for a spray gun. Each layer I rubbed back with a plastic scourer/scrubber, to reveal highlights and not let it get too dark. The top layer is splattered/flicked light grey with thickener in it.. like dirt and impasto etc in it. Sealed with an acrylic spray.1 point
-
So after a bit of thought, I’m going for this guy in terms of weathering At this point that’s also roughly where my bucket is at too1 point
-
The bucket is a black series lid, which seems to be the current standard, except Jim’s bucket which also looks great. The shield is an Empire 3D model and print (thanks Nic). The challenge being to get the mud looking right. The best reference under ‘normal’ lights I found is this.. photo credit not mine. From the lucasfilm bucket you can make out some of the composite colours that make up the overall mud effect. The issue I have with really dark weathering is that under most lighting conditions the costume will look dark, very contrasty and the details disappear especially in photographs. I noticed the anovos interpretation is much more monotone grey and lighter overall.1 point