Leaderboard


Popular Content
Showing content with the highest reputation on 06/18/2018 in all areas
-
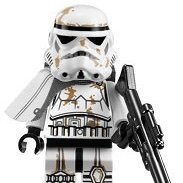
Hi everyone. So, around 1 year ago (June 2017) I started a project to revive my 12 year old Shepperton Design Studios Stunt lid. The years has taken their toll on my once beloved TK lid so I did my research, ended up finding the videos of TK4510/ Mike / Trooperbay and decided to strip down, spray and hand paint my old lid. Well, this REALLY got me interested in Stormtroopers again and, thanks to doing plenty of research on FISD on how to respray my lid, got me hooked on the whole armour idea. Right, back to the subject at hand.... I came across Mike’s videos again on YouTube, one of which was weathering a Sandie helmet. Based upon this I ordered some Fullers Earth and a Revell weathering set. Following Mike’s excellent video, essentially the process is done with hairspray > earth flicked on with paintbrush > brush off excess earth > repeat. This, mixed with brush dabbing, sponge dabbing, sandpaper in places etc hopefully leading to a realistic, dirty/used look. Firstly, I started by painting over the vertical black stripes in the traps and tears, then improving the frown paint by extending it beyond the un-drilled 5th hole. I also took the opportunity to raise the brow. As this isn’t my trooping lid, I simply cut an additional upward curve in the cap. Time to throw some dirt at this thing!! After fogging the front of the lid with hairspray, I started to flick Fullers Earth at the lid to give a general covering. After letting the hairspray dry for a bit, it was then time to brush of the loose earth. Essentially, the process is then repeated and repeated, mixing in different shades of earth at different times, and focusing in areas where dirt would naturally build up over time. Next round: Now, at this stage I decided to do another round of hairspray and darker earth, then attempted some wet sponge dabbing..... I went a bit heavy!!! Well - as it was heavier than I had planned, and my first attempt, I decided to have another go. I took the lid out to the garden and literally washed off all of the weathering with the hose! I started the process again and was a lot more careful with damp paper towels his time. Here’s some picture from along the way. And now for the finished lid. Overall, I’m really pleased with how it turned out. I set out to make a naturally dirty looking sandie, hence using Fullers Earth and weathering powder, to get a textured look, and am pleased with the results. Hopefully to photos do it justice. Enough from me - thanks for reading. Dan :-) Sent from my iPhone using Tapatalk1 point
-
And coffee-spot is reduced. Before: And after: Gesendet von iPhone mit Tapatalk1 point
-
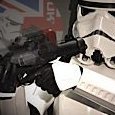
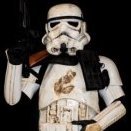
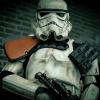
WOW!! Ok, so things escalated kinda quick. We dont frequent the conventions and are pretty much out of the loop on that kind of stuff. But for the last couple years, my wife has been volunteering a booth at the Denver Comic Con for the library. So for grins my kiddo and I have dressed up in something and tagged along basically to check out the other cool costumes. This year she was working Sunday, which we decided would be cool fathers day gig. Saturday afternoon I found out that my armor maker Cal from Far Away Creations was going to be down there with his landspeeder. There was no way I was going to miss the opportunity to get a photo with it in my kit. That said, I had been wrestling with my weathering, and hadn't even started the helmet, boots, belt, and pauldron. I had no pouches attached, no idea if my mic set up would work, or even how to get it in the armor. Regardless, I basically pulled an all nighter rushing through the minimum bits, and threw it all in a bin Sunday morning as we headed out. I met up with Cal who graciously let me use their "behind the booth" area to suit up, and just like that, my first public outing. Heck of a way to test out everything. My shoulder pouch isnt dyed yet and was just strapped to the pauldron, way outta whack. I rushed the helmet weathering and it's really ham fisted. I didnt have time to work on my TK Boots, so the CaBoots had to make the cut. No fans in the bucket and my sound was feedbacky and hard to hear. BUT...I was in heaven for about 3 hours! Got some great feedback from other con goers, and more importantly some 501st members. Nothing fell off or broke, everything seemed to stay put, and felt pretty comfortable. Biggest issue was my voice box. People couldnt hear me. If I turned it up, feedback was horrible. So for the day it was mostly thumbs up and waving. A few details to take care of and I should be able to submit pics to my GML and get my basic approval!1 point
-
I really need to say that you did an excellent job with the weathering. I know it can be a pain in the b*tt but the results you have showed here are really good. As Urs already mentioned, should be approvable for #2 as well and I couldn't agree more. So, great job and you can be proud of what you have achieved!1 point
-
As long as they fit you, it should be ok then. Good thing for you is there are some great builders in the German Garrison who should be able to put some eyes on your armor to help where needed.1 point
-
Looks fantastic!1 point
-
Great, i like this weatheringstyle1 point
-
You're welcome buddy, glad I could help and you're happy now... and it looks good, nice work!1 point
-
Looking good . I'm a proponent of less is more with respect to the weathering.... If you want to look like the screen Sandy's....I really don't think they had much done to them imo. If you want to be your own dirty trooper, i say go nuts! Make it look like you took a bath in Bantha do do...lol... If you want to emulate an onscreen guy... Less is more for sure. For the tube stripes, I redid mine five times on the right side I used masking tape and superimposed a printout of the helmet stripes onto it, marked the bottom end locations by a dot on the masking tape, then free handed the puppies in... Stripes 6 and 7 are tight remember Sent from my Pixel XL using Tapatalk1 point
-
The straps connecting the chest to back sag and kinda bunch up. That's natural. It's also a reason why TKs have ABS straps on top to cover them up. What you can do to minimize the effect is to double up the elastic. By doing 2 pieces or do a fold and sew it together.1 point